Git 語法
名詞解釋
-
HEAD:
其為一個指標,通常指向一個 branch,而 branch 又指向一個 commit。
在 .git 目錄中有一名為 HEAD 之檔案,就是紀錄 HEAD 的內容,其內容通常為:graph LR A[HEAD] --> B[branch]; B --> C[commit]detached HEAD
會產生此狀態有以下三種情況:
-
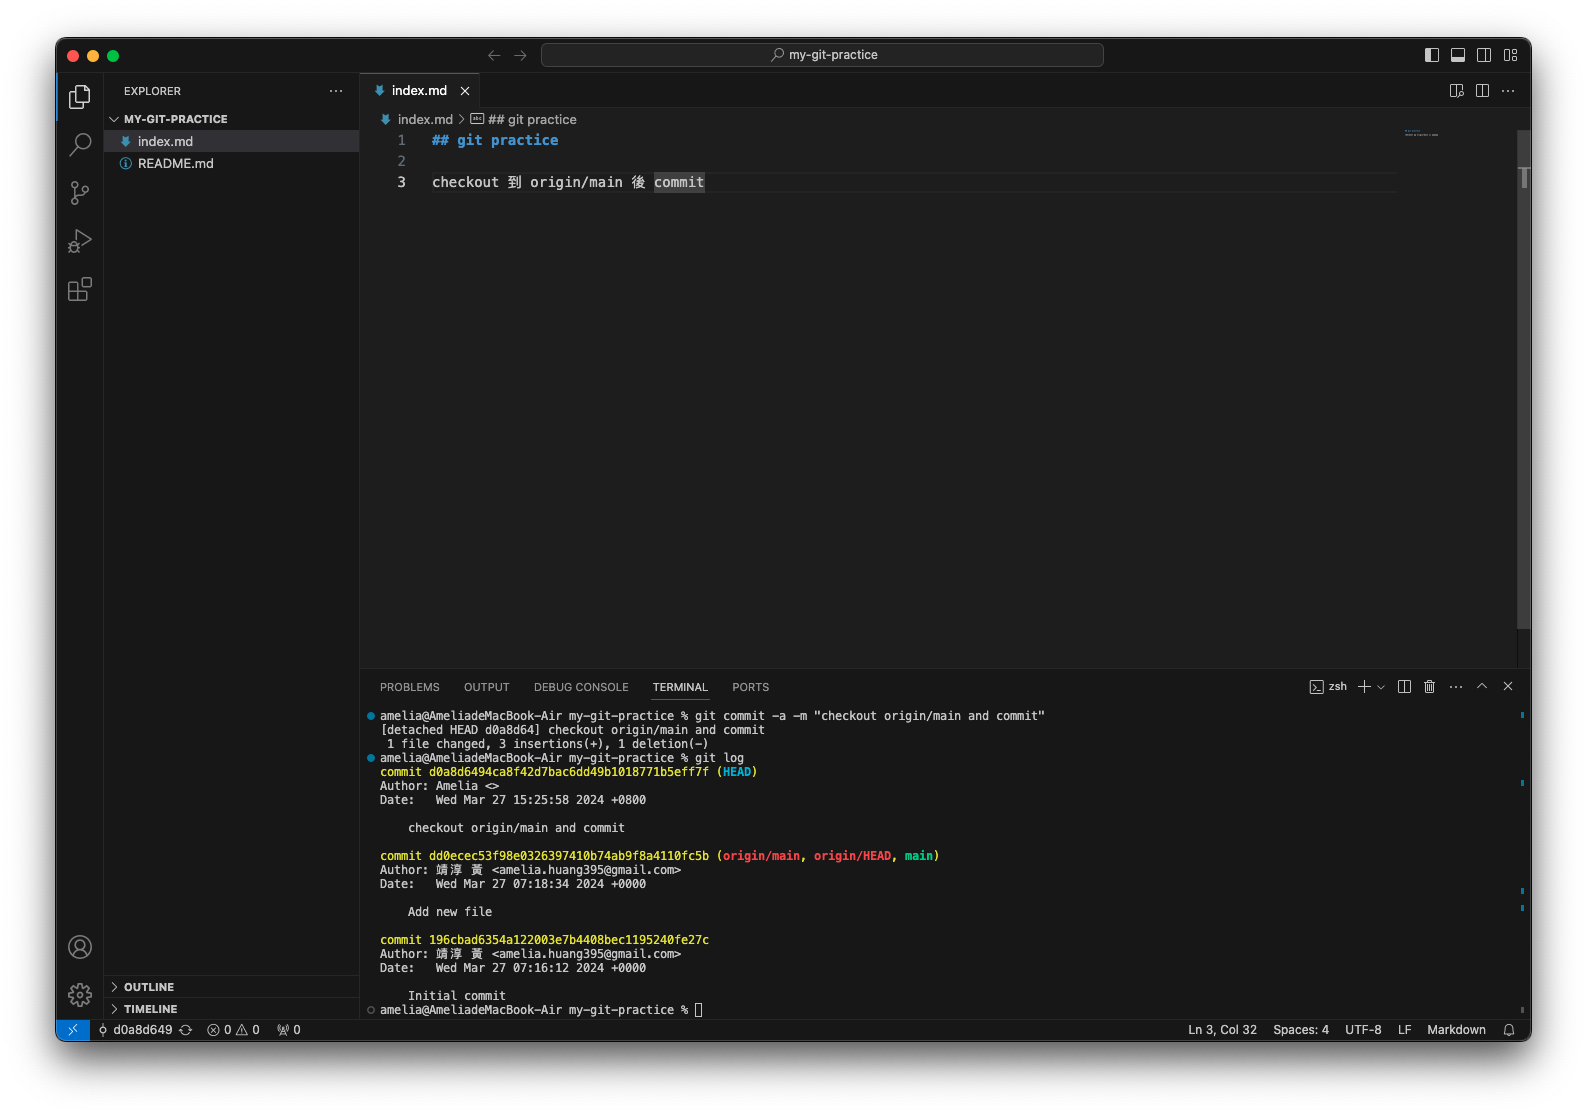
當 HEAD 不為指向 branch,而是指向 commit (git checkout commit) 時:
可針對該 commit 再 commit 一次,但若沒有產生新 branch 指向該 commit 就離開,前往其他 branch 或 commit,後續就不容易找到他,若一直沒有人去找他,一段時間後會被 Git 啟動的資源回收機制收掉。因此建議在 commit 後使用 git checkout -b "branch 名稱",除了創建新 branch 外,也將 HEAD 切換至該 branch,以離開 detached HEAD 狀態,graph LR A[HEAD] --> B[commit] -
Rebase 的過程也是處於不斷的 detached HEAD 狀態。
-
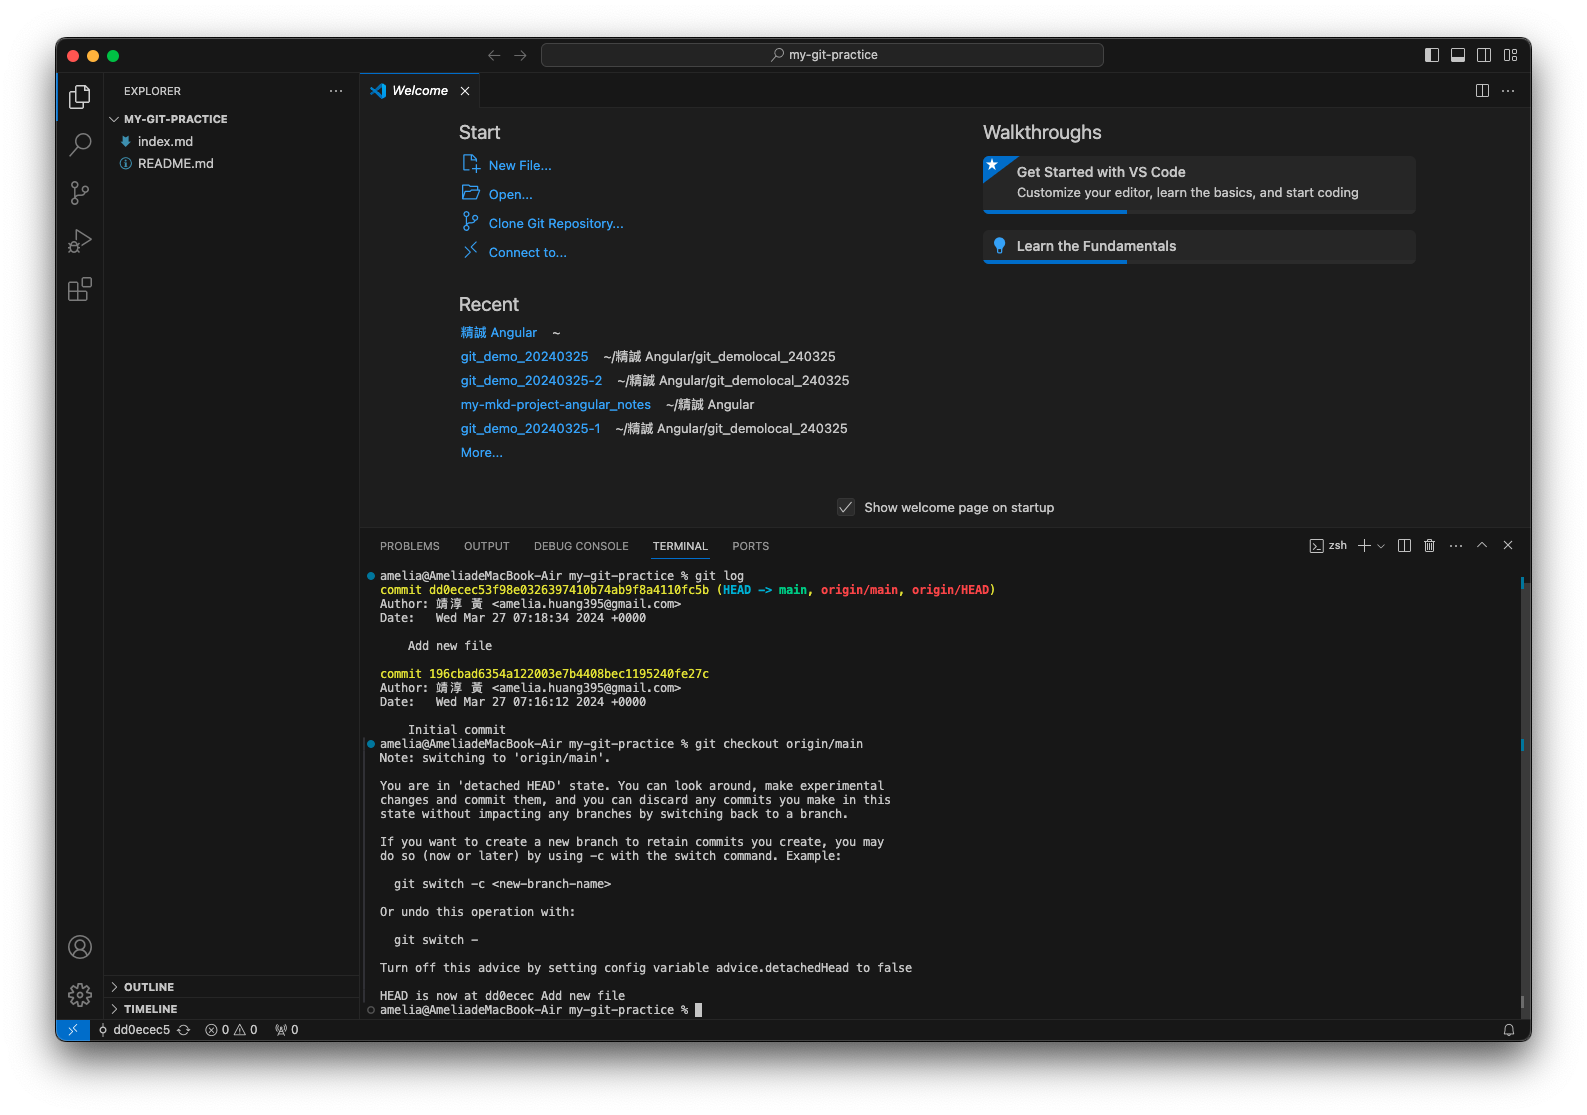
切換到某個 remote branch 時:
$ git branch --remote #使用 --remote 或 -r 參數可以顯示遠端的分支
  my-mkd-project-angular_notes/main
  my-mkd-project-angular_notes/master

$ git checkout my-mkd-project-angular_notes/main
Note: switching to 'my-mkd-project-angular_notes/main'.

You are in 'detached HEAD' state. You can look around, make experimental
changes and commit them, and you can discard any commits you make in this
state without impacting any branches by switching back to a branch.

If you want to create a new branch to retain commits you create, you may
do so (now or later) by using -c with the switch command. Example:

git switch -c <new-branch-name>

Or undo this operation with:

git switch -

Turn off this advice by setting config variable advice.detachedHead to false

HEAD is now at 25120f0 Add gird and arrange home's css
要避免切換至遠端 branch 時出現 detached HEAD 狀態,可在 checkout 後加上 --track 或 -t,此做法會在本機建立一個名為 tracking branch 的東西。
-
指令
-
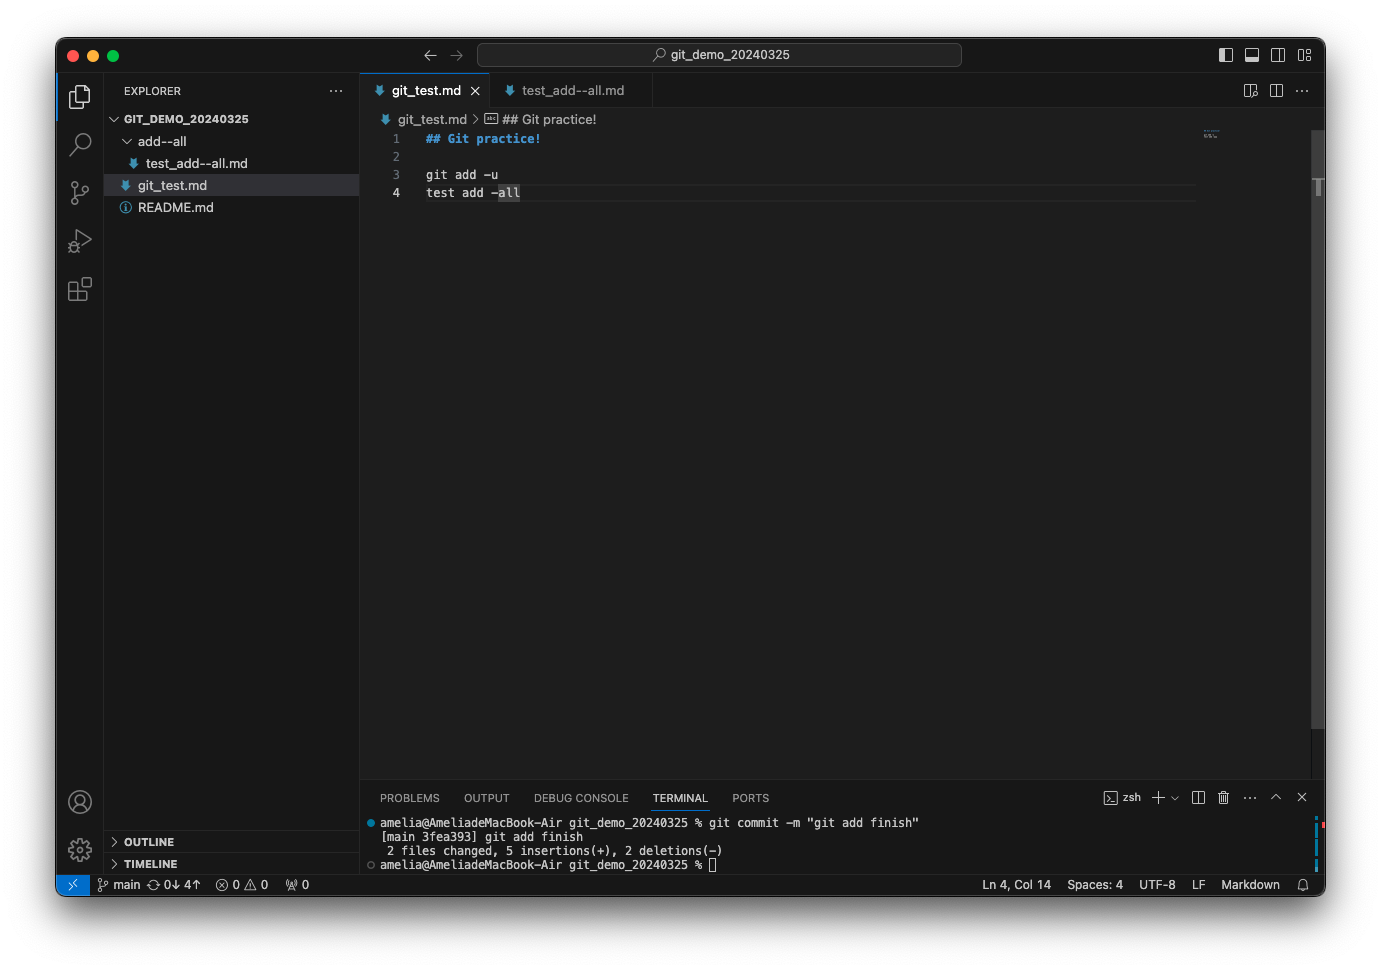
git add "檔案名稱" :
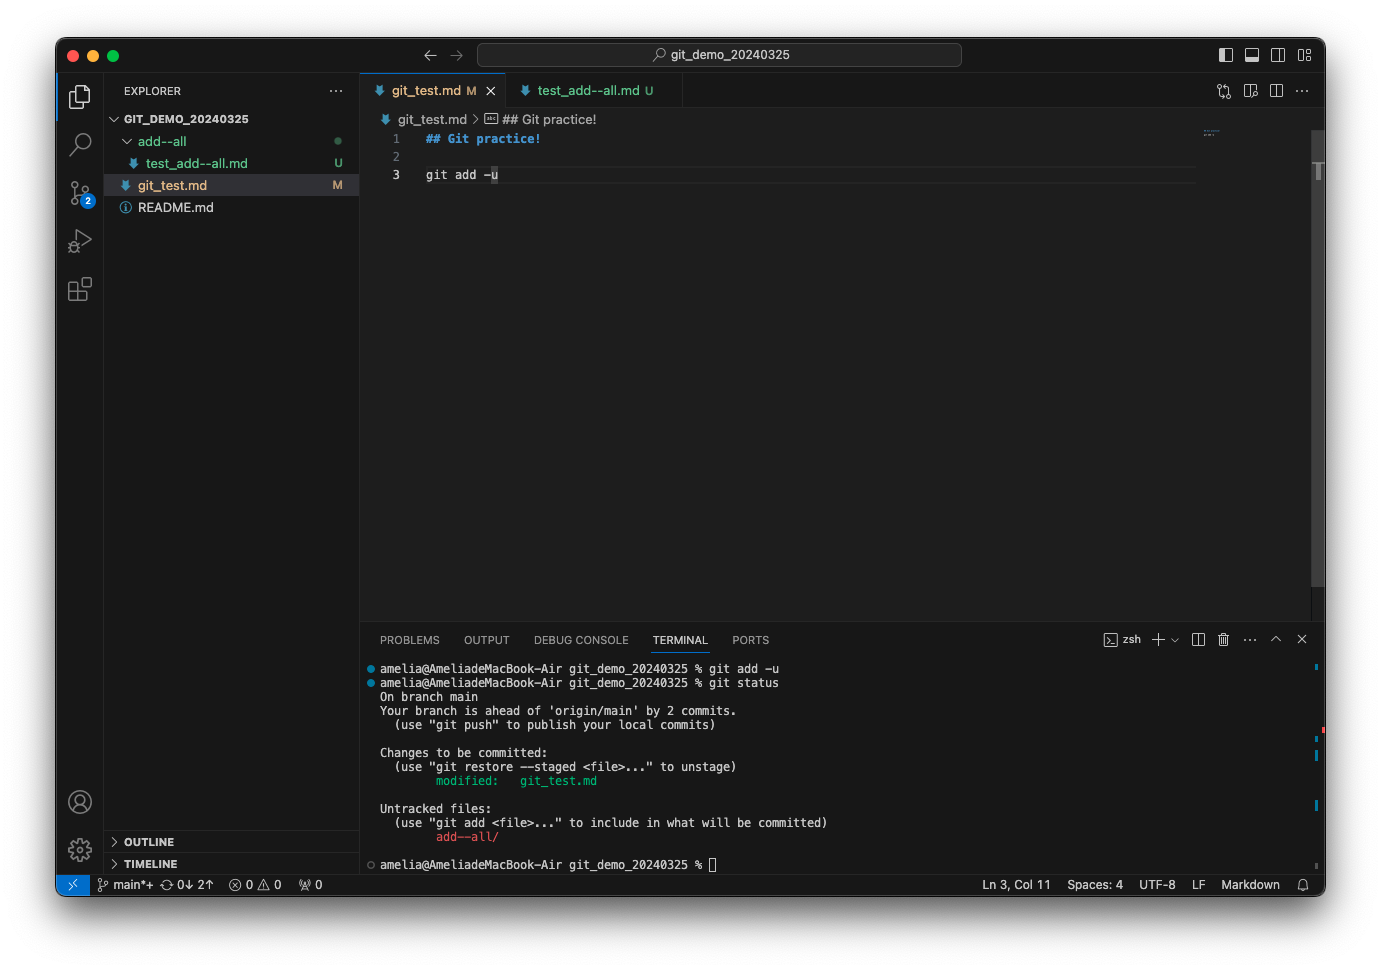
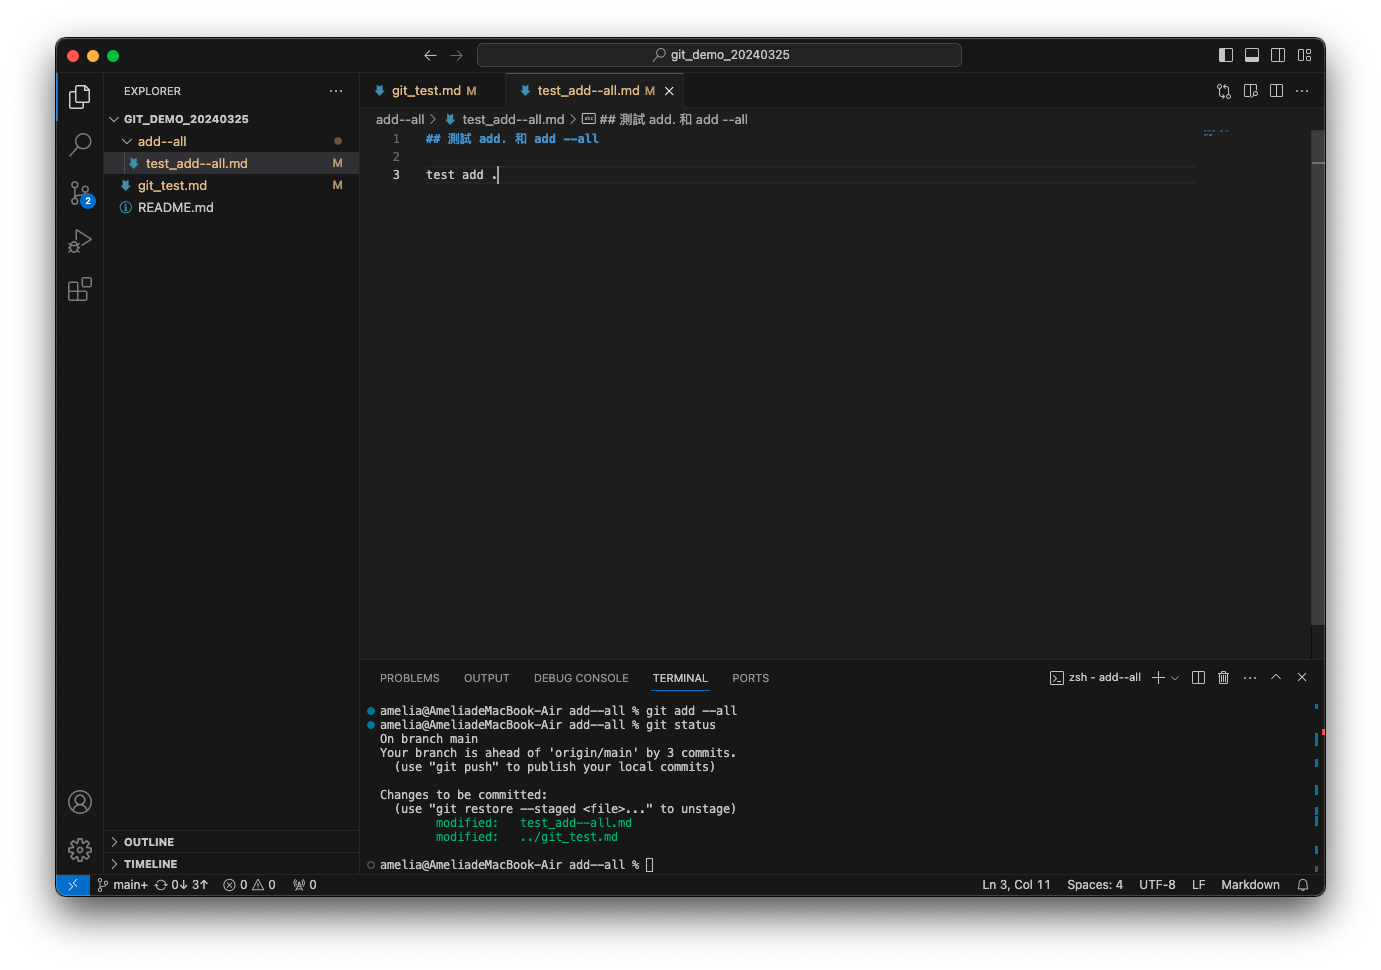
將檔案加入追蹤,放在暫存區,告訴 git 有哪些檔案有新贈和修改。多個檔案用空白隔開名稱。- -u:將有被 commit 過的檔案加入追蹤(新檔案不加入)
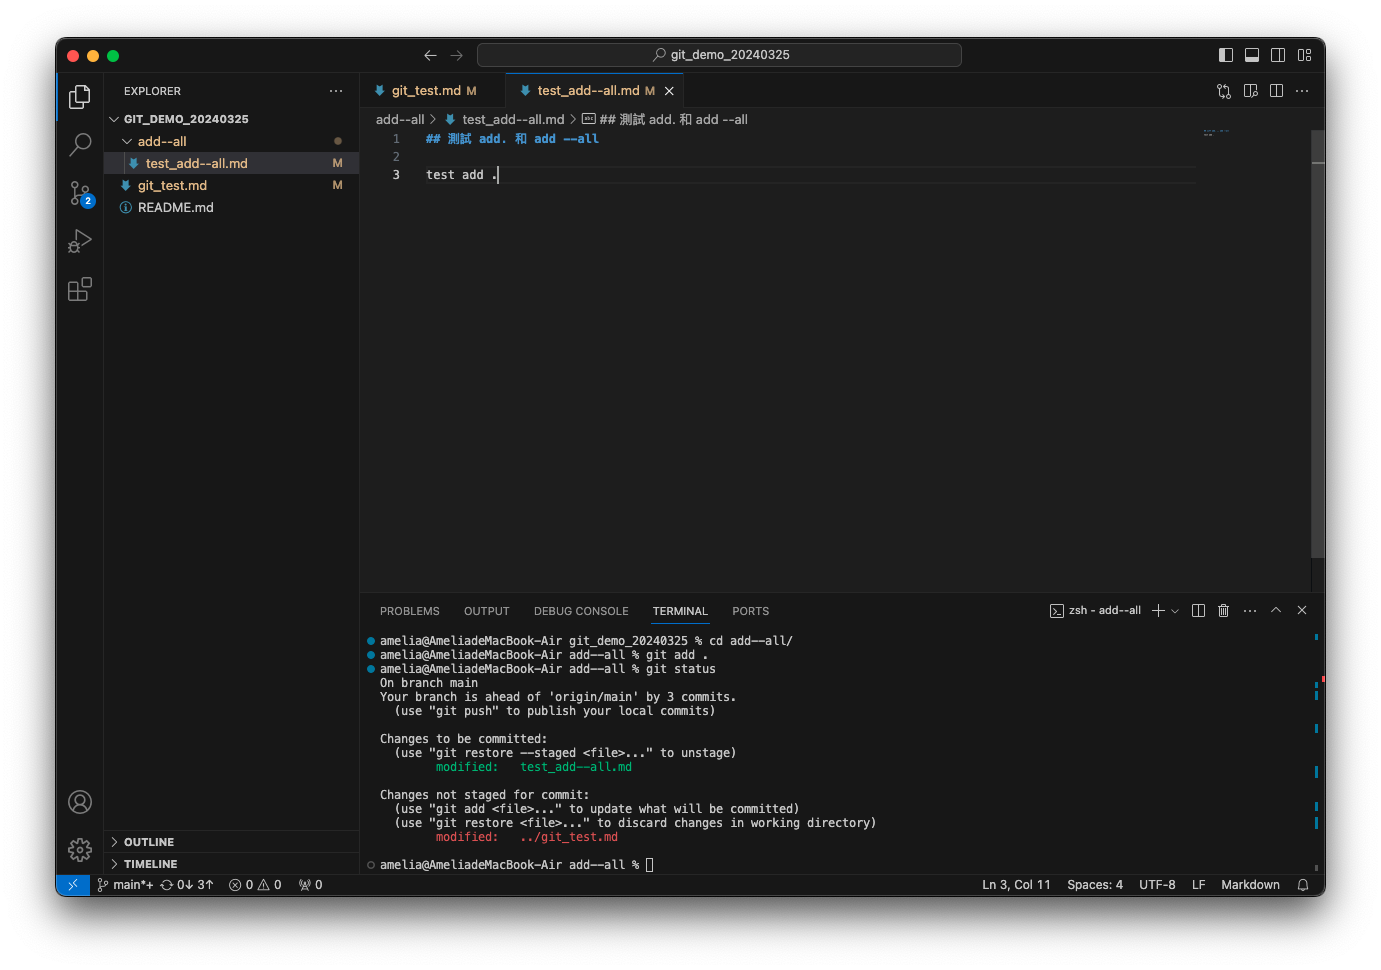
- .:將目前所在的目錄,以及它以下的子目錄、子子目錄 ...等裡的變動都加到暫存區,但若是在這個目錄外的東西,就不會被影響。
- --all:不管在哪一層目錄,只要是這個專案裡的東西,所有的變動都會加至暫存區。
-
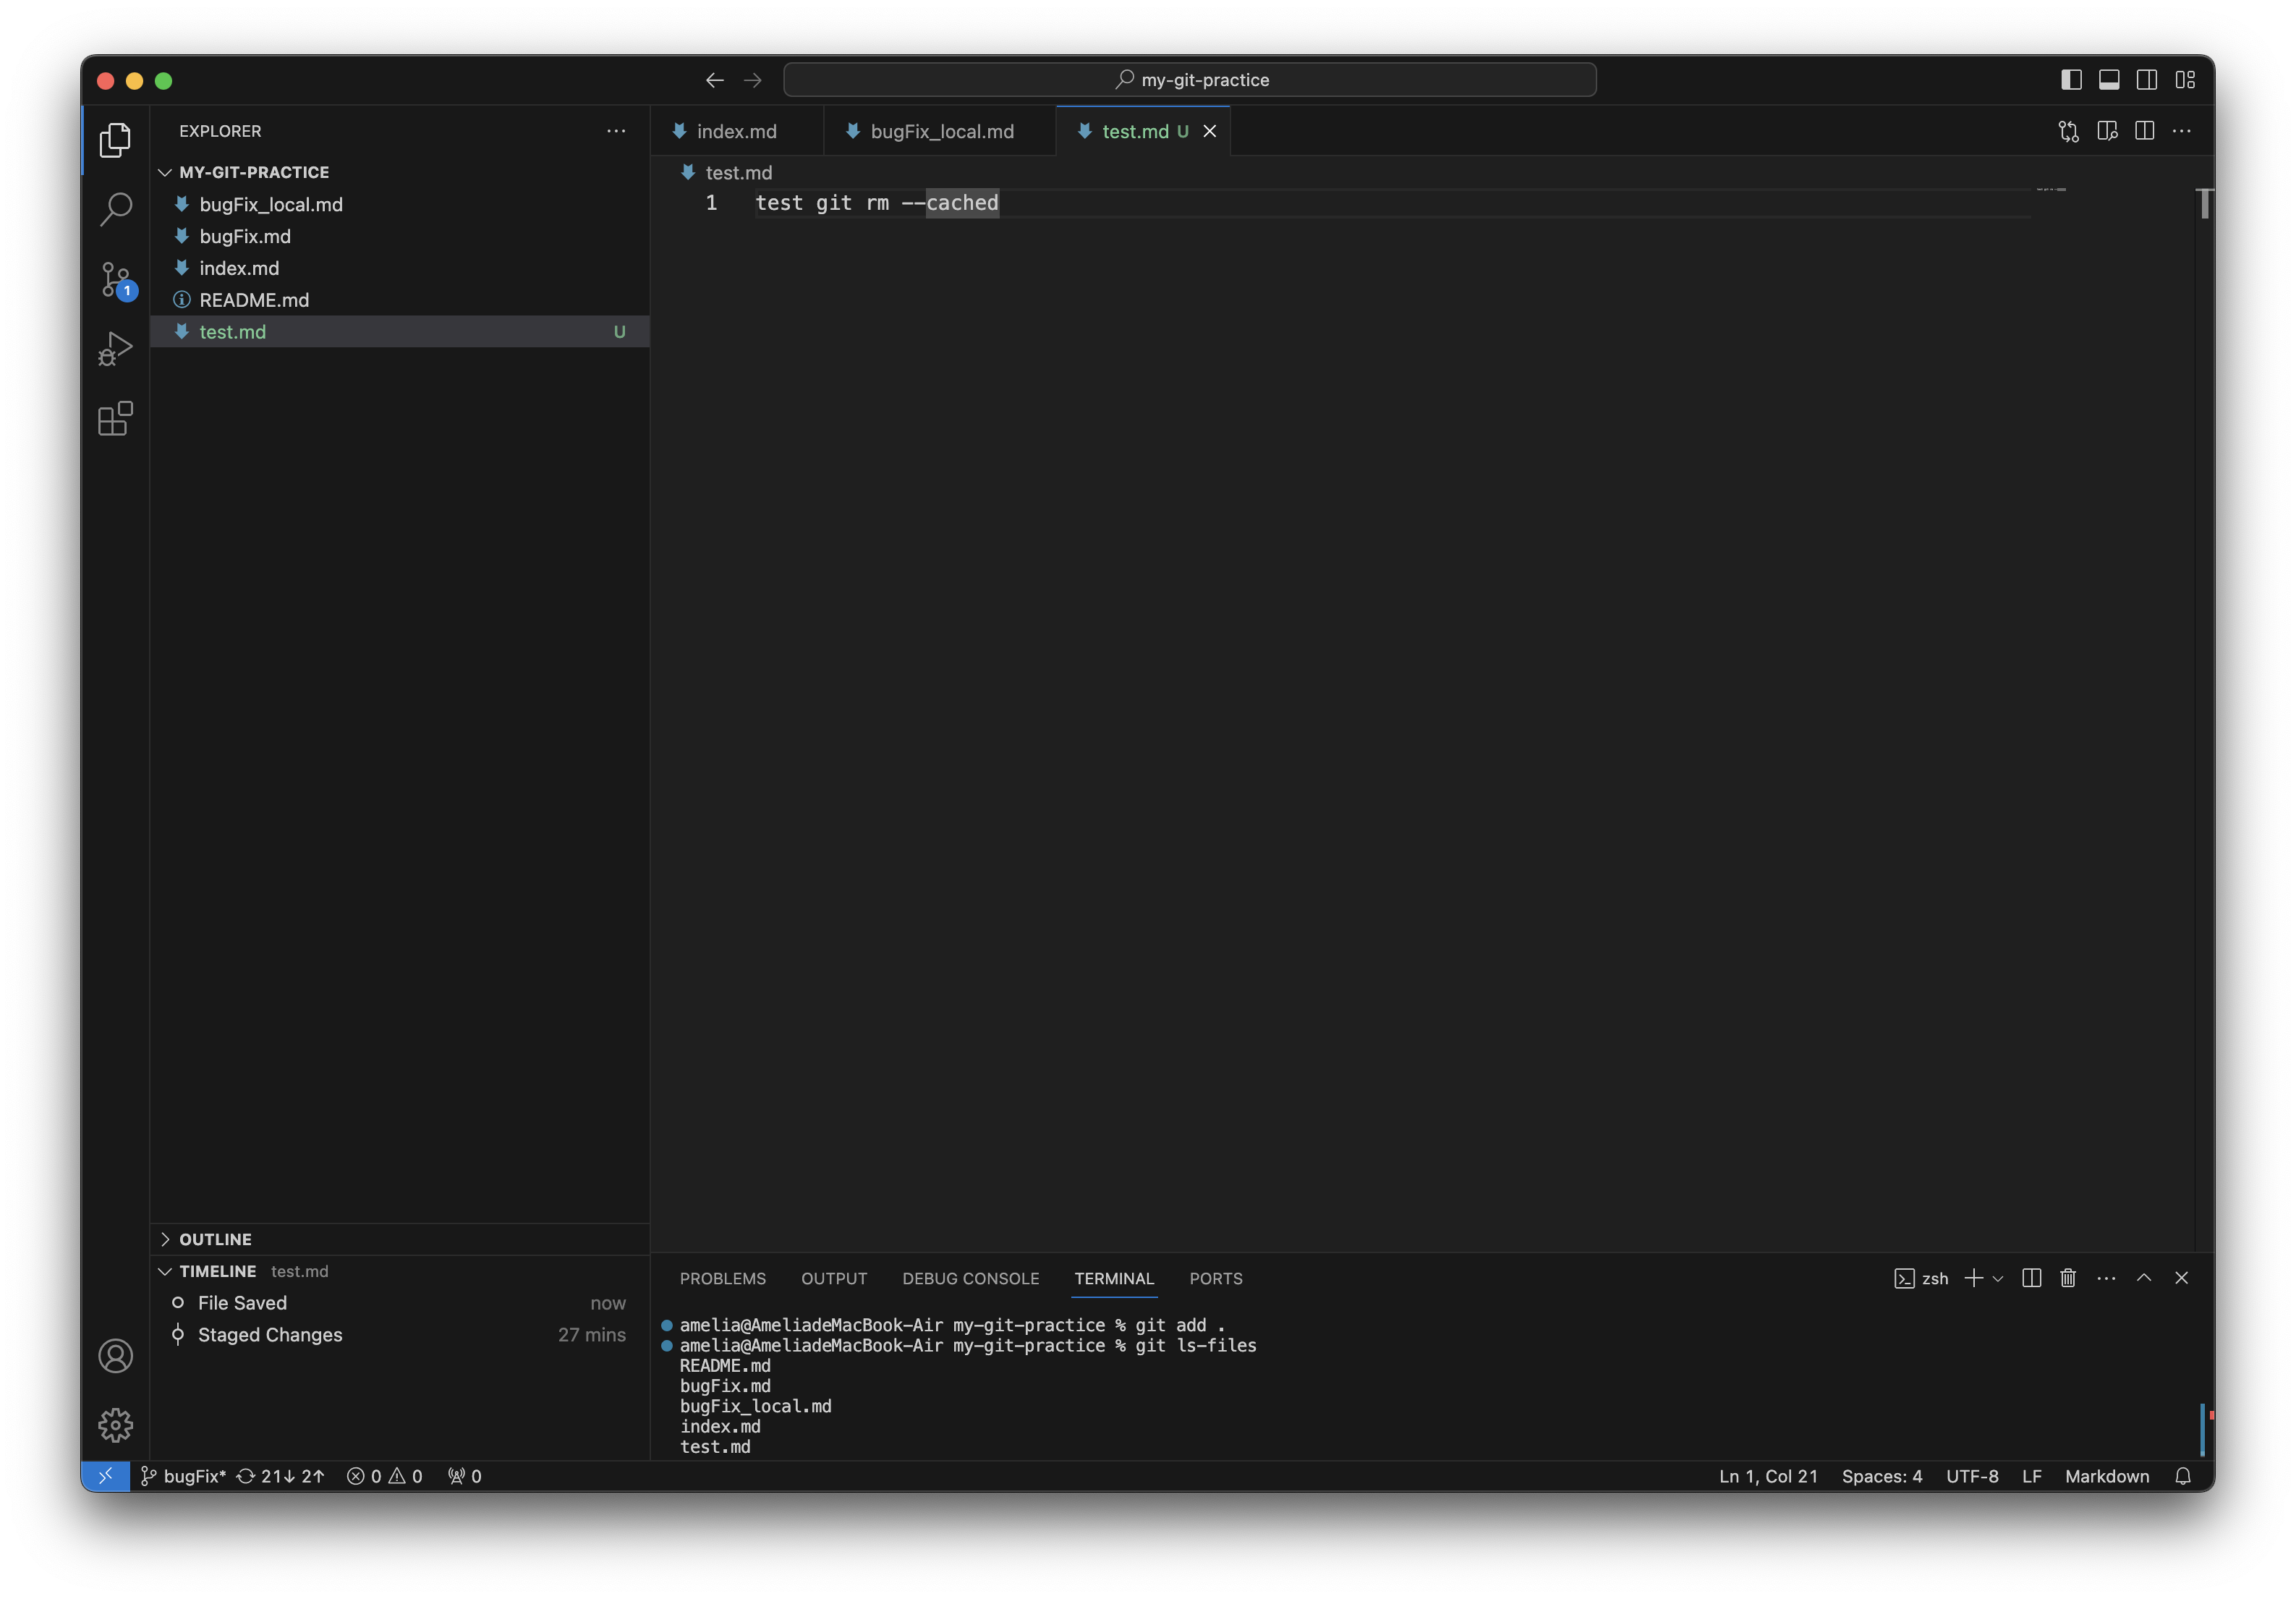
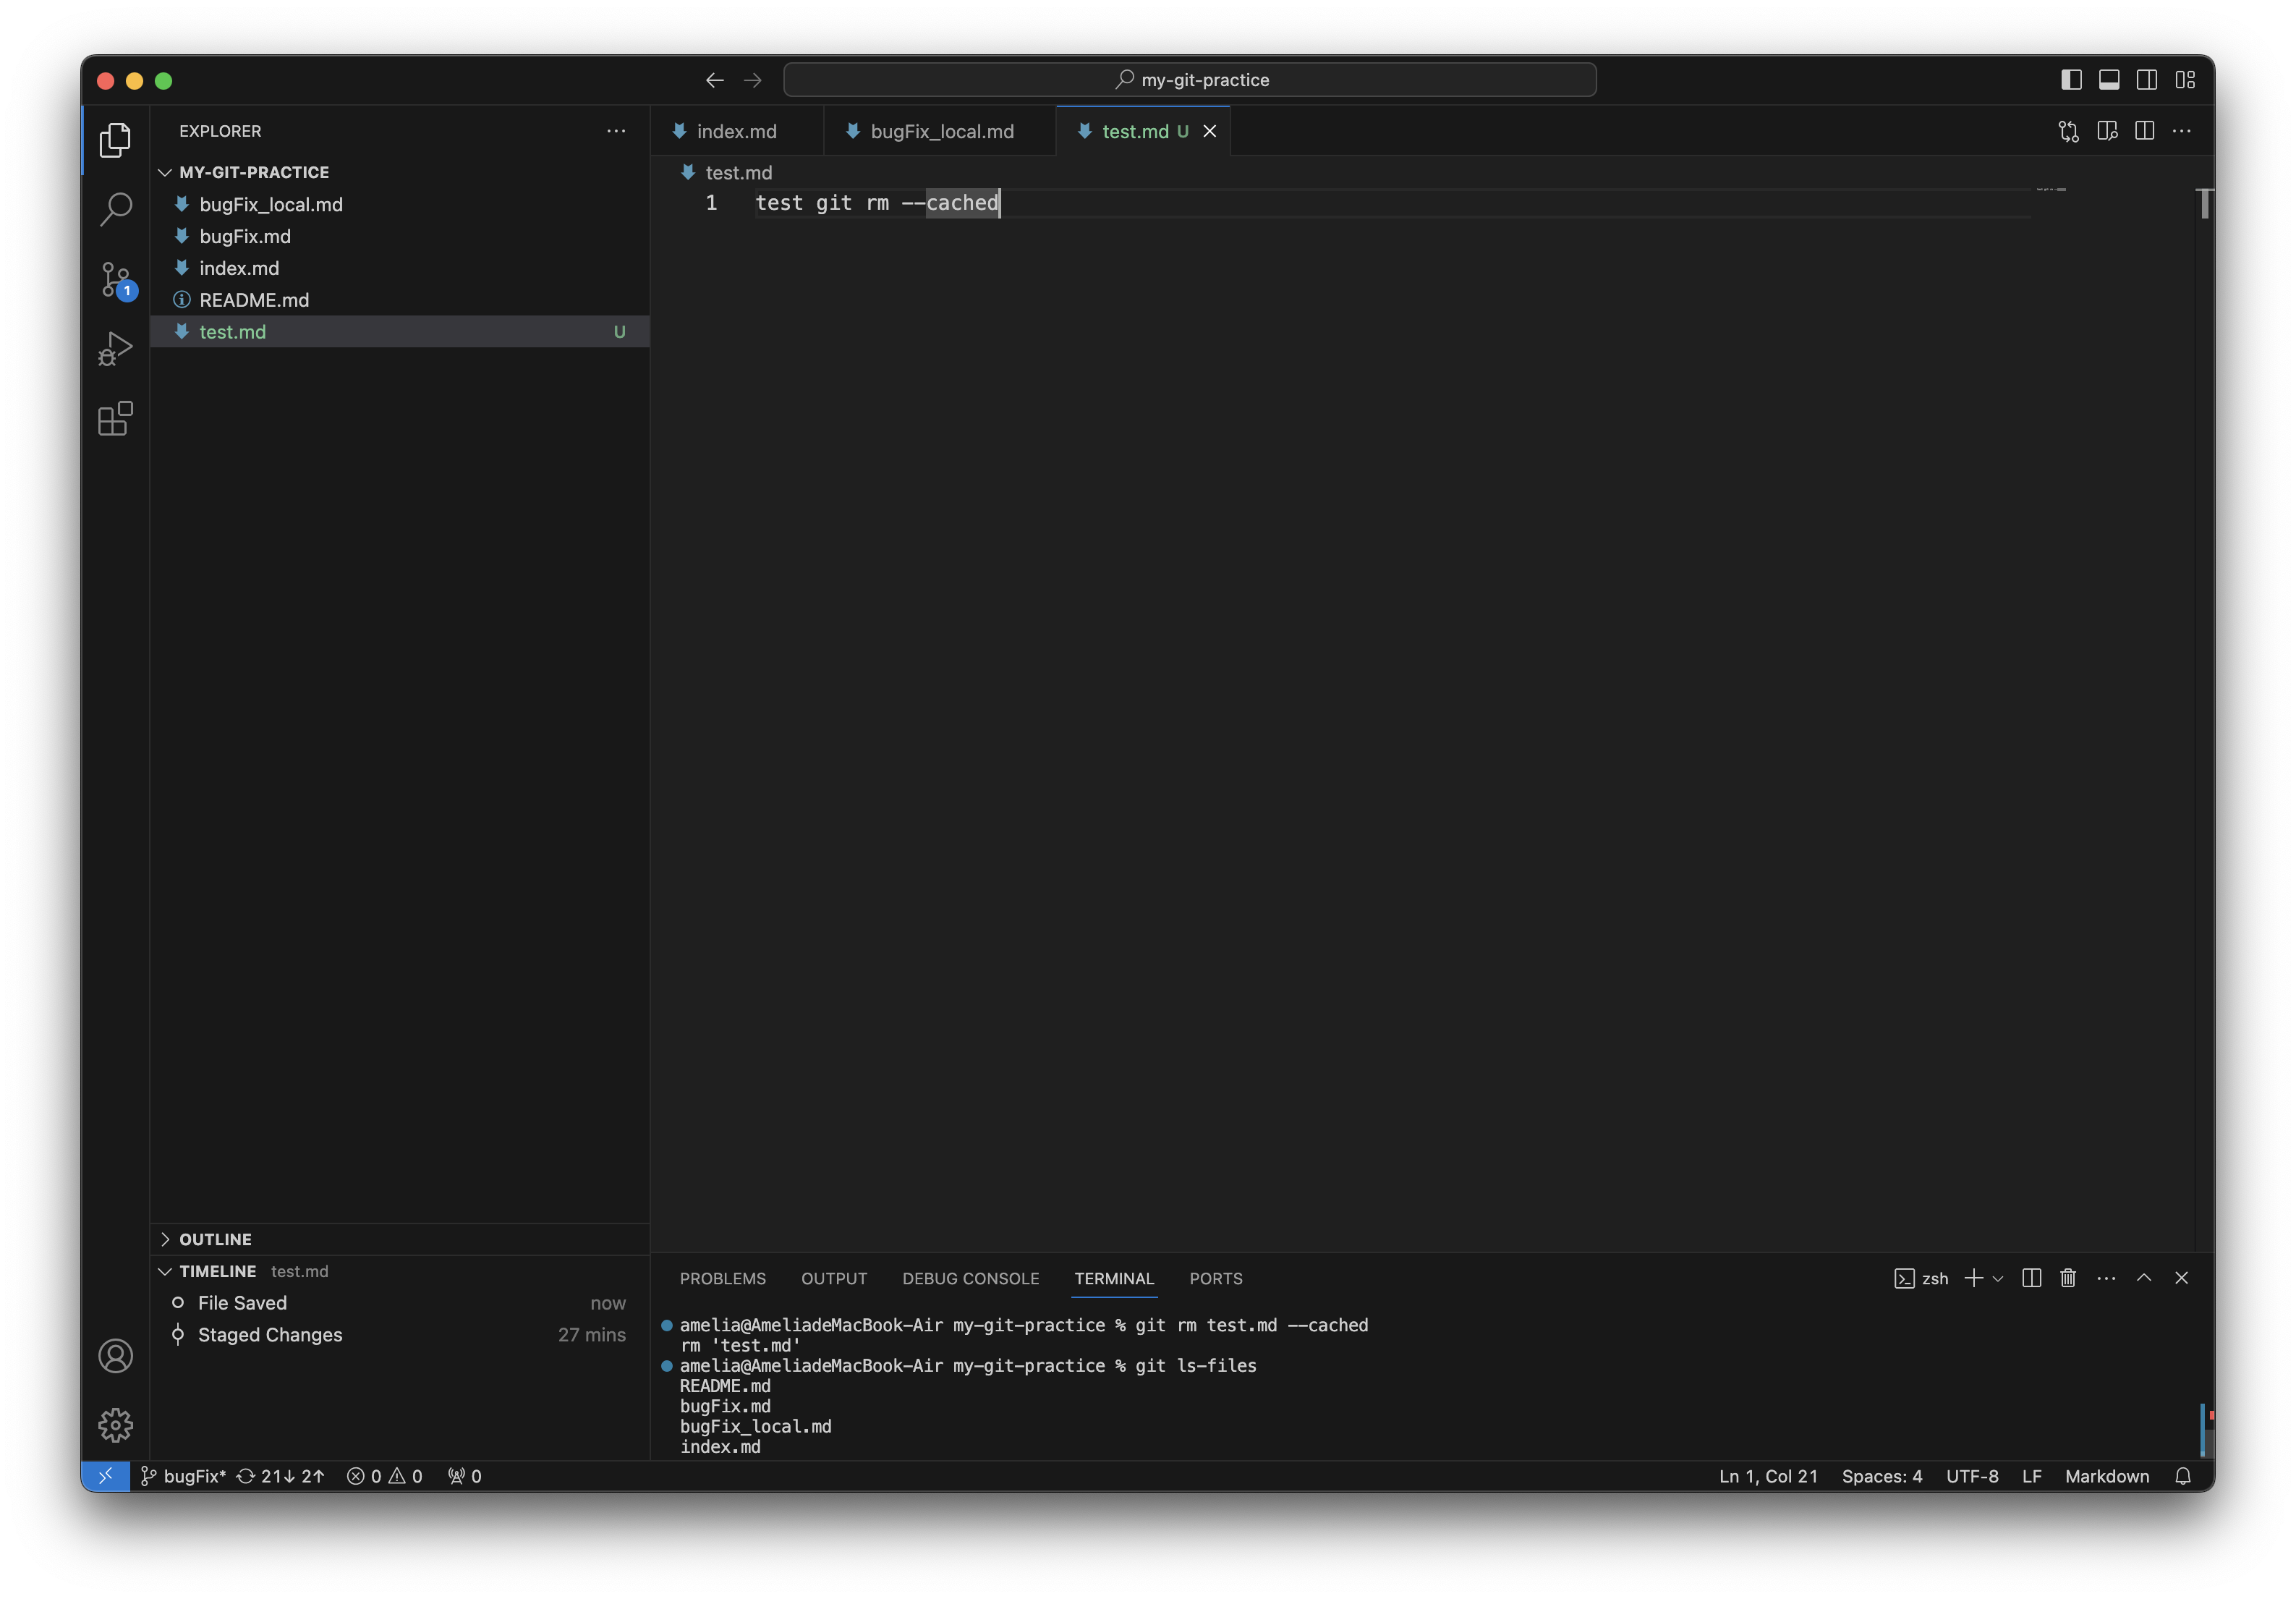
git rm "檔案名稱":
告訴 git 要刪除的檔案名稱,執行後不需 add,可直接執行 commit。- "檔案名稱" --cached:讓檔案不再被 git 控管,但依舊存在於資料夾中。
-
git ls-files:
顯示所有已被 git 追蹤的檔案。- -o:顯示所有未被 git 追蹤的檔案。
-
git status :
查詢有哪些檔案有變動,可參考 git add 範例。 -
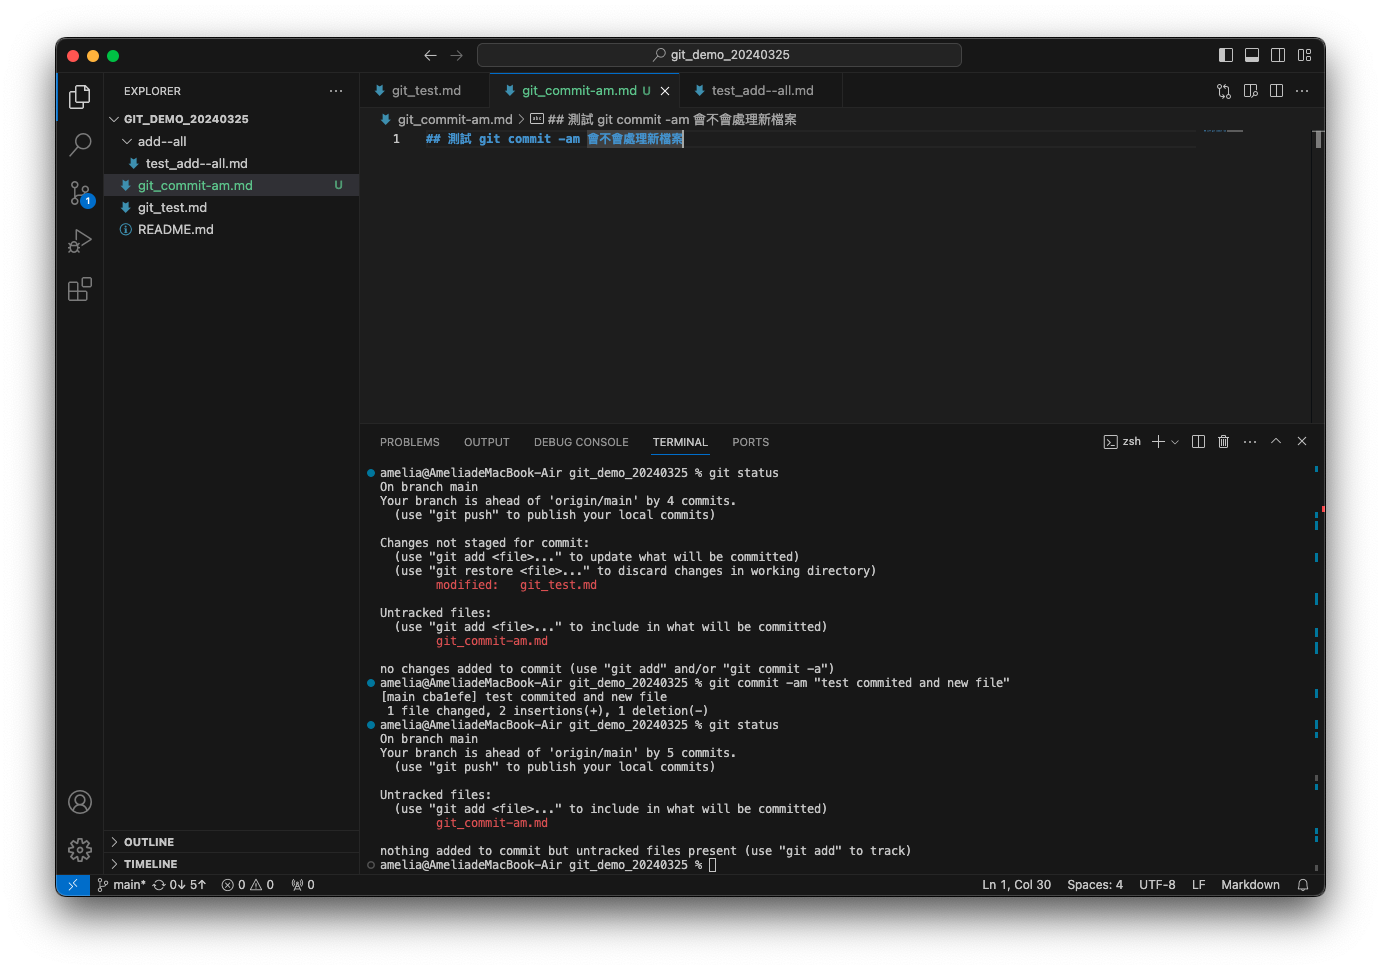
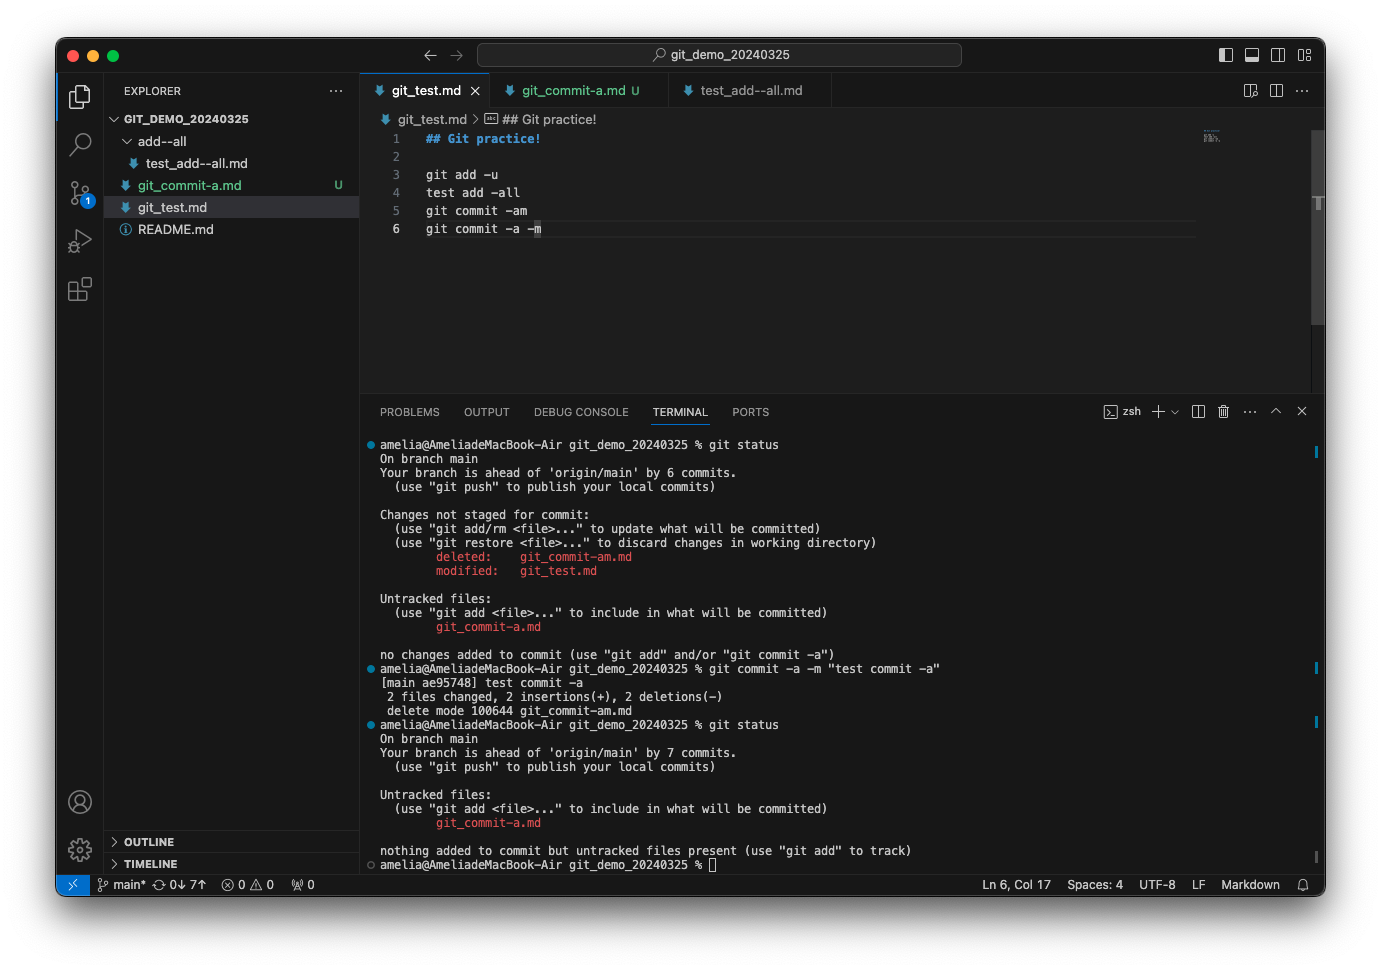
git commit: 將暫存區檔案提交至儲存庫(Repository),表示檔案能夠完整永久保存。
一定要加上以下其一,以說明此次修改之內容:- -m "說明變更內容":提交本次有追蹤的檔案。
- -am "說明變更內容":提交有 commit 過的檔案,不需再 add。
- -a -m "說明變更內容":執行 git add 以及 git commit,但無法作用於新增之檔案。
- --amend:可變更最後一次 commit 的內容。
- -m:可變更最後一次 commit 的訊息。
- --no-edit:不編輯 commit 訊息。
Example
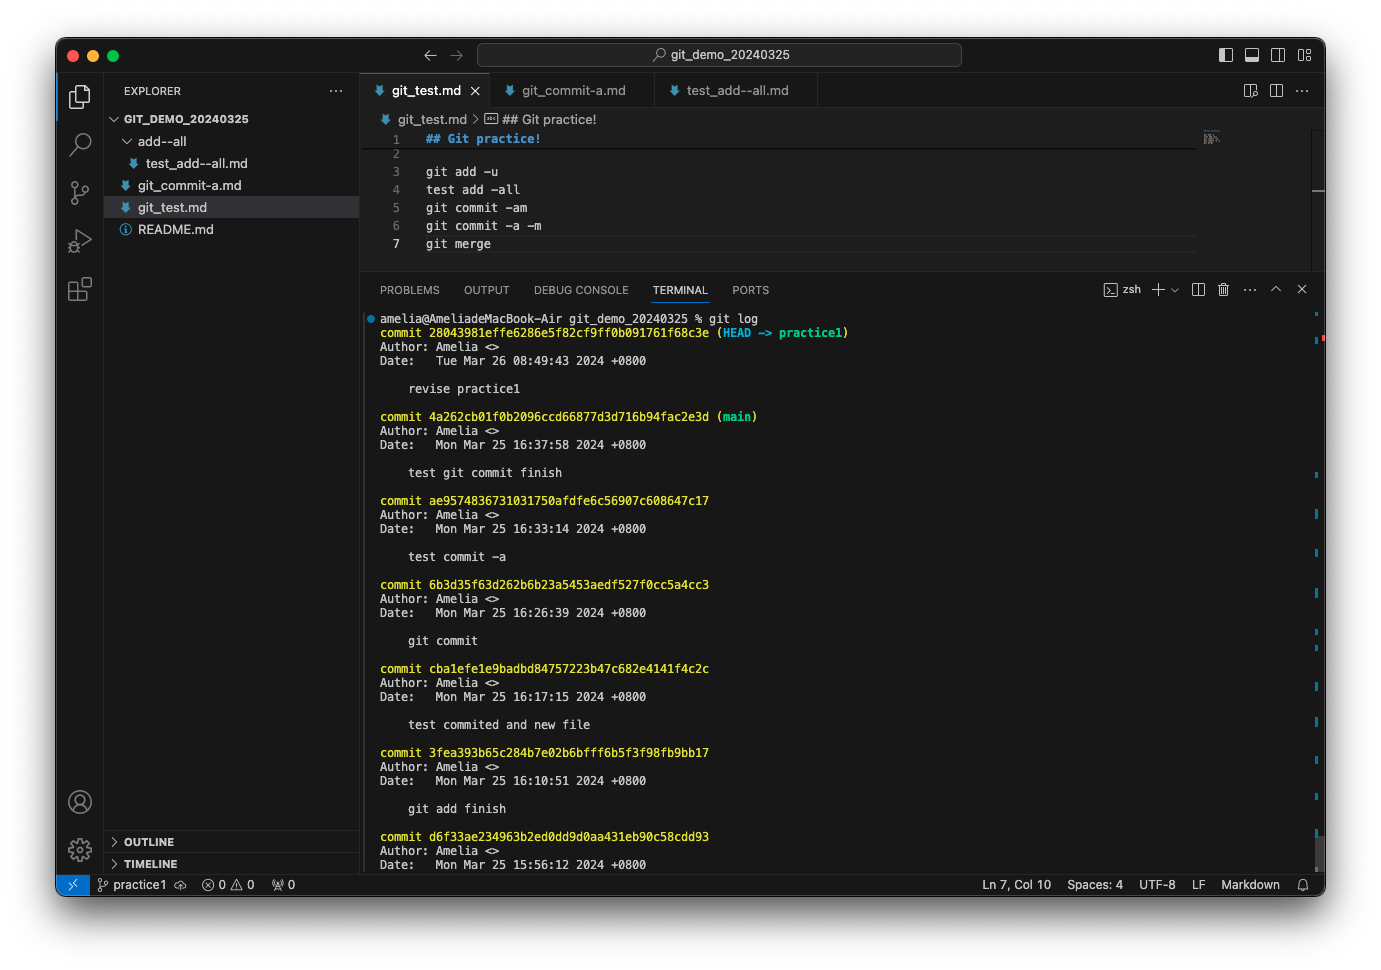
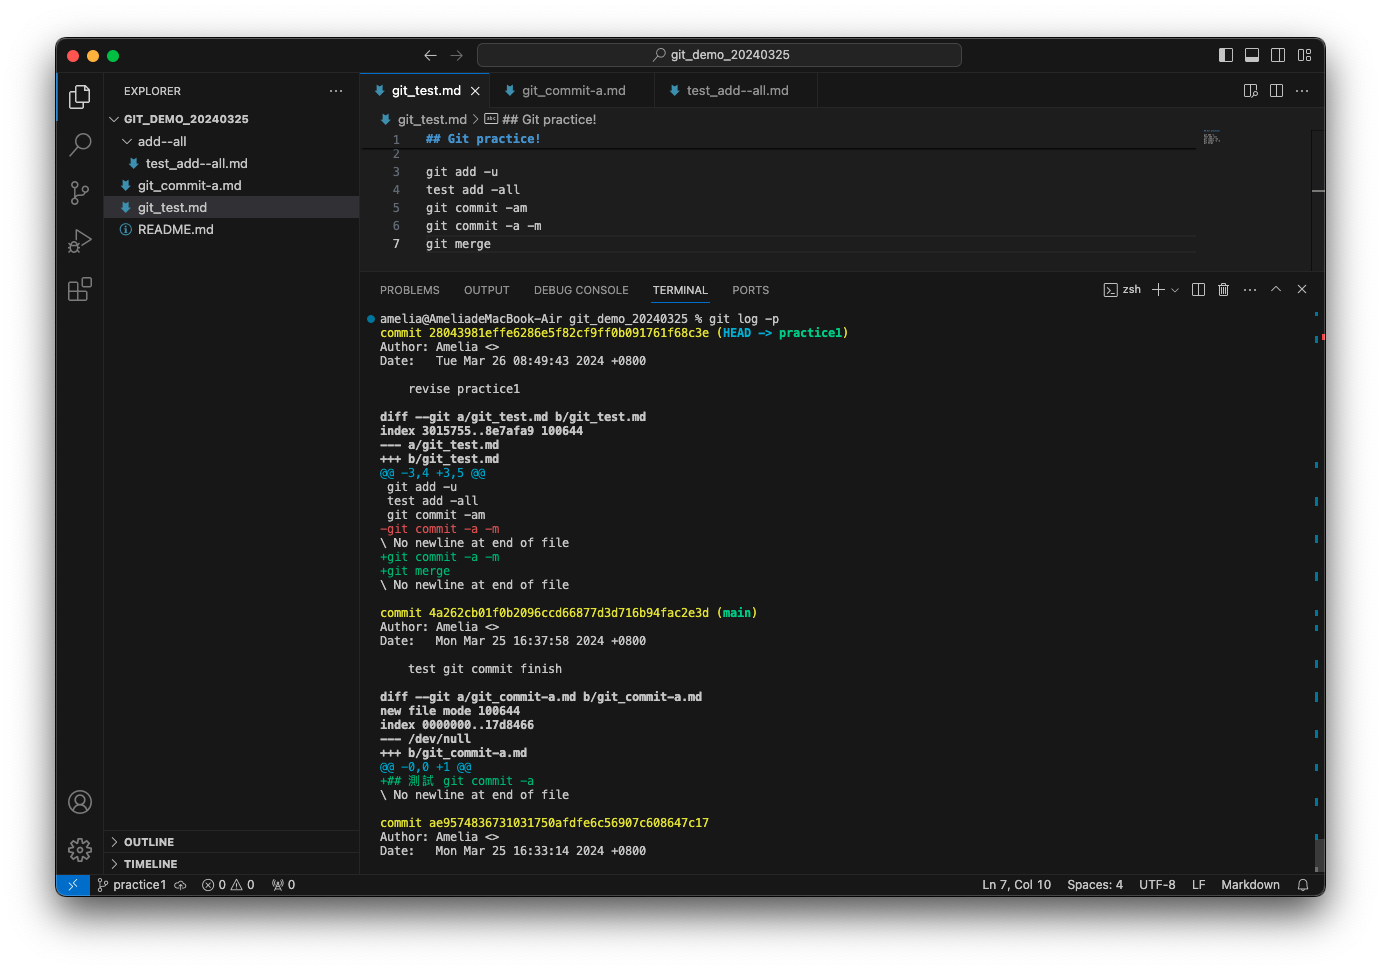
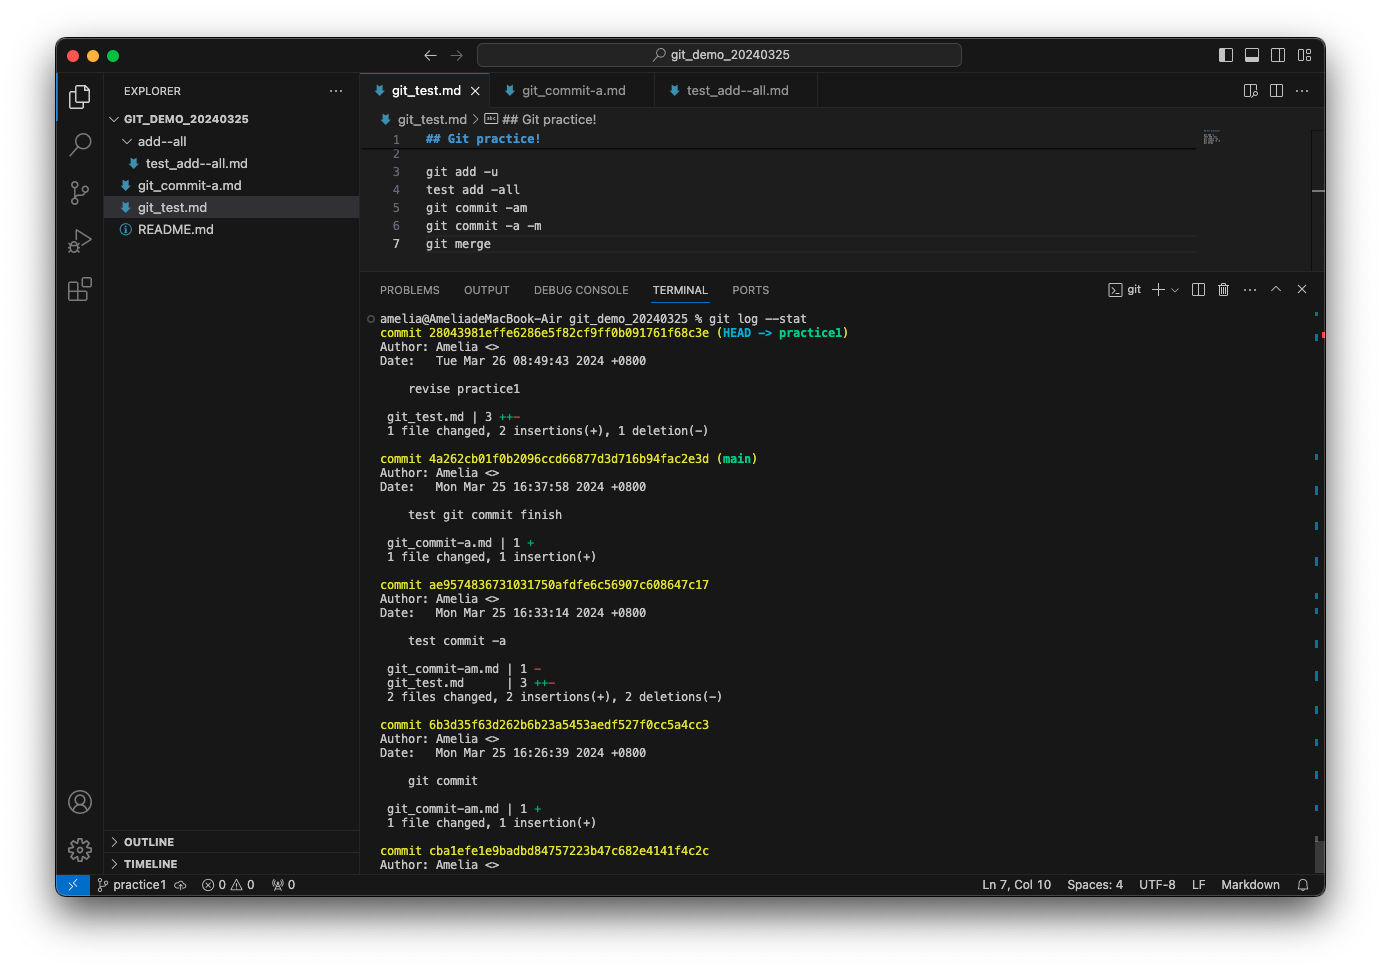
接續 git add --all 後
可觀察到在 git commit -am 前後兩次之 git status 不同,新檔案 git_commit-am.md 並沒有被 commit
可觀察到在 git commit -a -m 前後兩次之 git status 不同,修改及刪除之檔案皆有被 commit,新檔案 git_commit-a.md 則沒有
目前 commit 的狀況如下圖
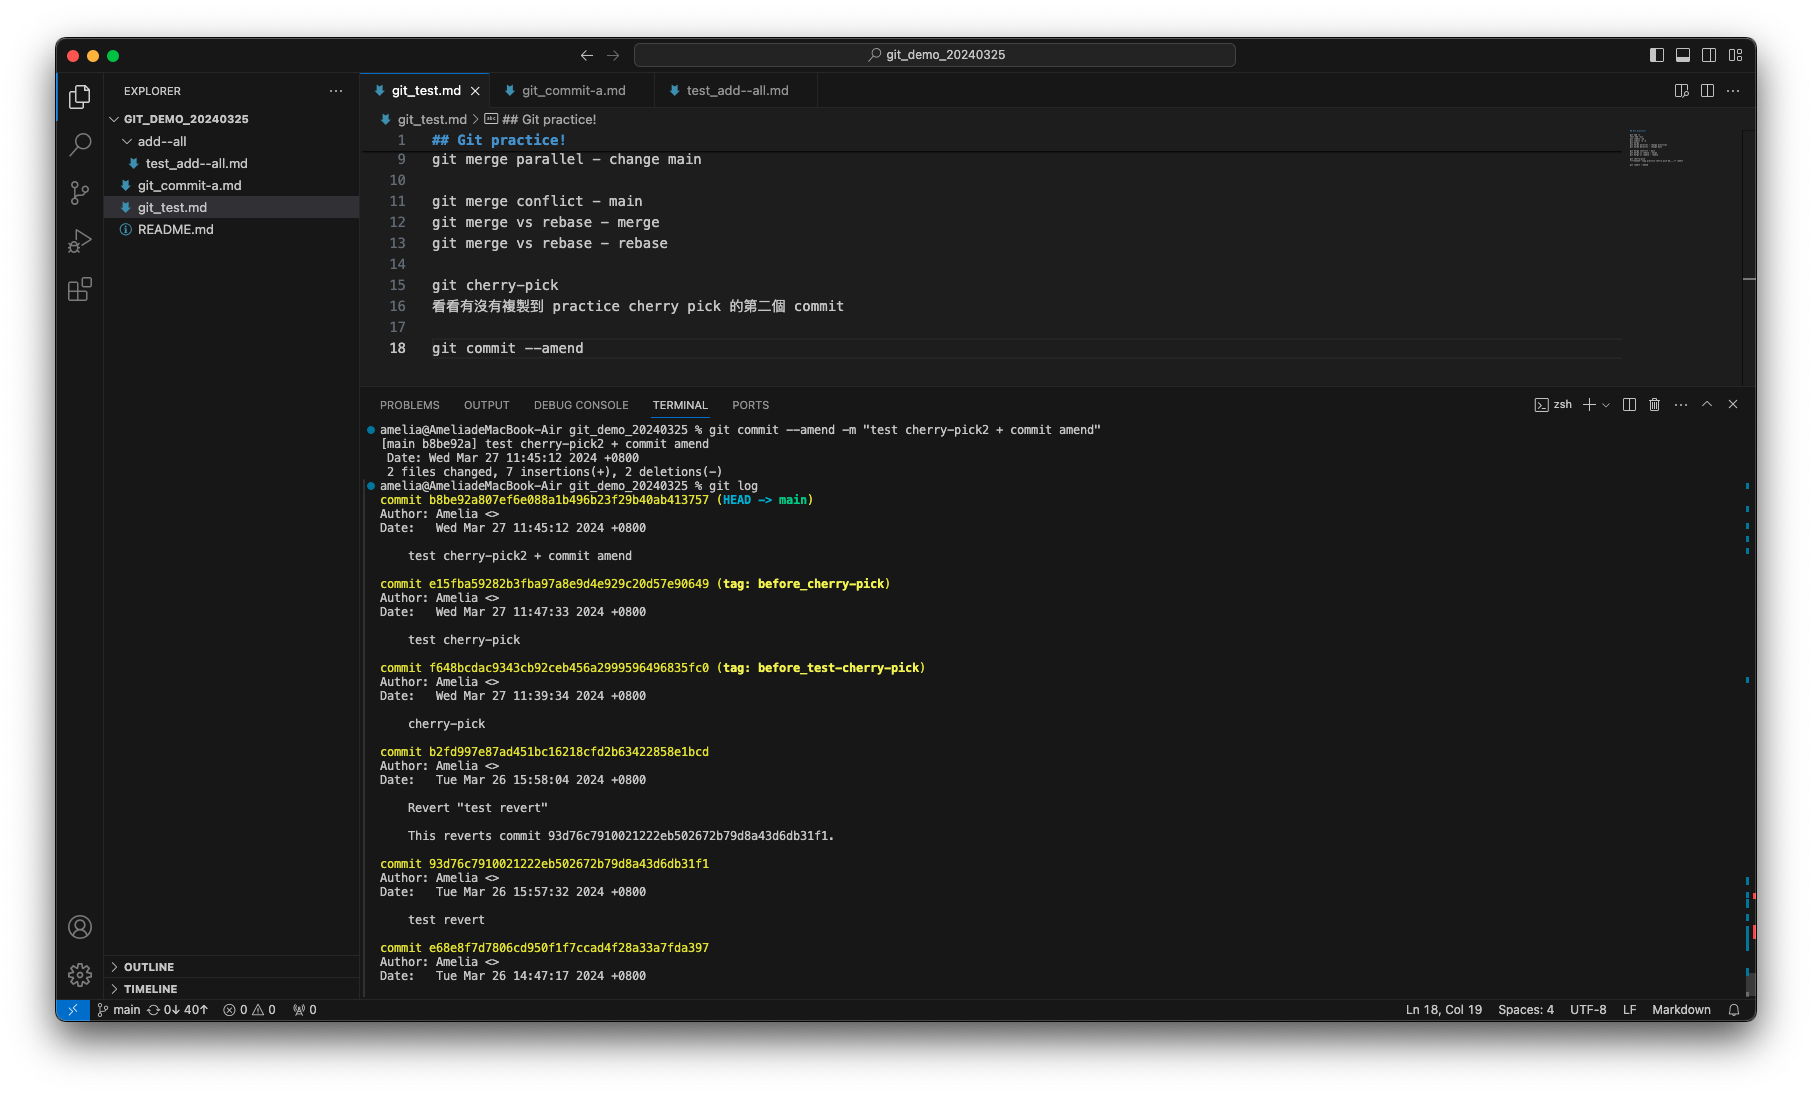
在 git_test.md 檔案中加入 "git commit --amend" 字串,並執行以下命令:
可以發現原本接在 e15fba5 後的 f3fb1da 不見了,變成 8d2796f 新的 commit。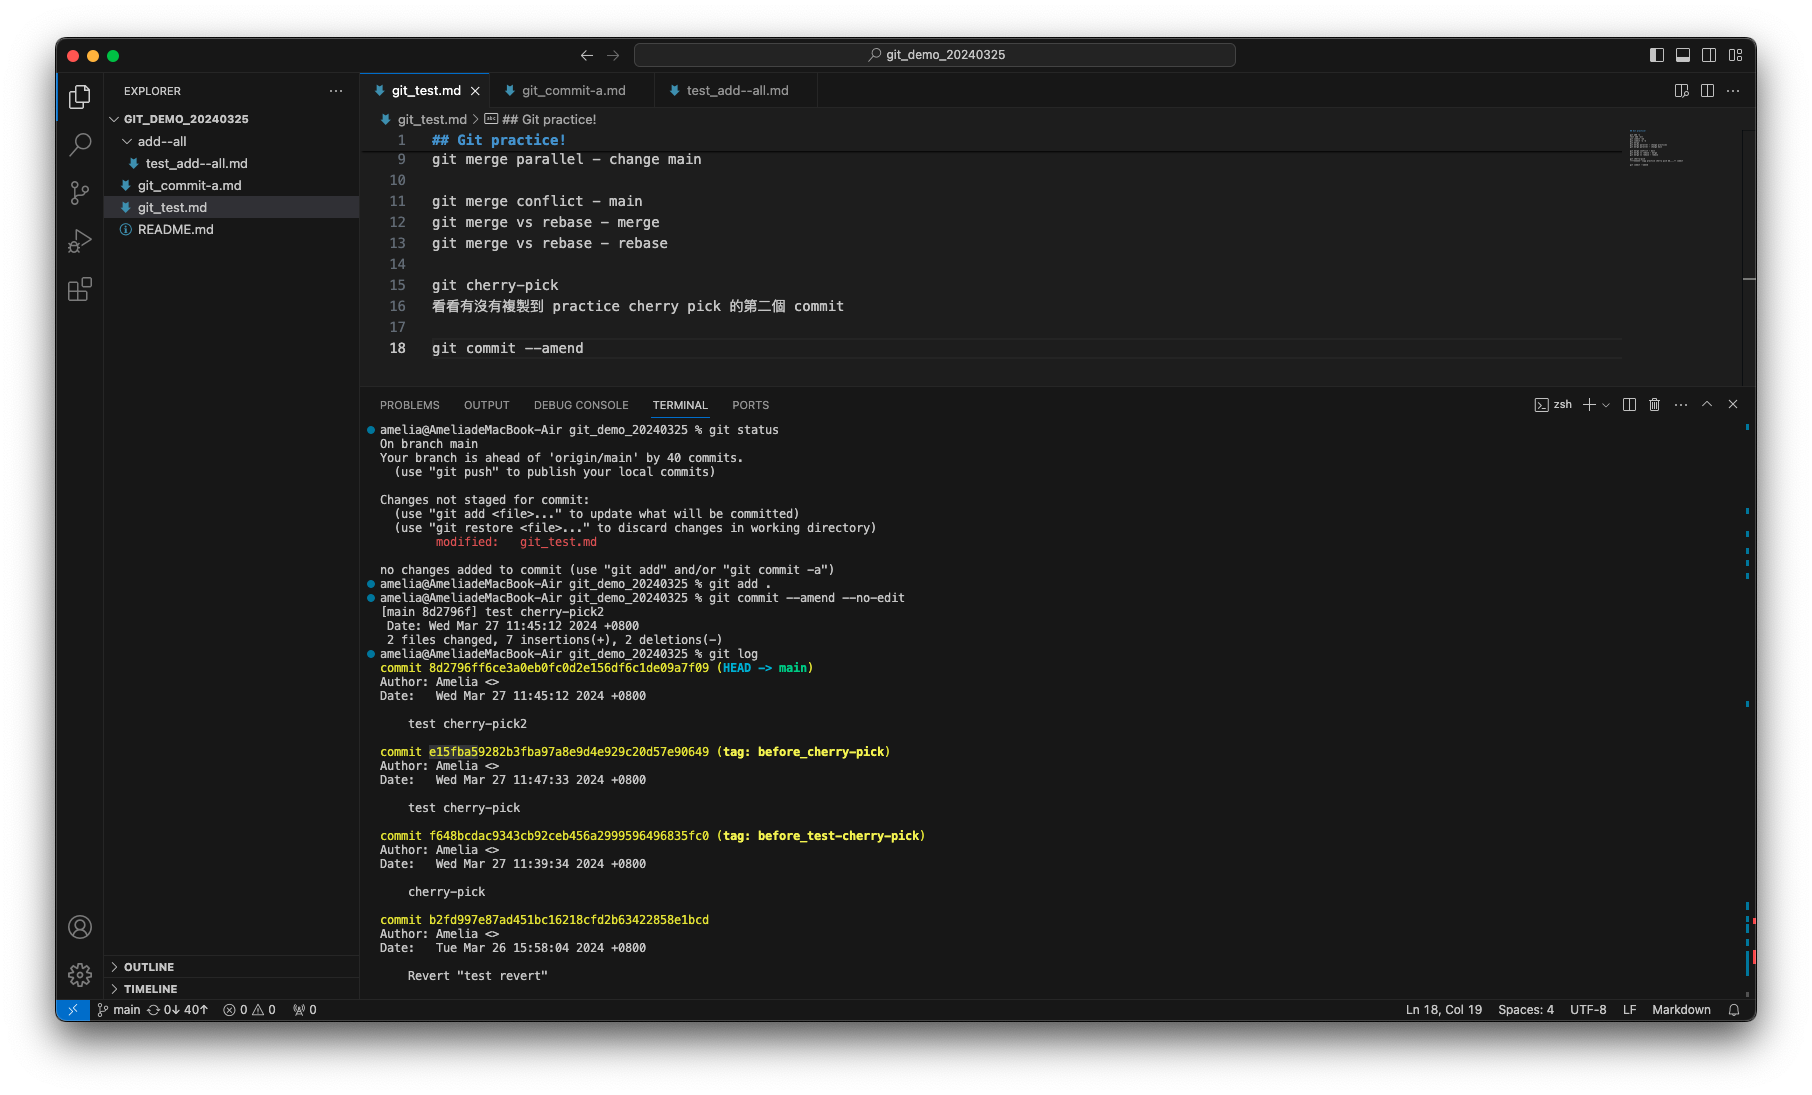
-
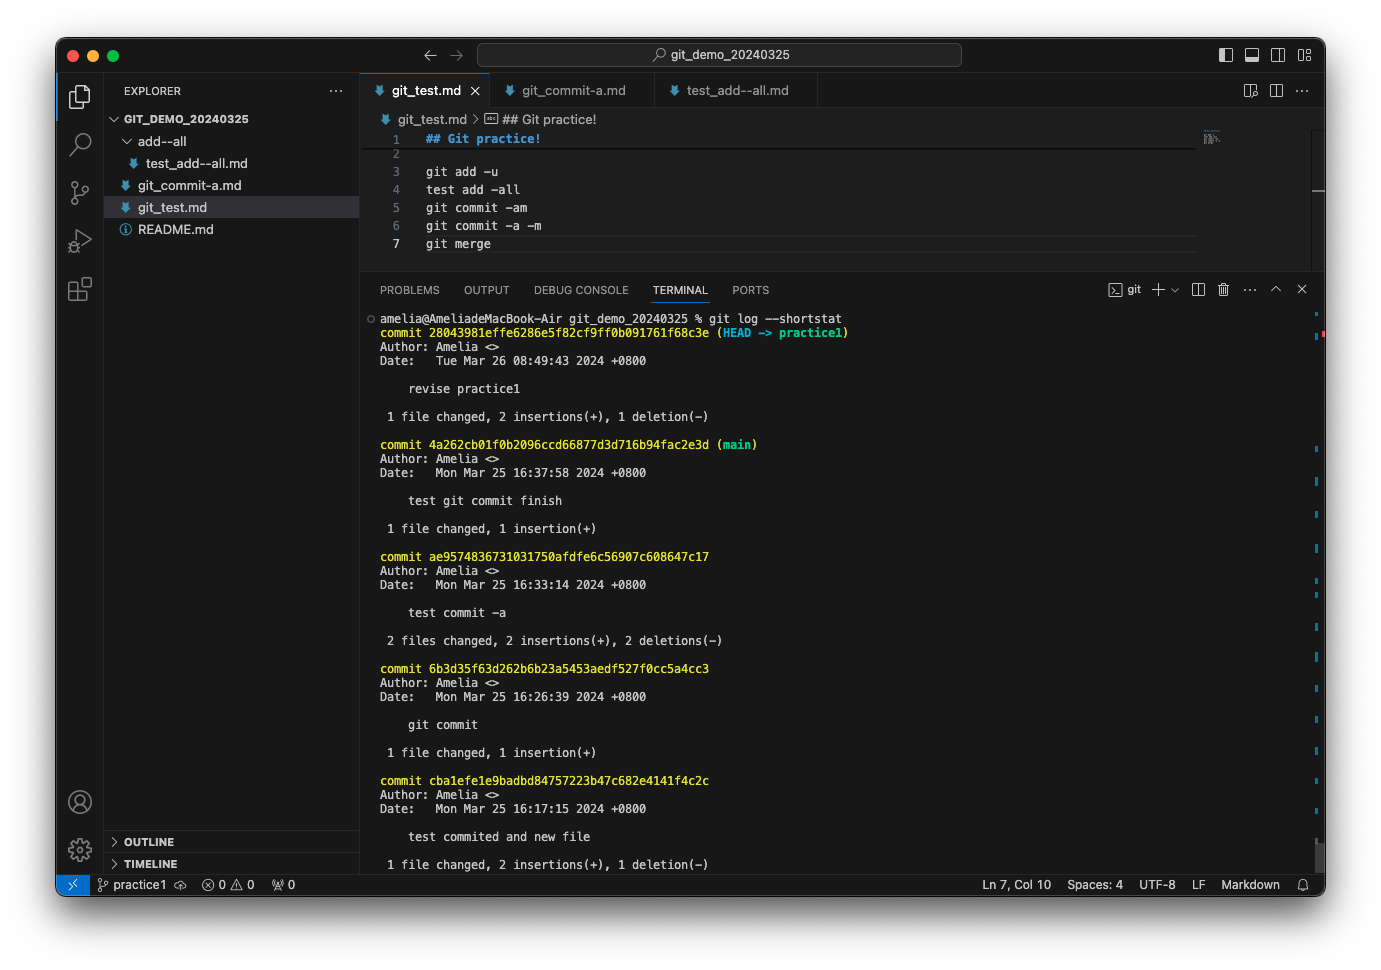
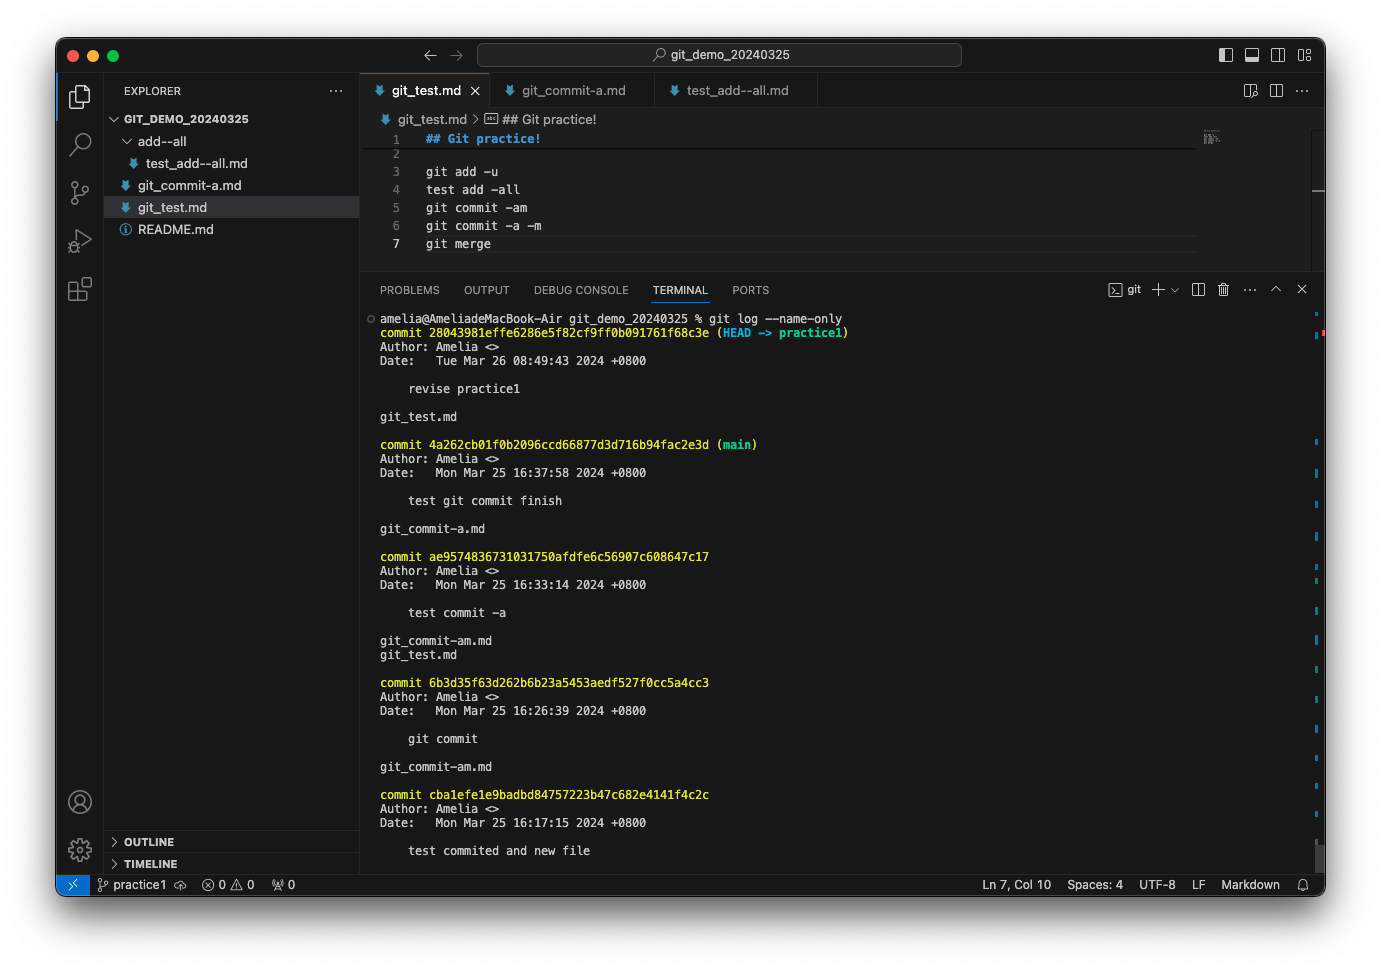
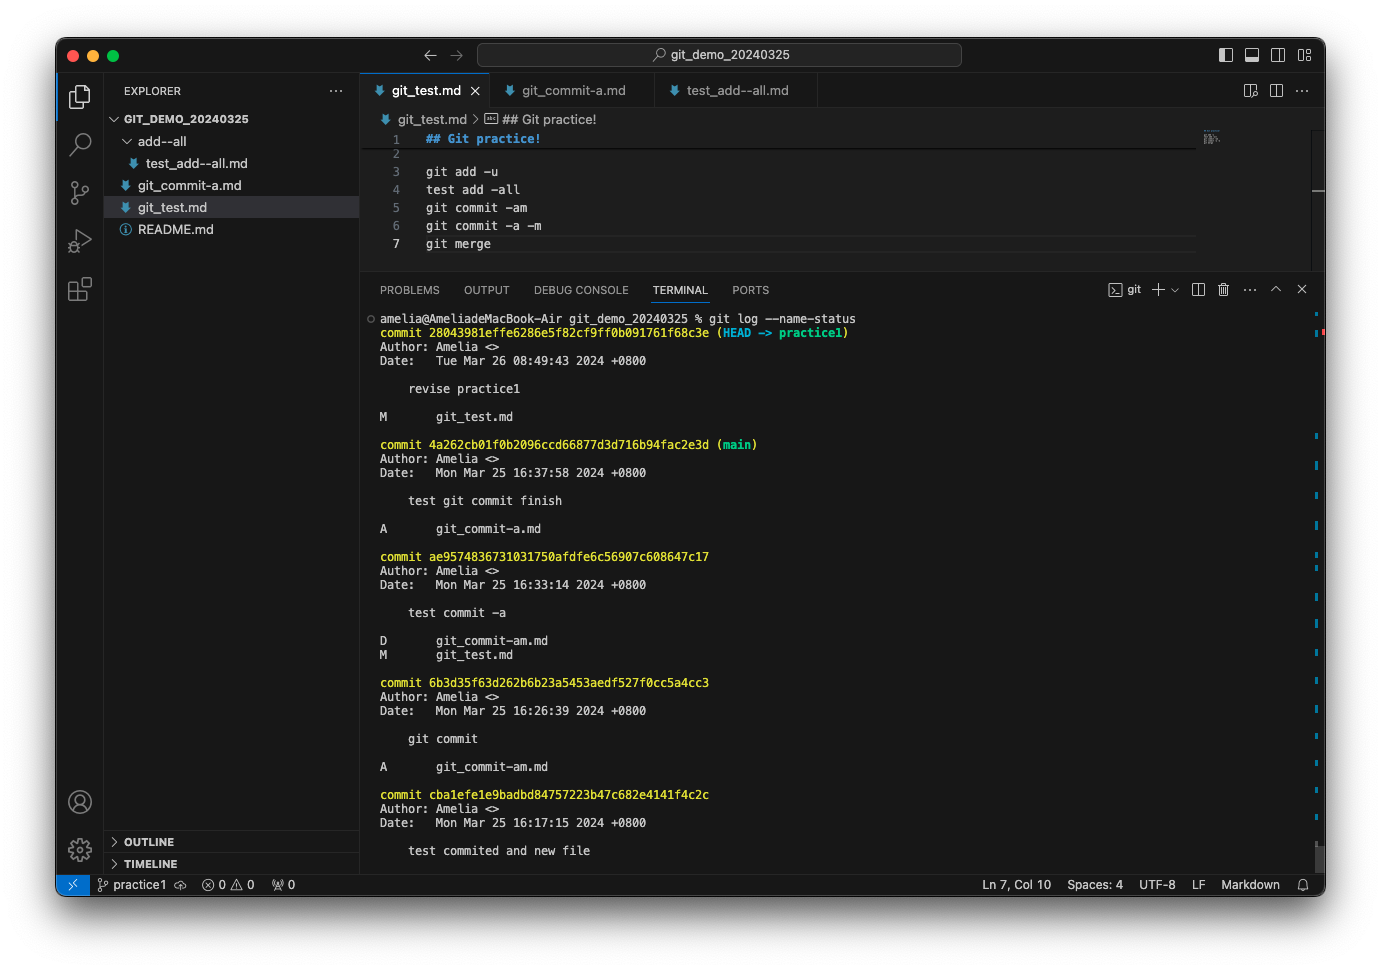
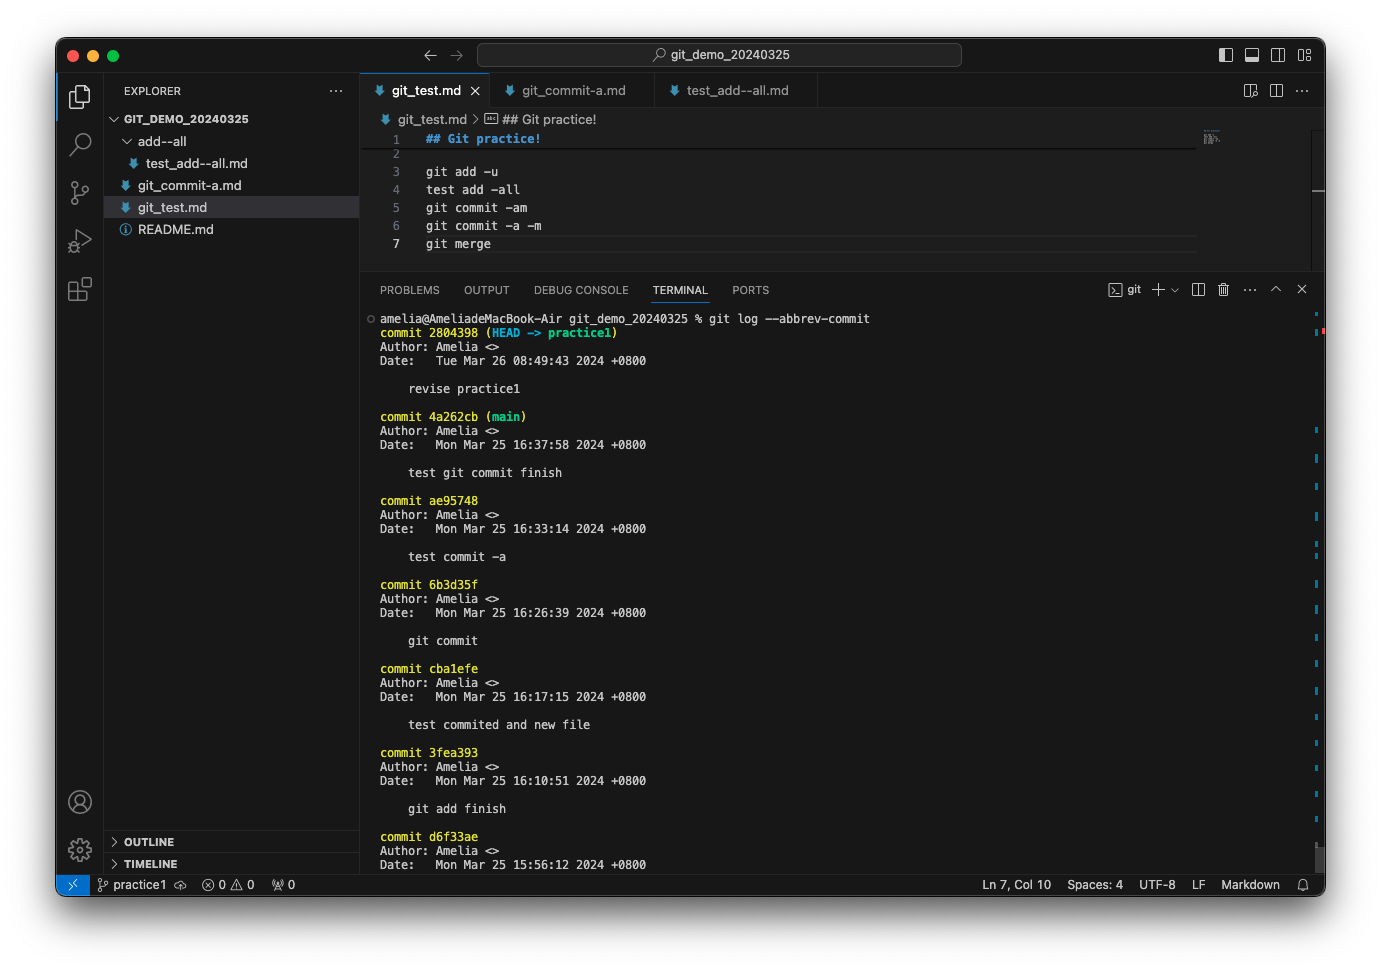
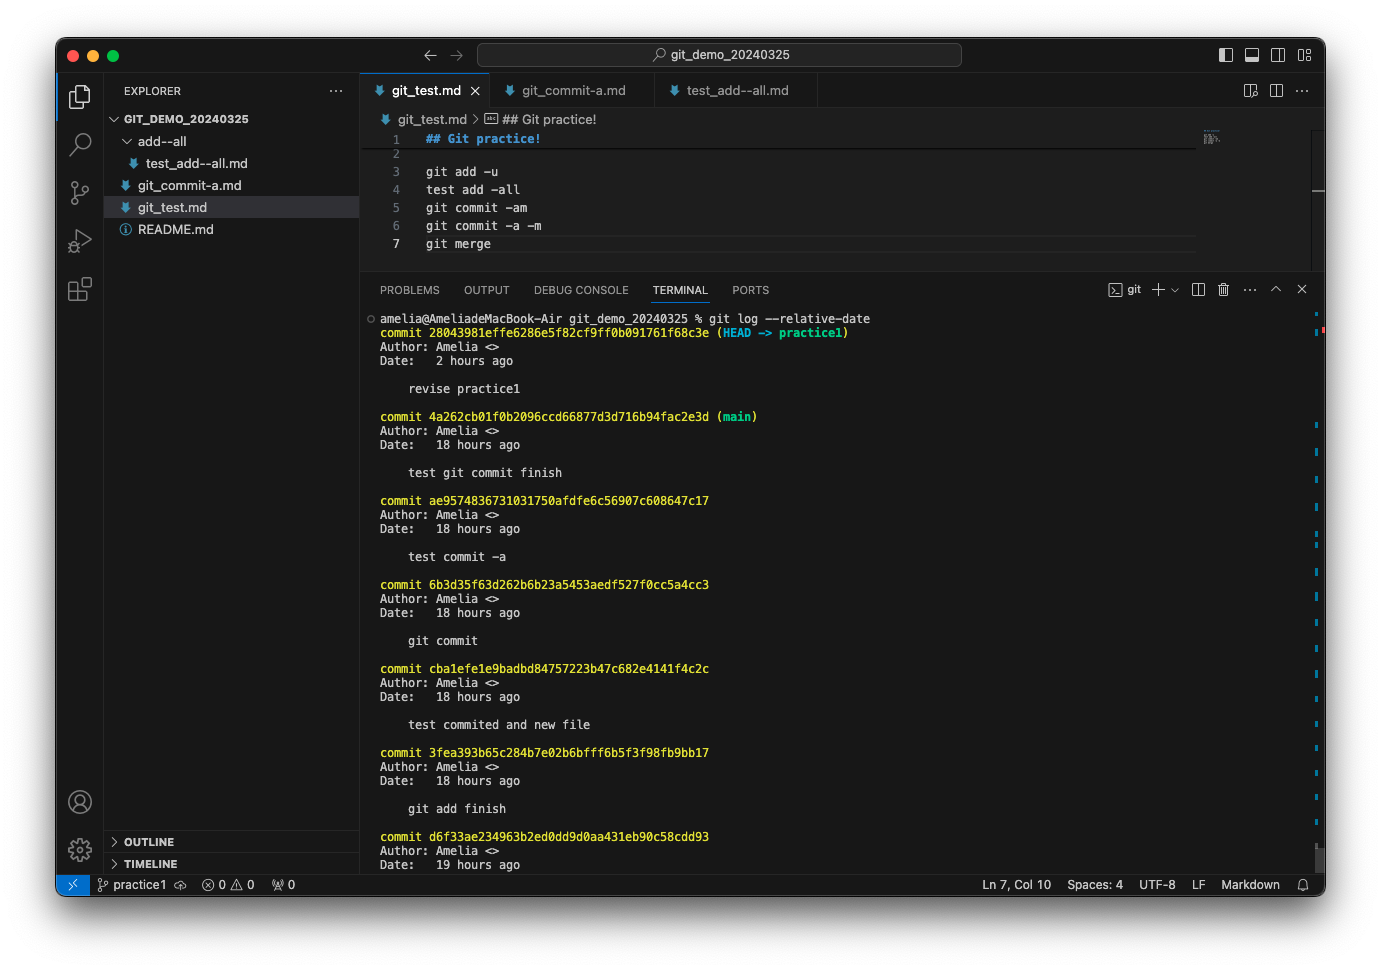
git log :
查看 commit 歷史紀錄,預設會以反向的時間順序列出,並列出每筆 commit 的 SHA-1 校驗碼、作者名字、電子郵件(<> 內)、寫入日期以及 commit 訊息。按 Q 即可離開。- -p:顯示每筆 commit 所修改的內容。
- --stat:顯示每筆 commit 中更動檔案的統計及摘要資訊。
- --shortstat:只顯示 --stat 提供的訊息中關於更動、插入、刪除的文字。
- --name-only:在提交訊息後方顯示更動的檔案列表。
- --name-status:在檔案列表顯示新增、更動、刪除等資訊。
- --abbrev-commit:只顯示 SHA-1 校驗碼的前幾位數,而不是顯示全部 40 位數。
- --relative-date:已相對時間格式顯示日期,如:2 weeks ago。
-
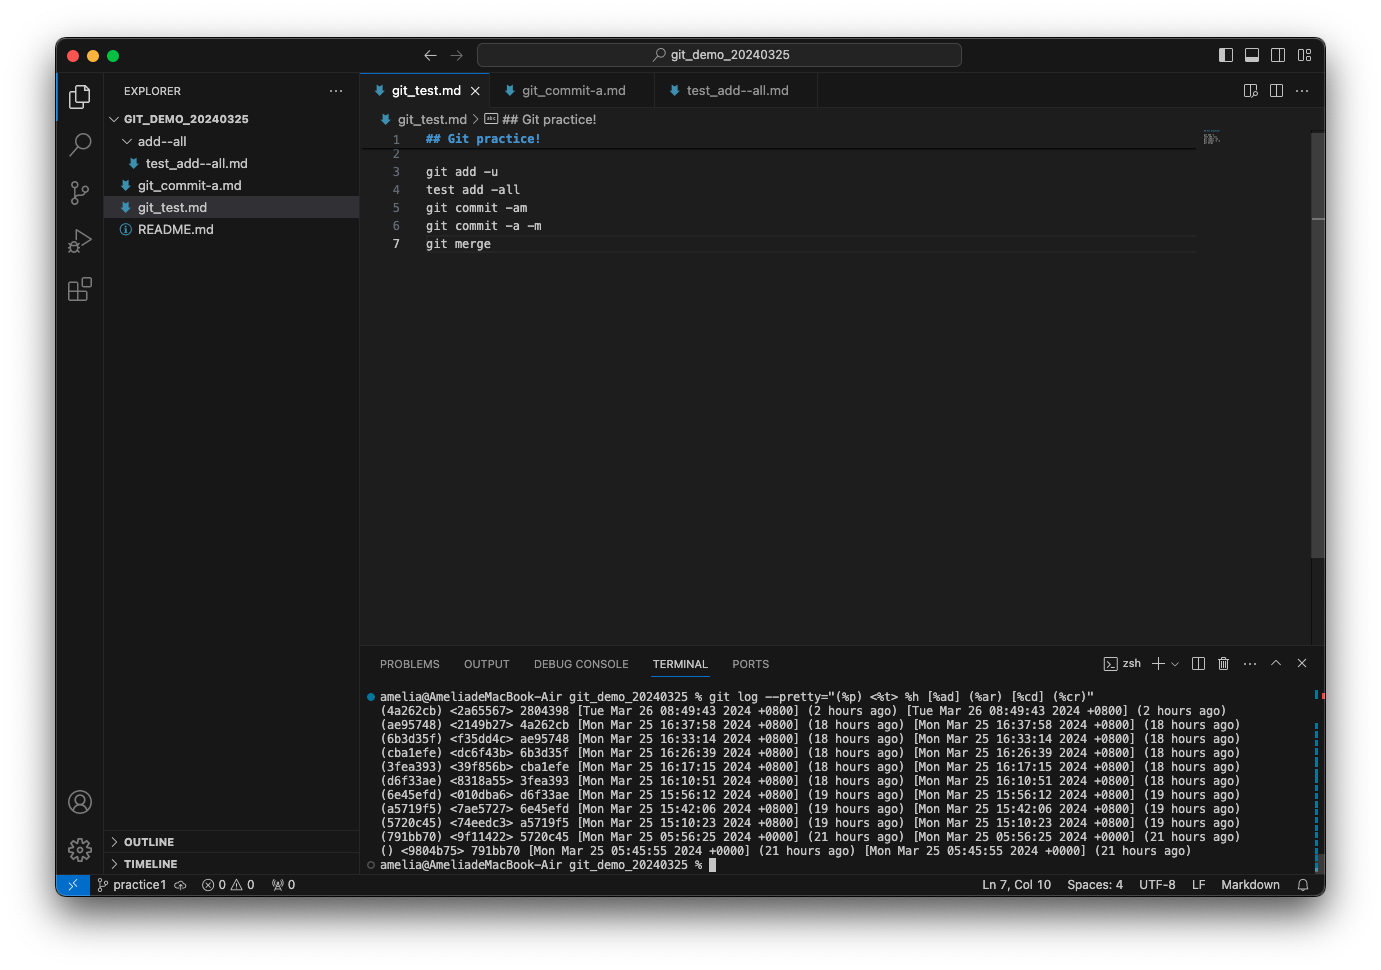
--pretty="格式":使 git log 已指定格式輸出資訊。常用參數如下表格所示:
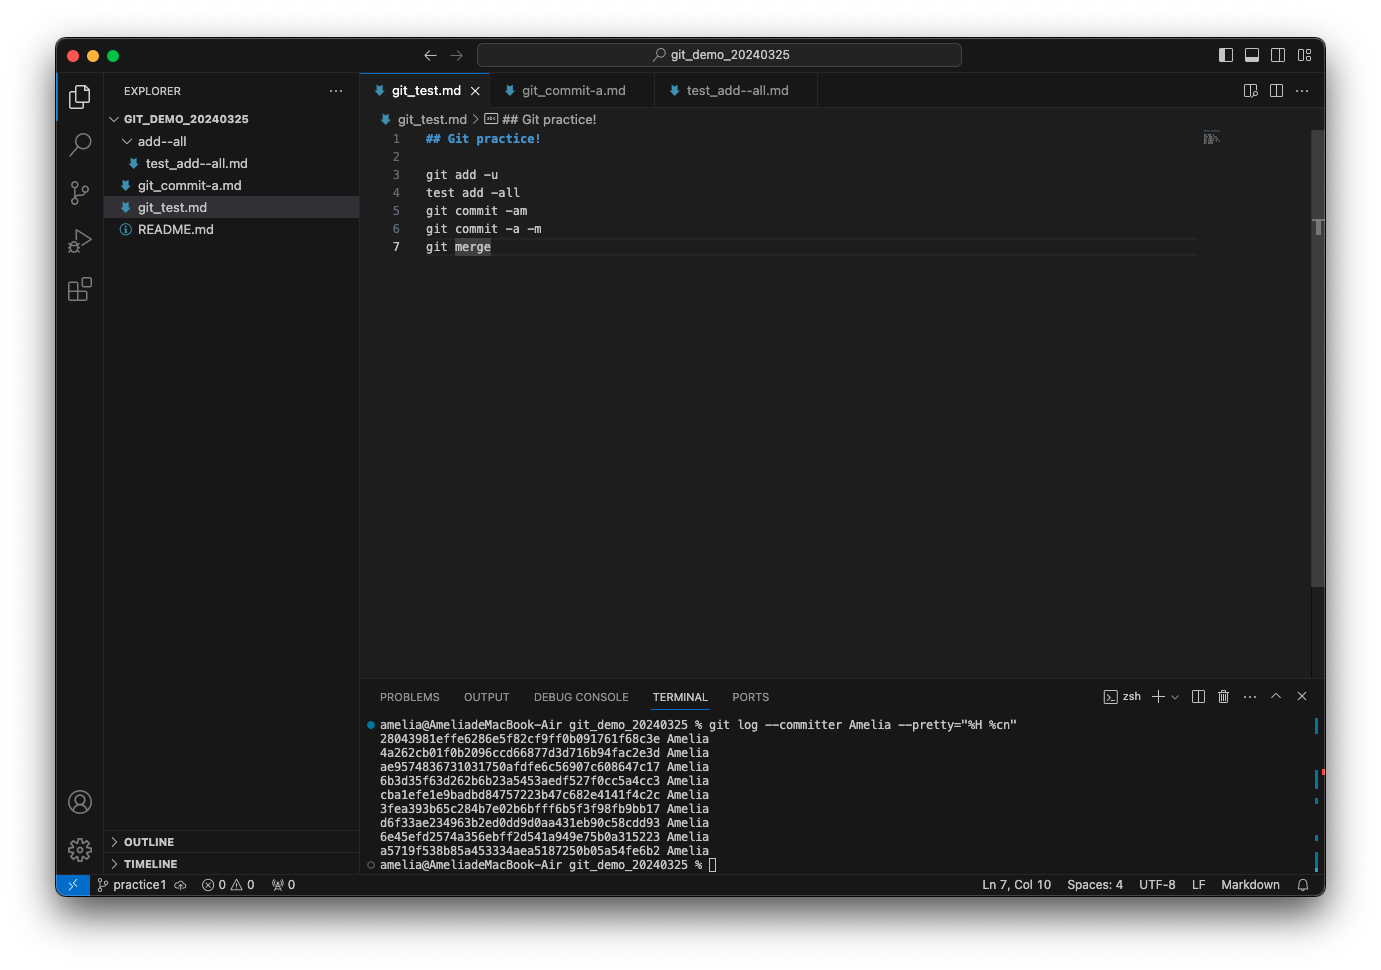
選項 說明 %H 該 commit SHA-1 雜湊值 %h 該 commit 簡短的 SHA-1 雜湊值 %T 「樹(tree)」物件的 SHA-1 雜湊值 %t 「樹」物件簡短的 SHA-1 雜湊值 %P parent commit 的 SHA-1 雜湊值 %p parent commit 簡短的 SHA-1 雜湊值 %an 作者名字 %ae 作者電子郵件 %ad 作者日期(依據 --date 選項值而有不同的格式) %ar 作者日期,相對時間格式。 %cn committer 名字 %ce committer 電子郵件 %cd committer 日期 %cr committer 日期,相對時間格式 %s 標題 -
--graph:顯示 branch 及 merge 歷史的 ASCII1 圖形。
-
-"n":n 可為任意整數,限制 git log 只列出 n 筆資料。
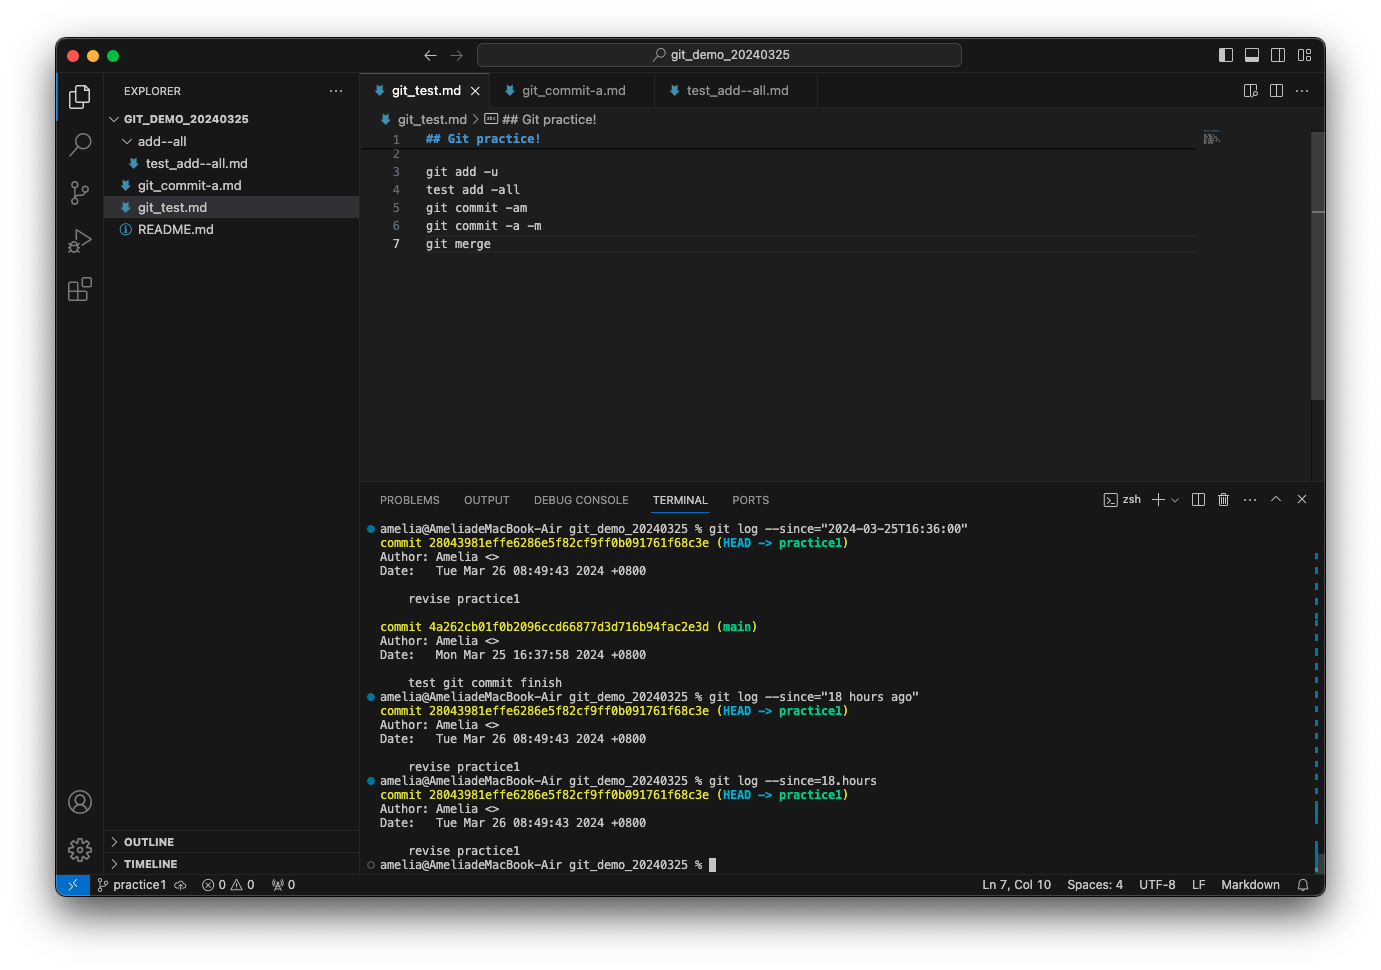
- --since="指定時間", --after=“指定時間”:可限制 git log 列出指定時間後的 commit。
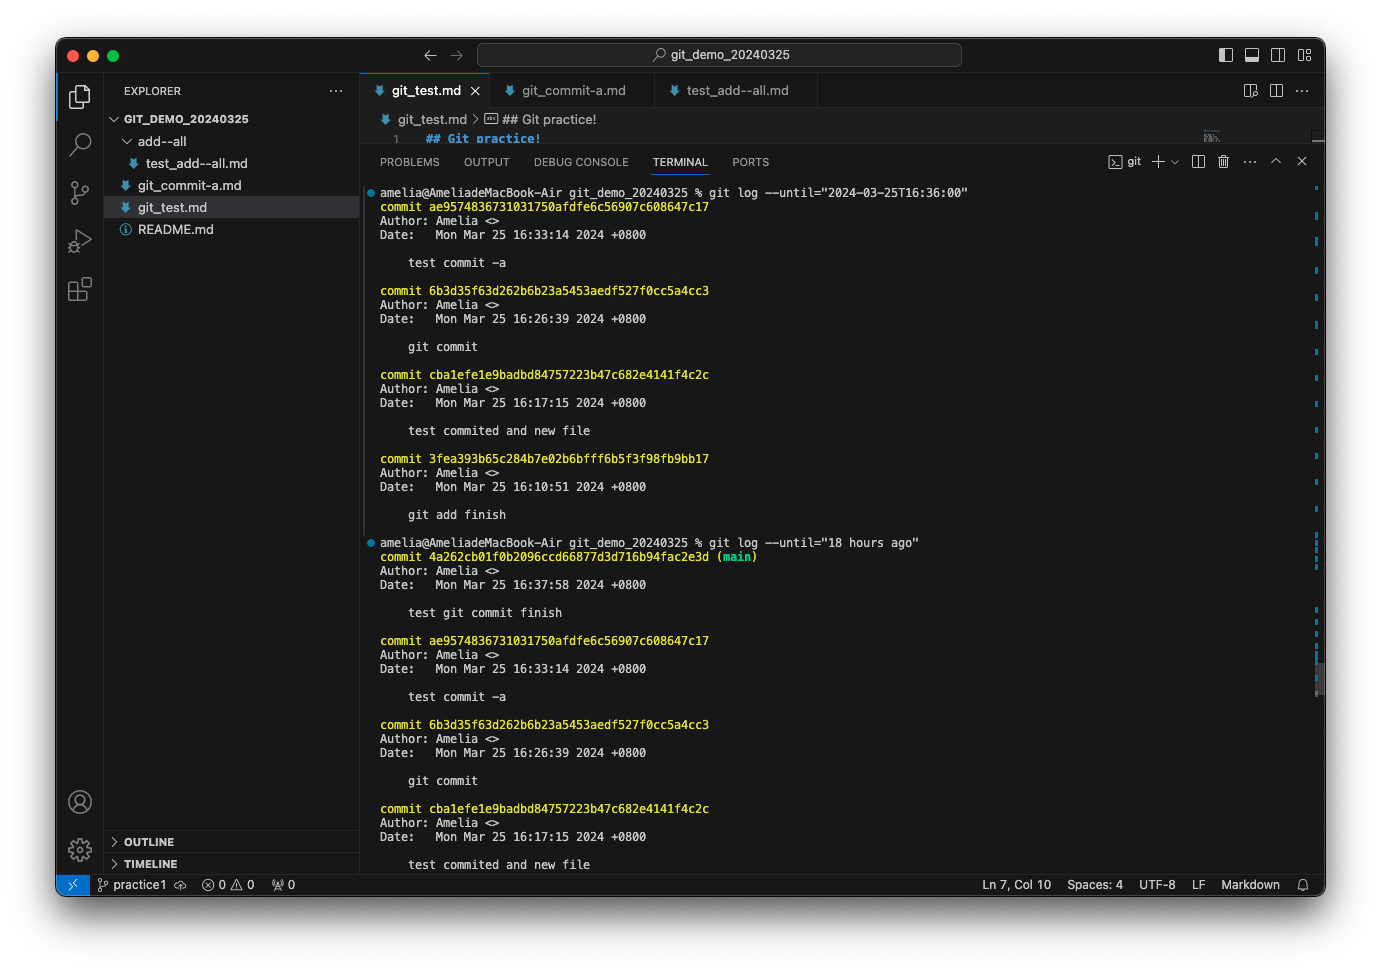
- --until="指定時間", --before="指定時間":可限制 git log 列出指定時間前的 commit。
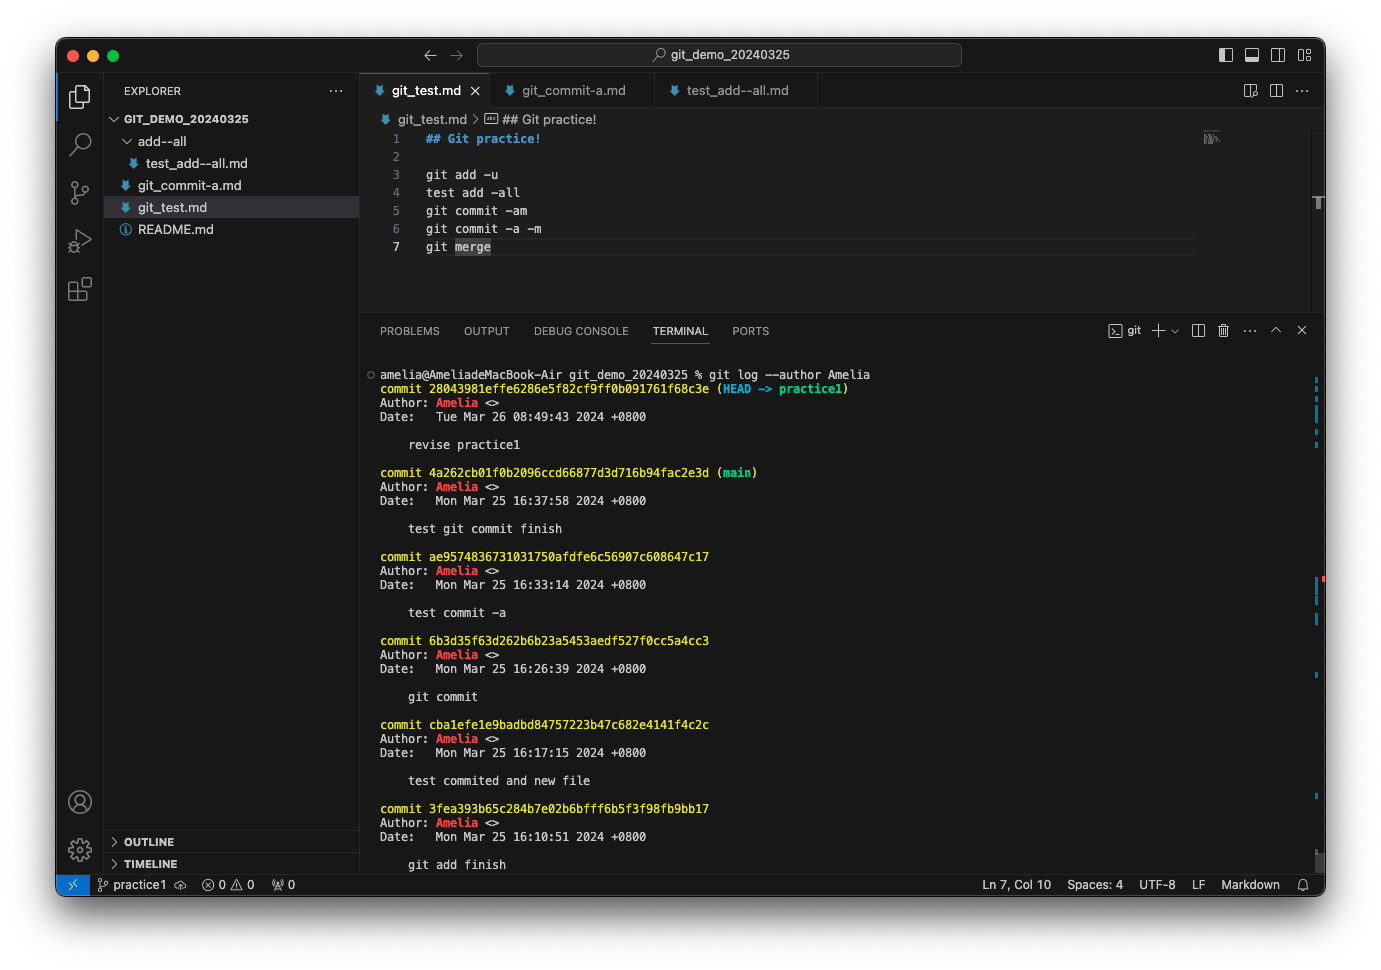
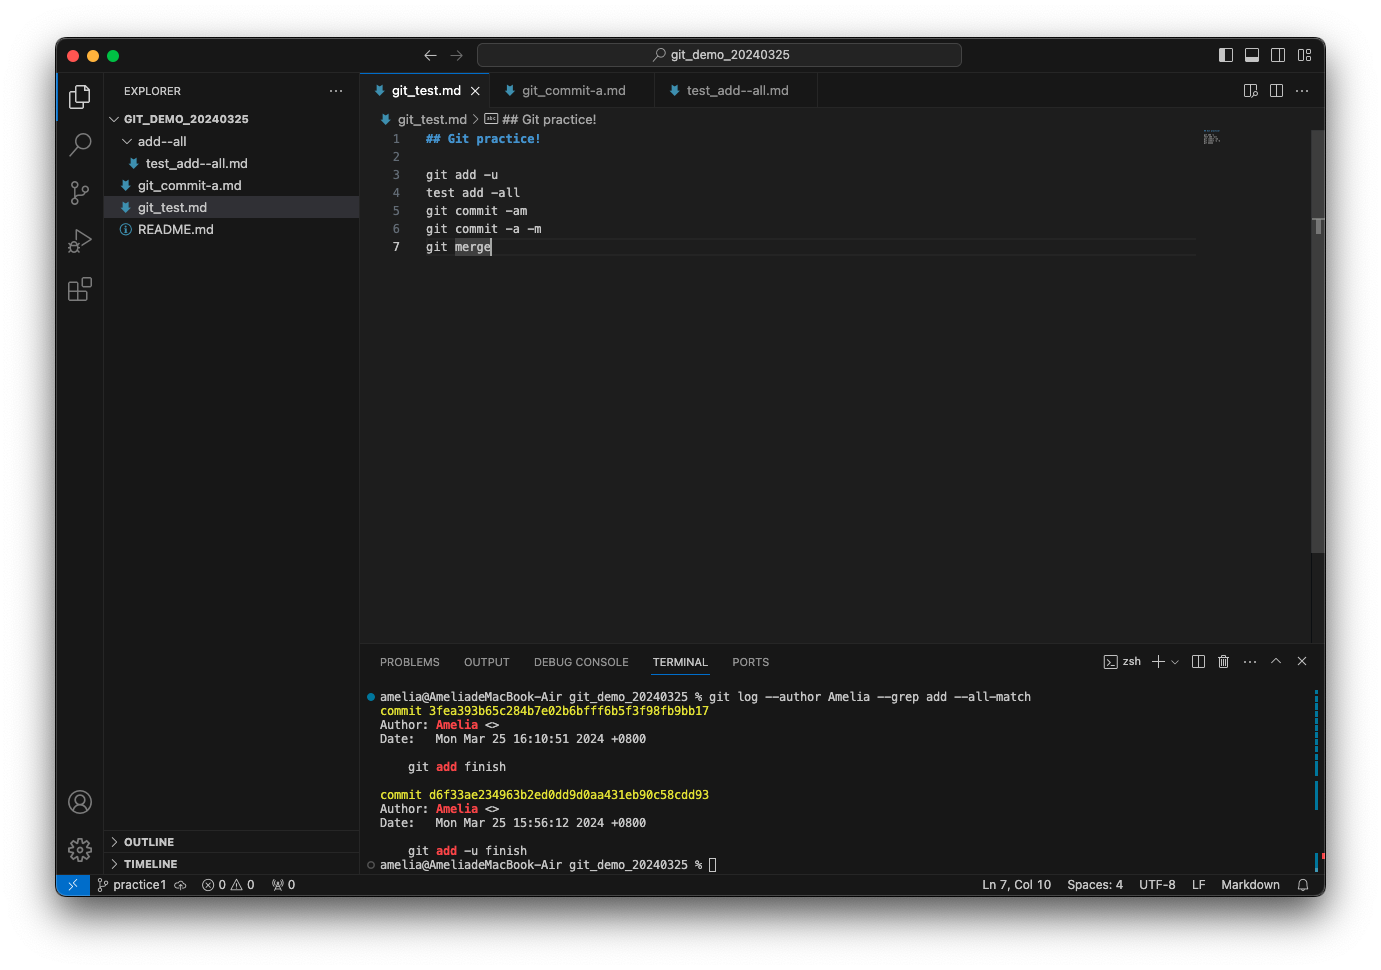
- --author:可過濾出指定作者的 commit。 (註:author 為最一開始修改該 commit 的人)
- --committer:可過濾出指定之 committer 的 commit。 (註:committer 為提交該 commit 的人)
-
--grep:可過濾出 commit 訊息符合指定字串之 commit。 若要同時比對作者及 commit 訊息,記得要加上 --all-match,否則只要滿足其中一個條件的 commit 都會被列出來。
-
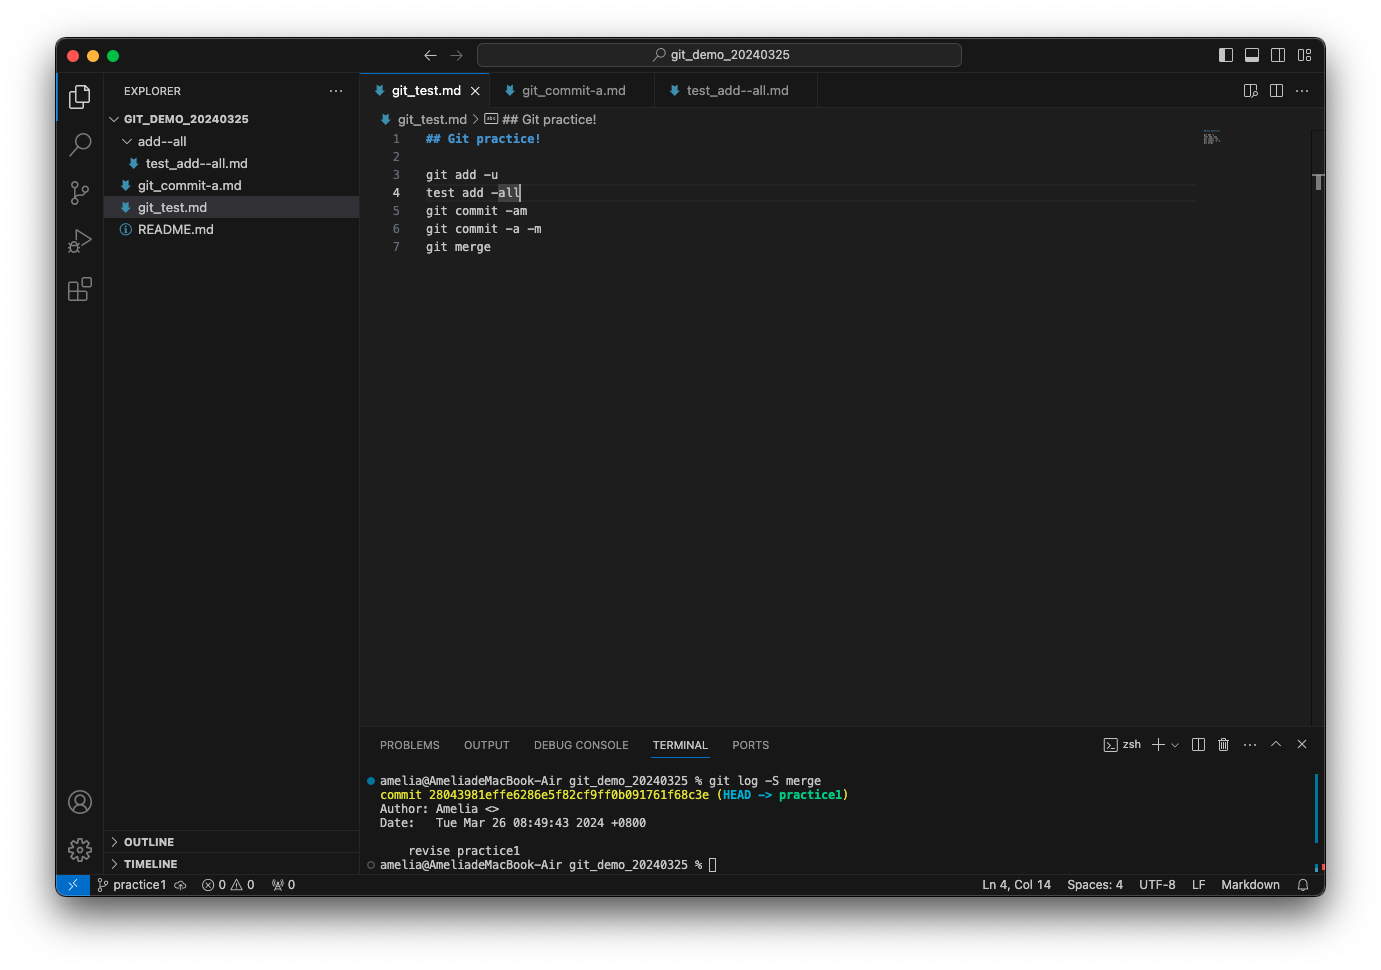
-S:用來尋找 commit 所修改的內容中,被加入或移除某指定字串的 commit。
顯示格式參數
過濾條件參數
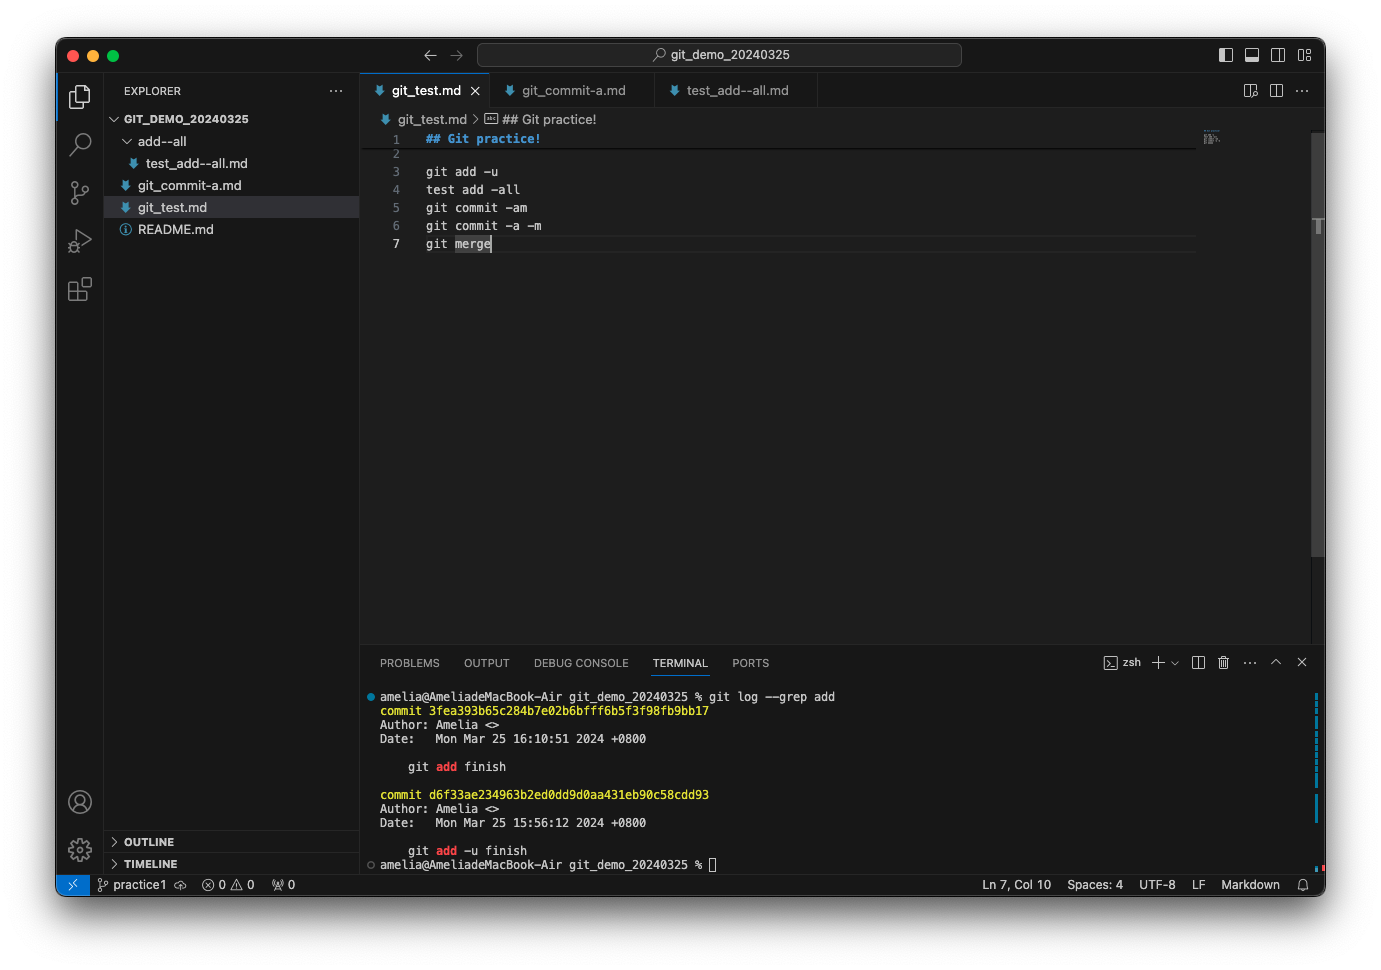
查詢修改內容中有 "merge" 被新增或刪除的 commit
-
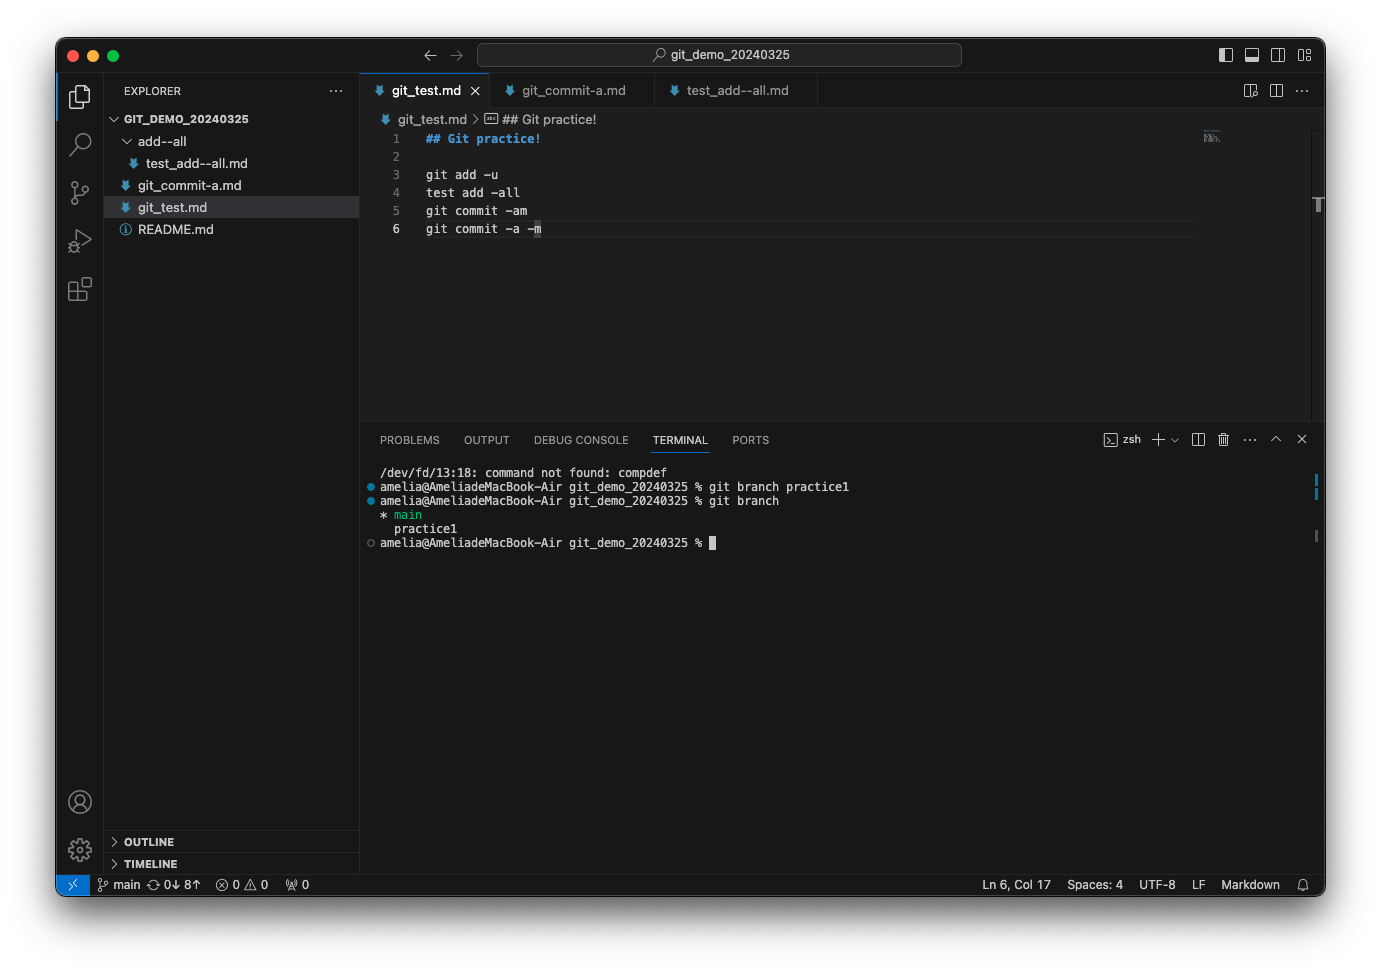
git branch "branch 名稱“:
- 不輸入 branch 名稱可查詢目前所有 branch,目前 HEAD 所在之 branch 前有 * 標示。
- 輸入 branch 名稱即可於目前所在 commit 位置新增 branch。
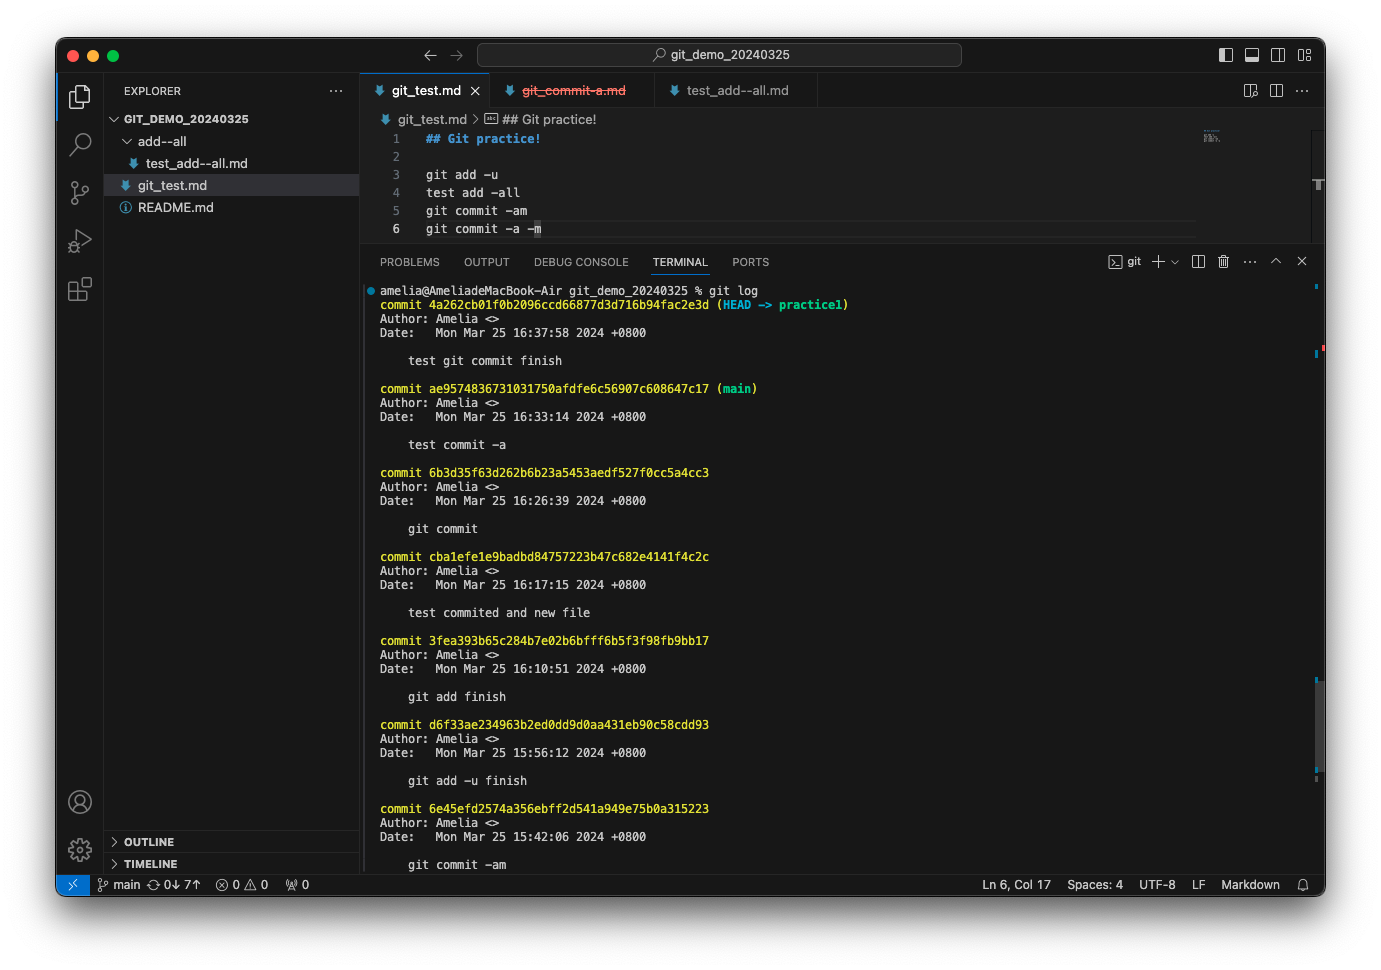
- -d "branch 名稱“:刪除 local branch。其有所限制,如下所示:
- 無法刪除目前 HEAD 所在的 branch
- 若欲刪除的 branch 中有 commit,且還未被 merge,則無法使用 -d。
- -D "branch 名稱“:刪除有尚未被 merge 的 commit 的 local branch。
- -f "branch 名稱" "指定位置“:移動指定 branch 到指定的 commit 位置。
- -u "remote branch 名稱" "已存在的 branch 名稱(若目前 HEAD 已在該 branch 上則可以省略)":指定 branch 追蹤特定 remote branch。
- -vv:可顯示目前 local 端 branch 的詳細訊息。
- 輸出格式:"local branch" "目前指向的 commit SHA-1 值" "[關聯的 remote branch: local 落後 (behind)/ 較新 (ahead) remote branch 幾個更新]" "目前指向的 commit 訊息"
Example
checkout 至 feature2 上,並查看目前 local branch 的情況

若想直接刪除 feature2,會出現錯誤

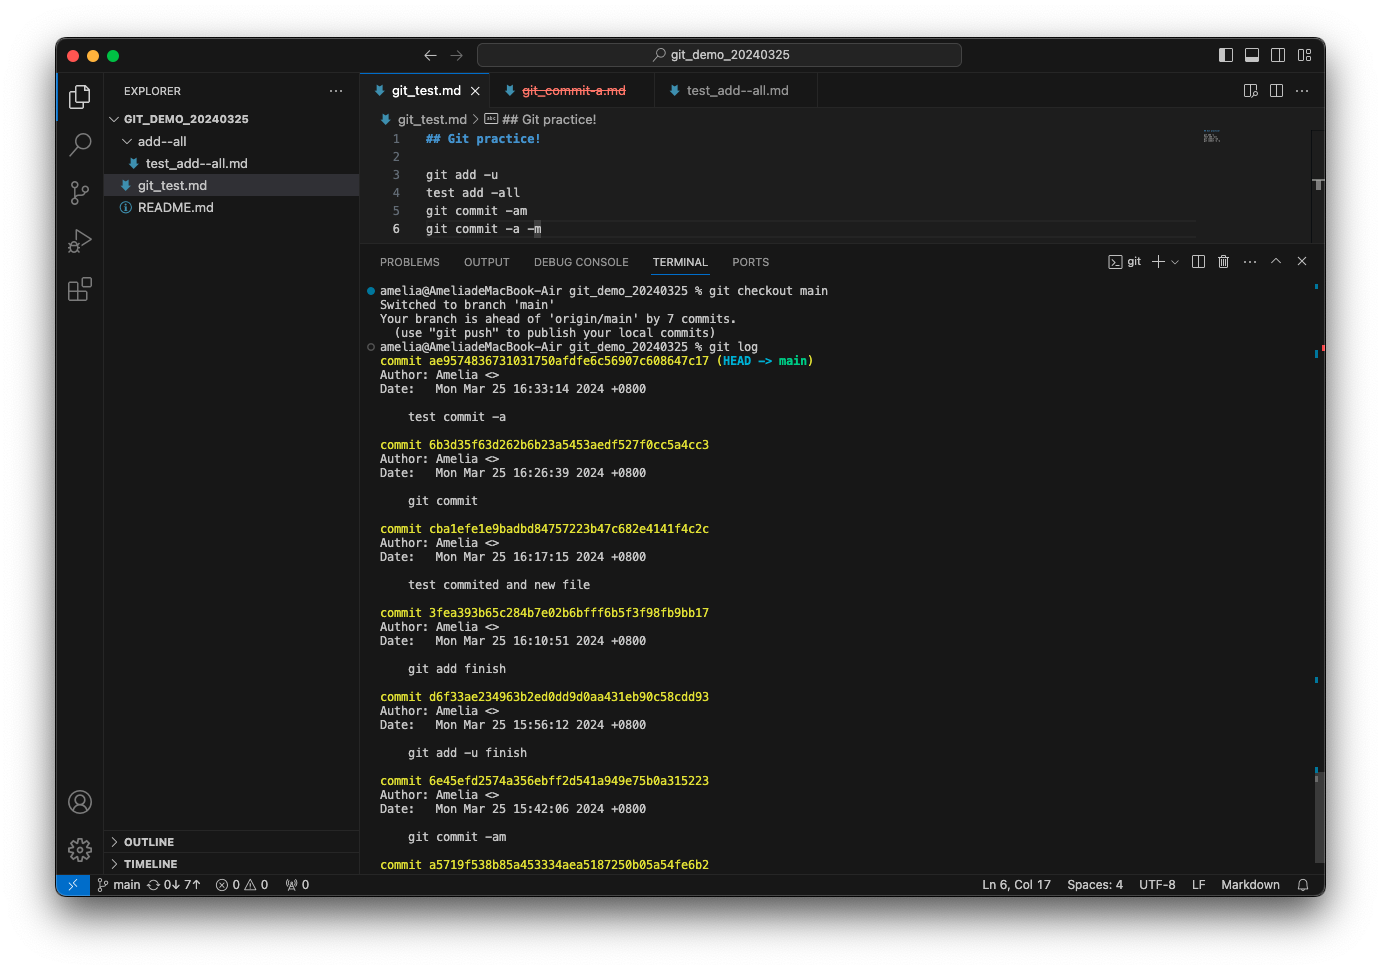
checkout 至其他 branch 即可成功刪除

即便不在要刪除的 branch 上,該 branch 有已 commit 但尚未 merge 的內容也無法用 -d 刪除
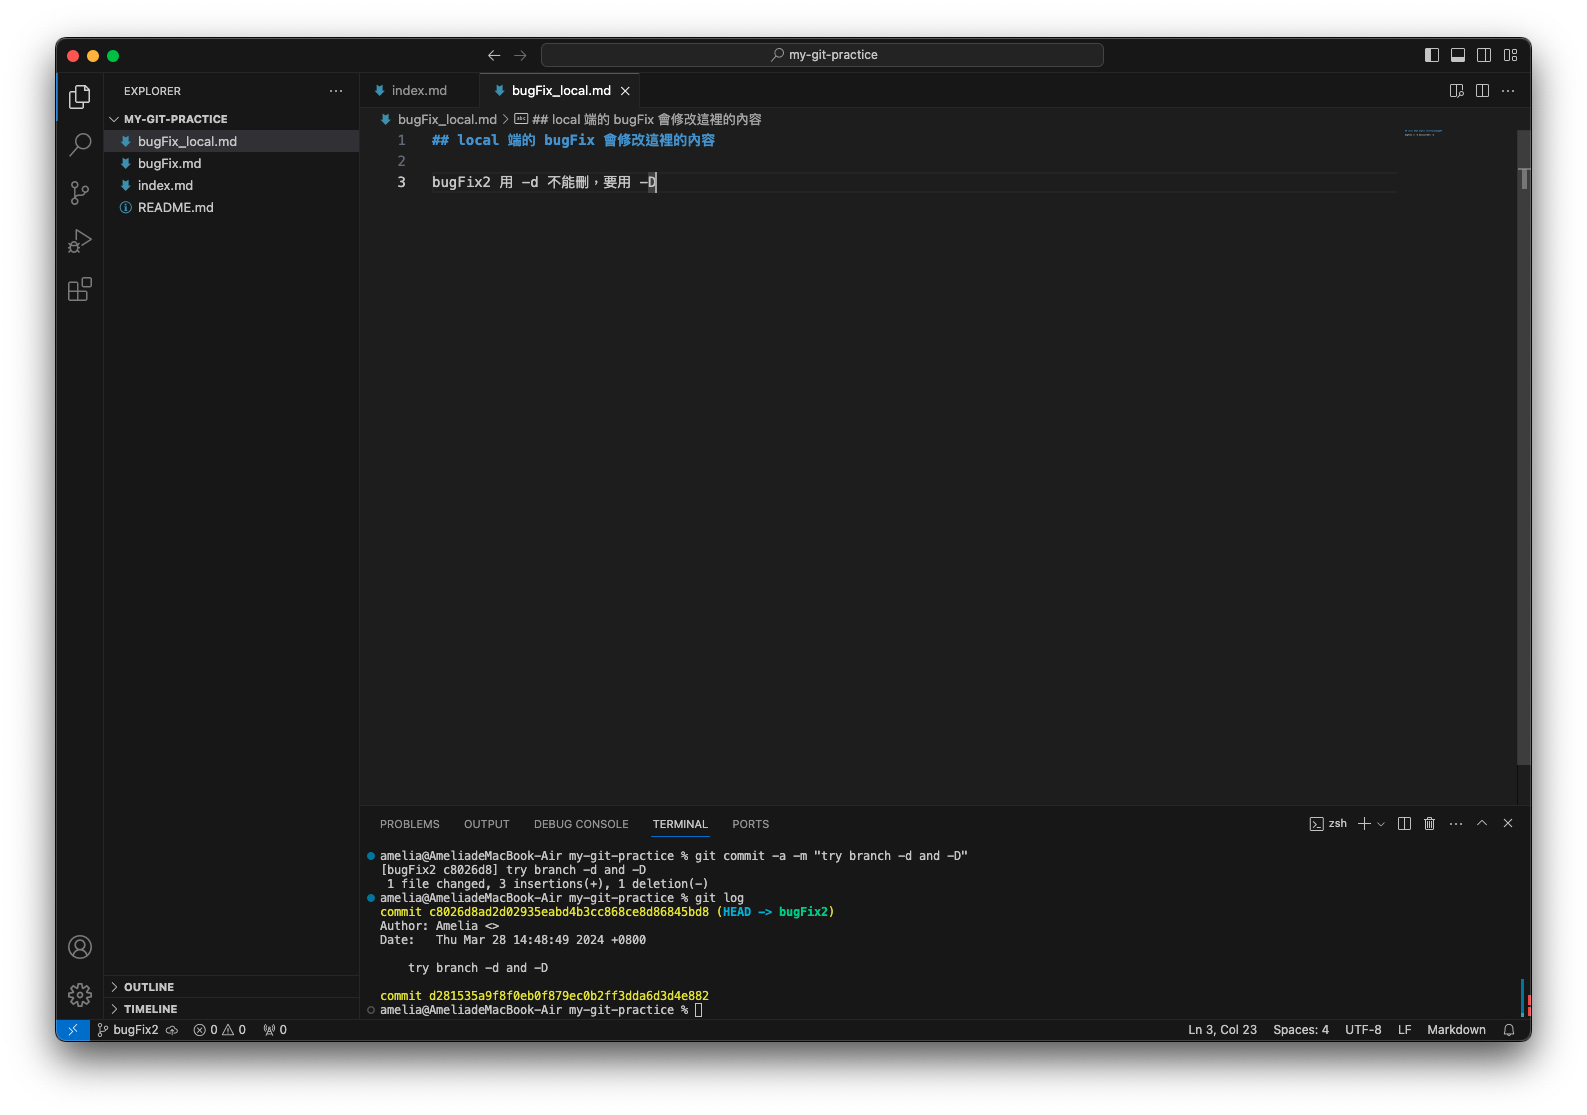
 解決方式請見 git branch -D
可觀察到在 git branch -f main HEAD^ 前後兩次之 git log,main 所在之 commit 位置不同
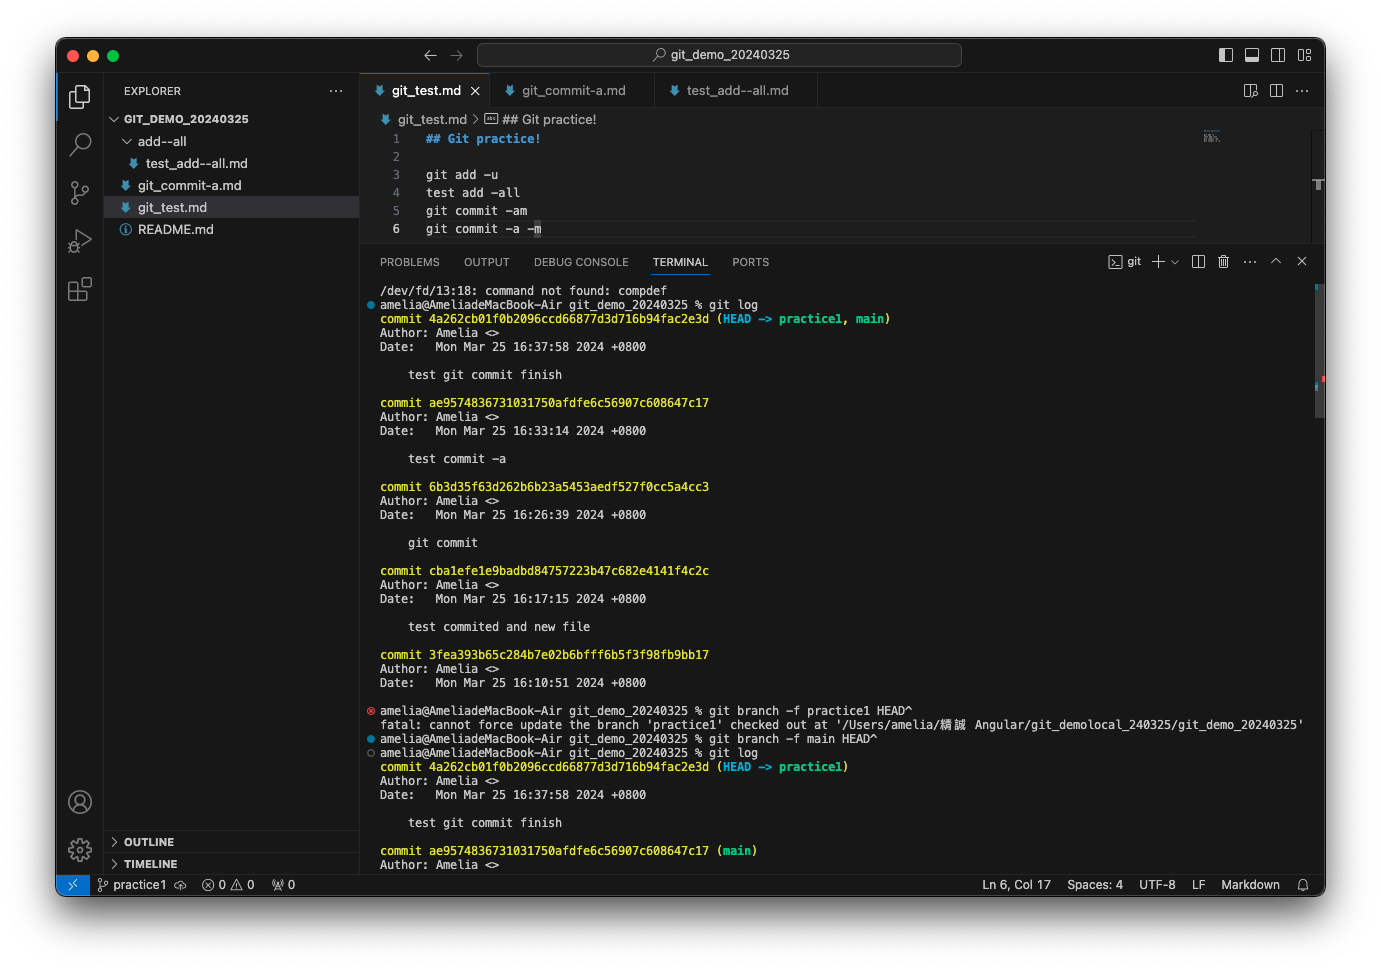
創建一 local branch 名為 bugFix,並以 git branch -vv 查看目前其沒有對應的 remote branch

執行 git branch -u
再以 git branch -vv 查看,可發現目前 bugFix 已對應到 origin/bugFix
-
git checkout "指定位置":
可移動目前位置 (HEAD) 到指定的位置,可以是 branch,也可以是 commit。- ^:加在 branch 名稱或 commit 後,指向該 branch 或 commit 的 parent commit(上一層)。
- ^^:加在 branch 名稱或 commit 後,指向該 branch 或 commit 的 grandparent commit(上兩層)。
- ^"number":當 merge 後,該 commit 有多個 parent commit 時使用。^1 為 merge commit 正上方的 parent commit。
- ~"number":向上移動 number 層。
- -b "新 branch 的名稱":可直接創建新的 branch 並將 HEAD 指向他。
- -b "新 branch 的名稱" "remote branch 名稱":創建一新的 branch,並指定其追蹤指定的 remote branch。
Example
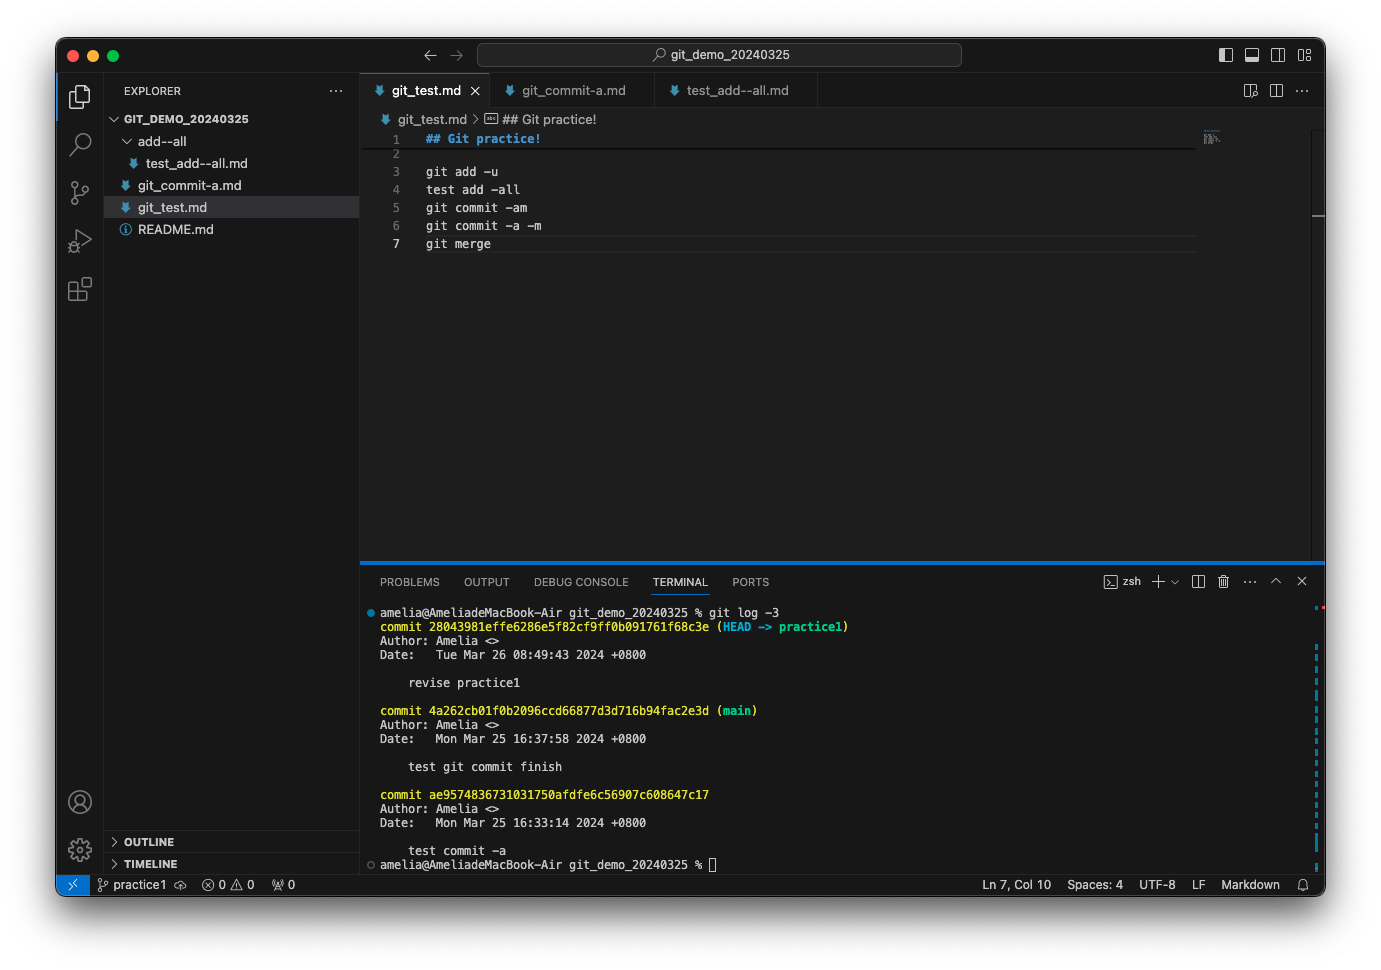
原本 HEAD 指向 practice1
下指令 git checkout main 後,HEAD 指向 main
承 git checkout main,下指令 git checkout main^ 後,HEAD 指向 main 所在的上一個 commit(可核對 commit 號),且 HEAD 直接指向 commit,因此出現 detached HEAD 狀態。
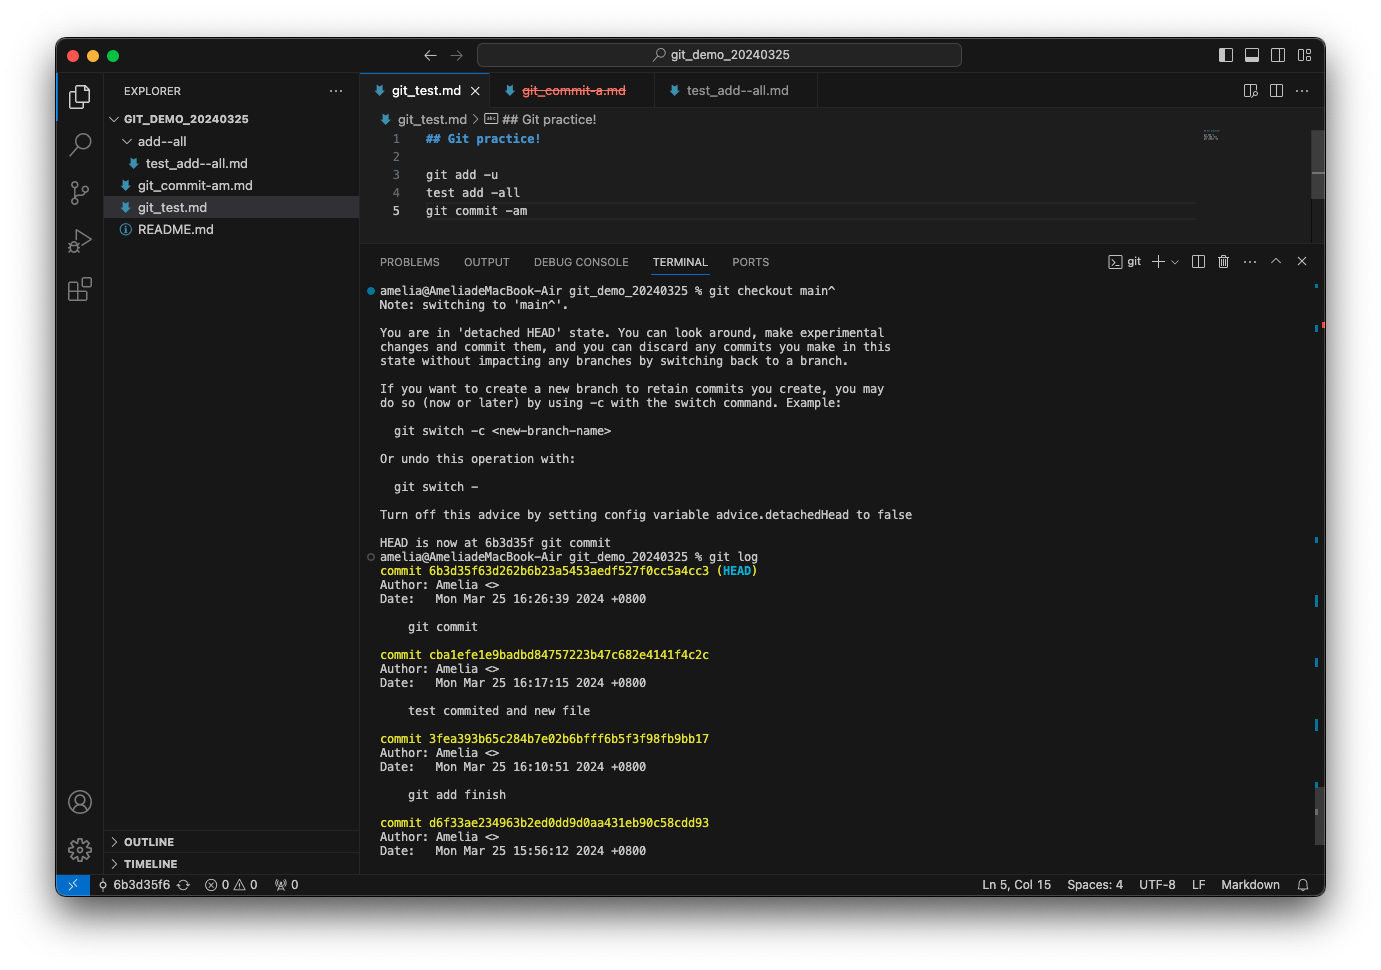
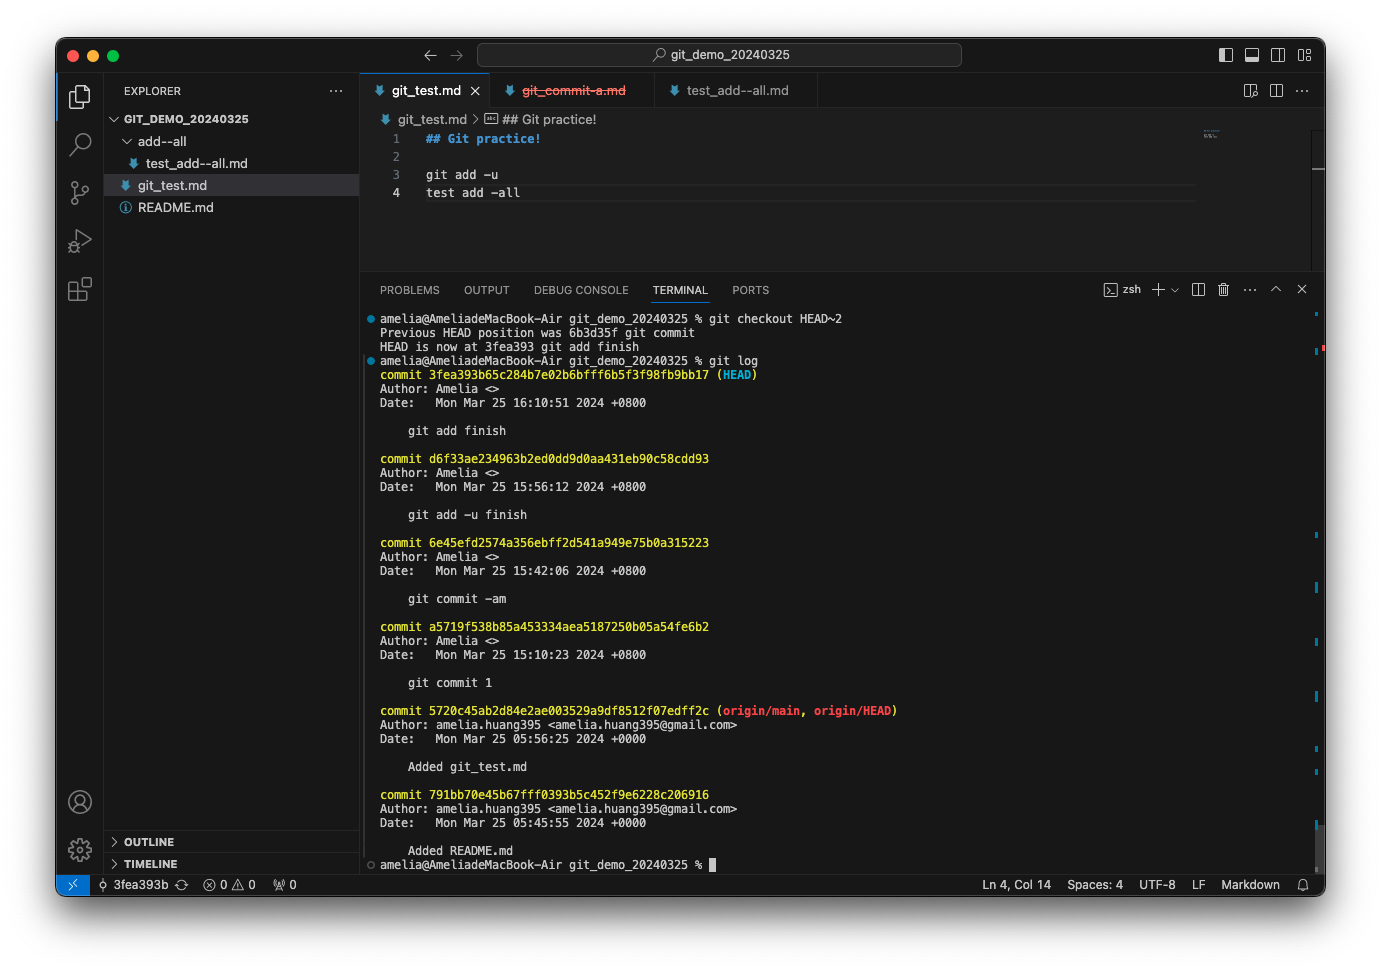
承 git checkout ^,下指令 git checkout HEAD~2 後,HEAD 指向原其所在之上兩個 commit(可核對 commit 號)
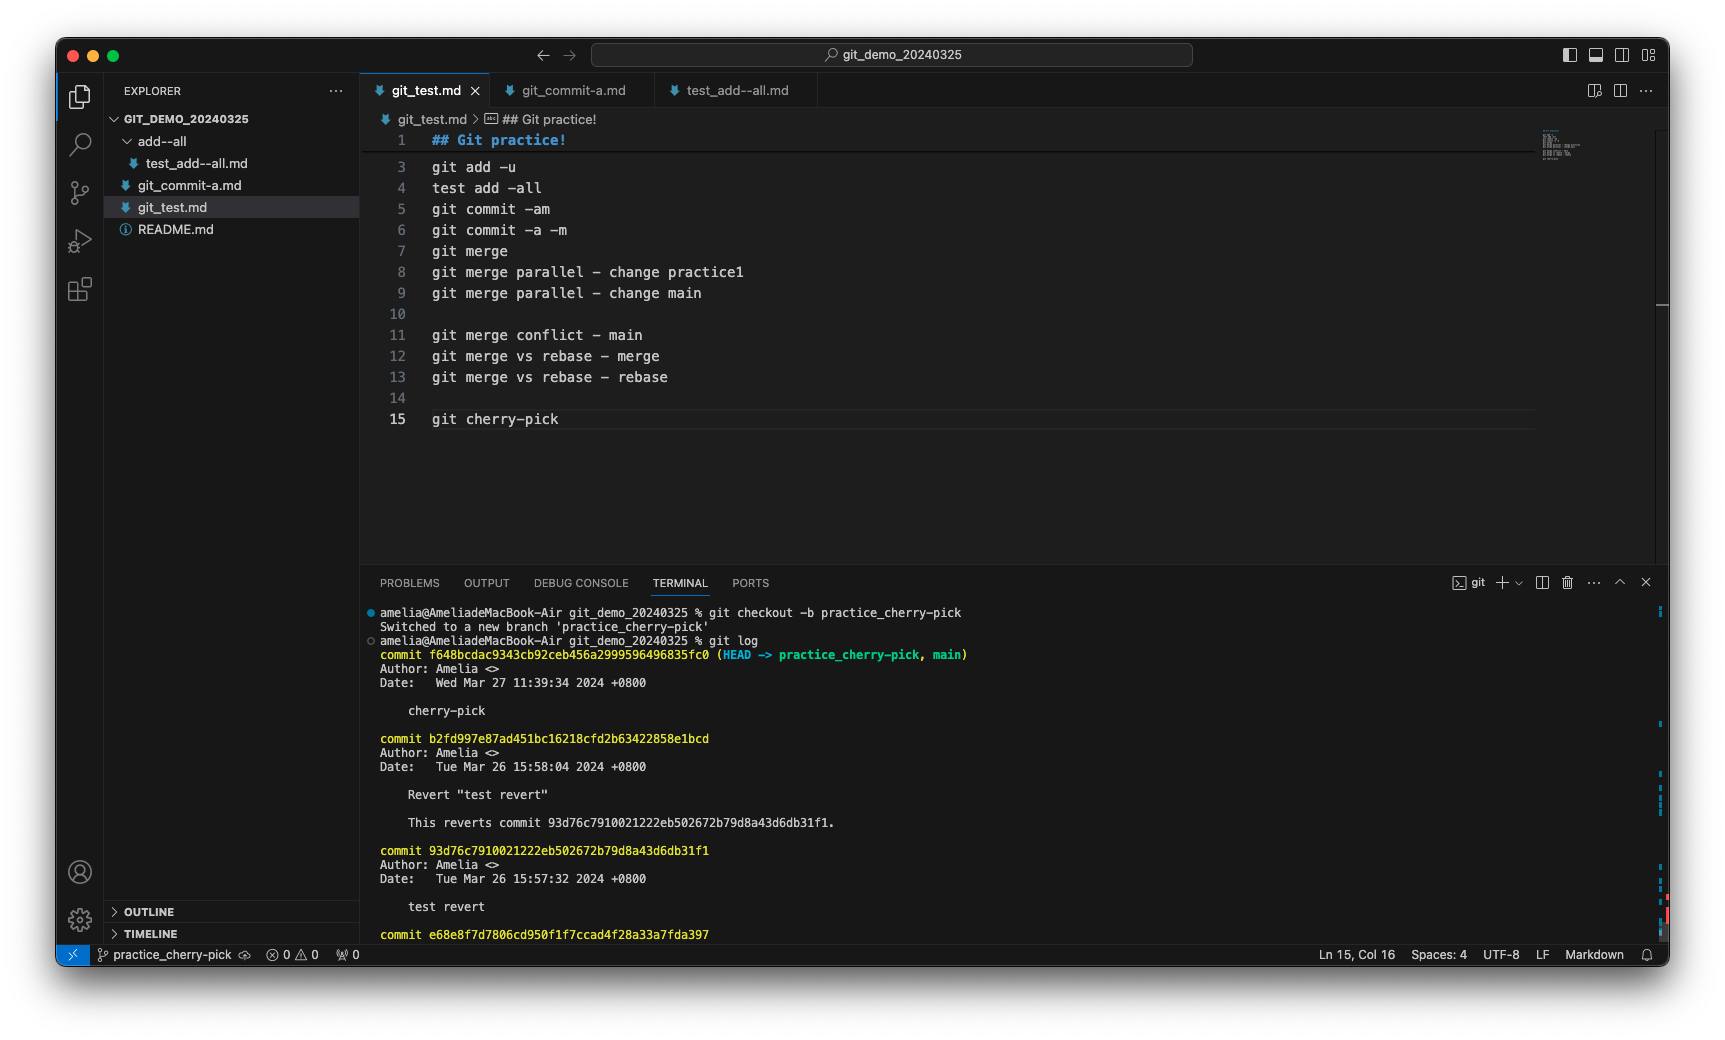
創建一新的 branch 名為 practice_cherry-pick,並將 HEAD 切換到他身上
-
git merge "欲合併到目前 branch 的 branch 名稱":
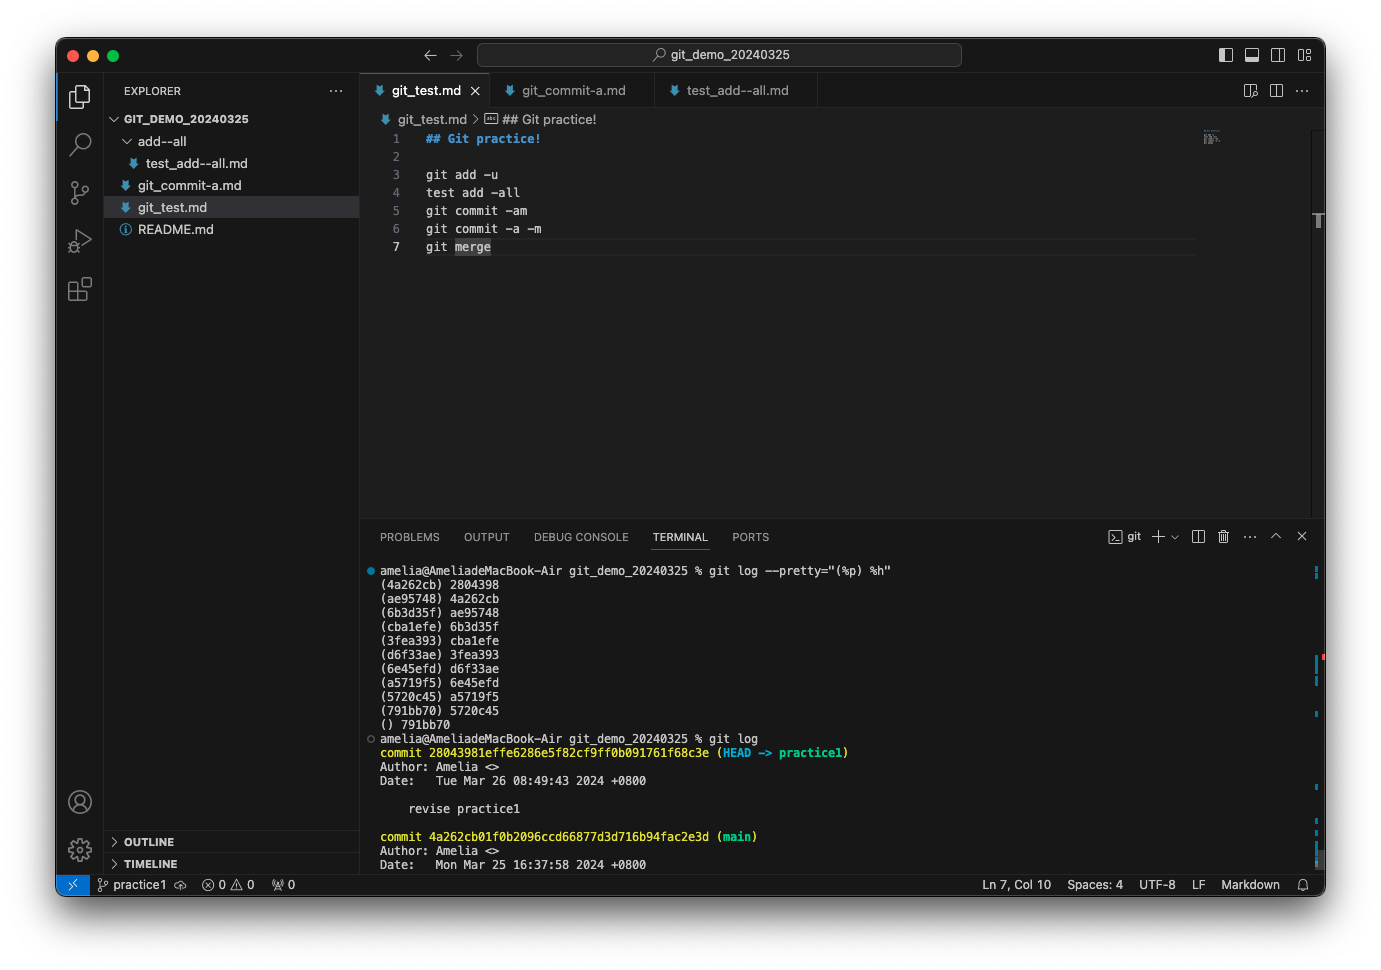
將欲合併的已修改 branch 合併至目前 HEAD 所在之 branch,若目前 HEAD 所在之 branch 為欲合併之 branch 的 parent,則 git 會單純的將目前 HEAD 所在的 branch 指向欲合併之 branch 所指向的 commit。Example
由 git log 可得知目前 main 為 practice1 (HEAD) 的 parent commit
在執行以下指令之後:
可看到 main 指向了 practice1 所在的 commit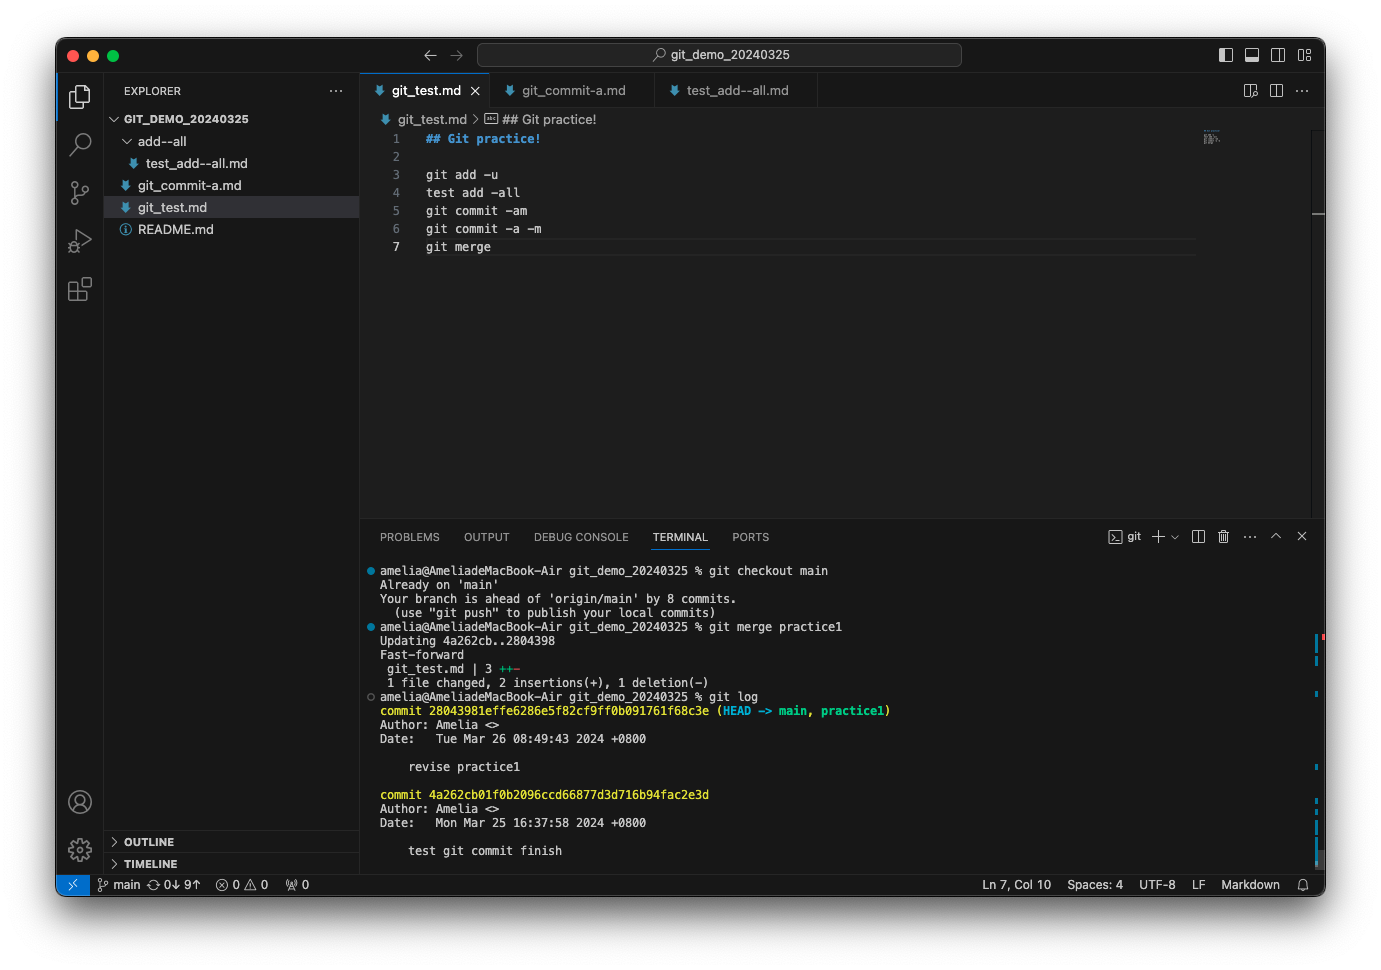
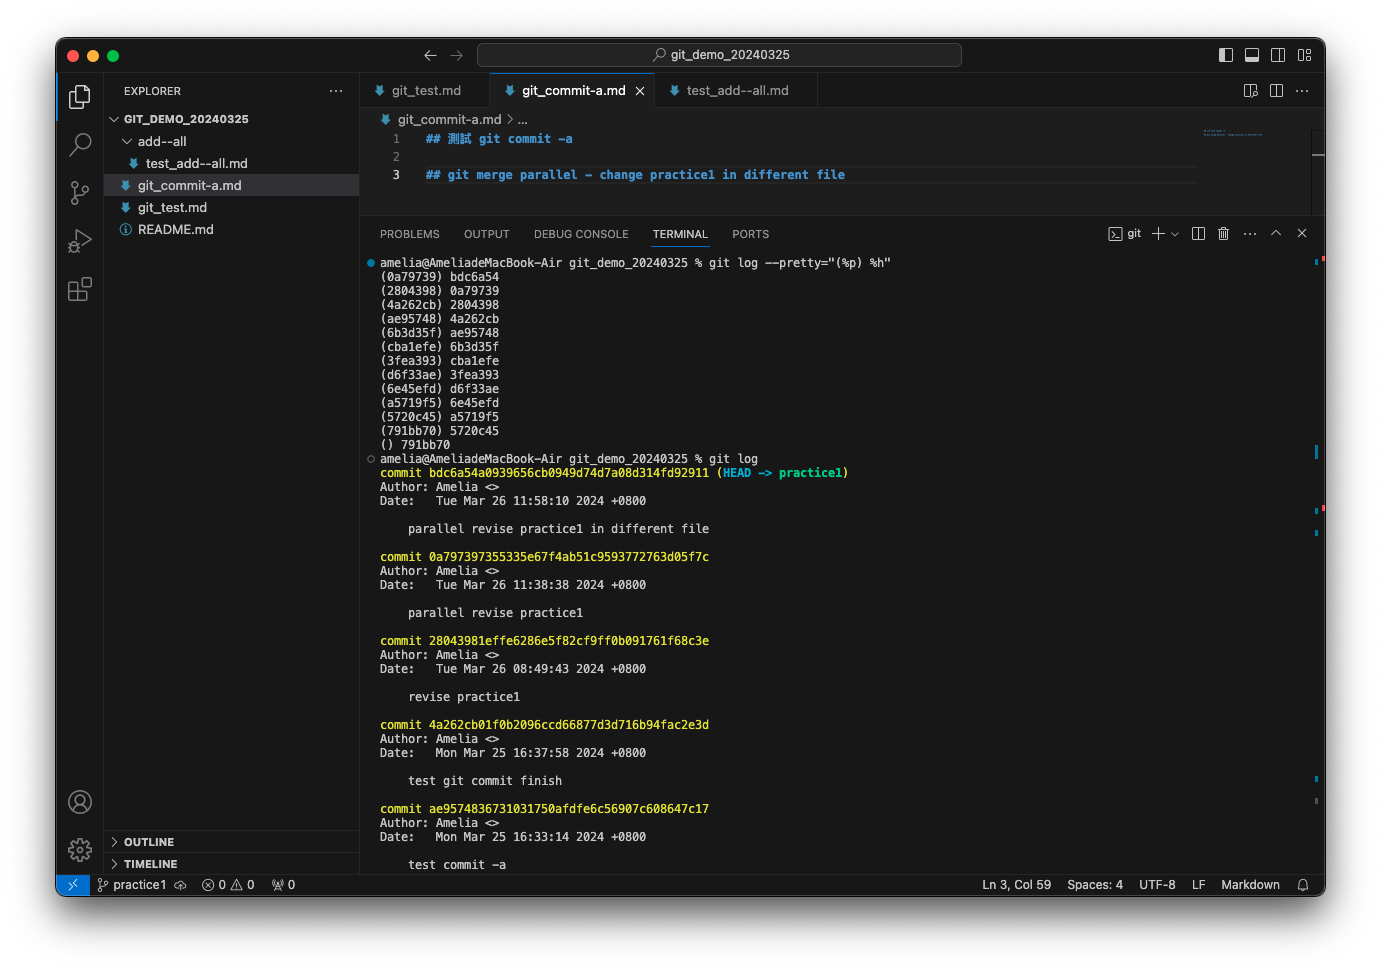
由 git log 可得知目前 main (HEAD) 和 practice1 為平行關係,parent commit 皆為 "0a79739",而 practice1 branch 中的 git_commit-a.md 檔案多了一行 “## git merge parallel - change practice1 in different file”
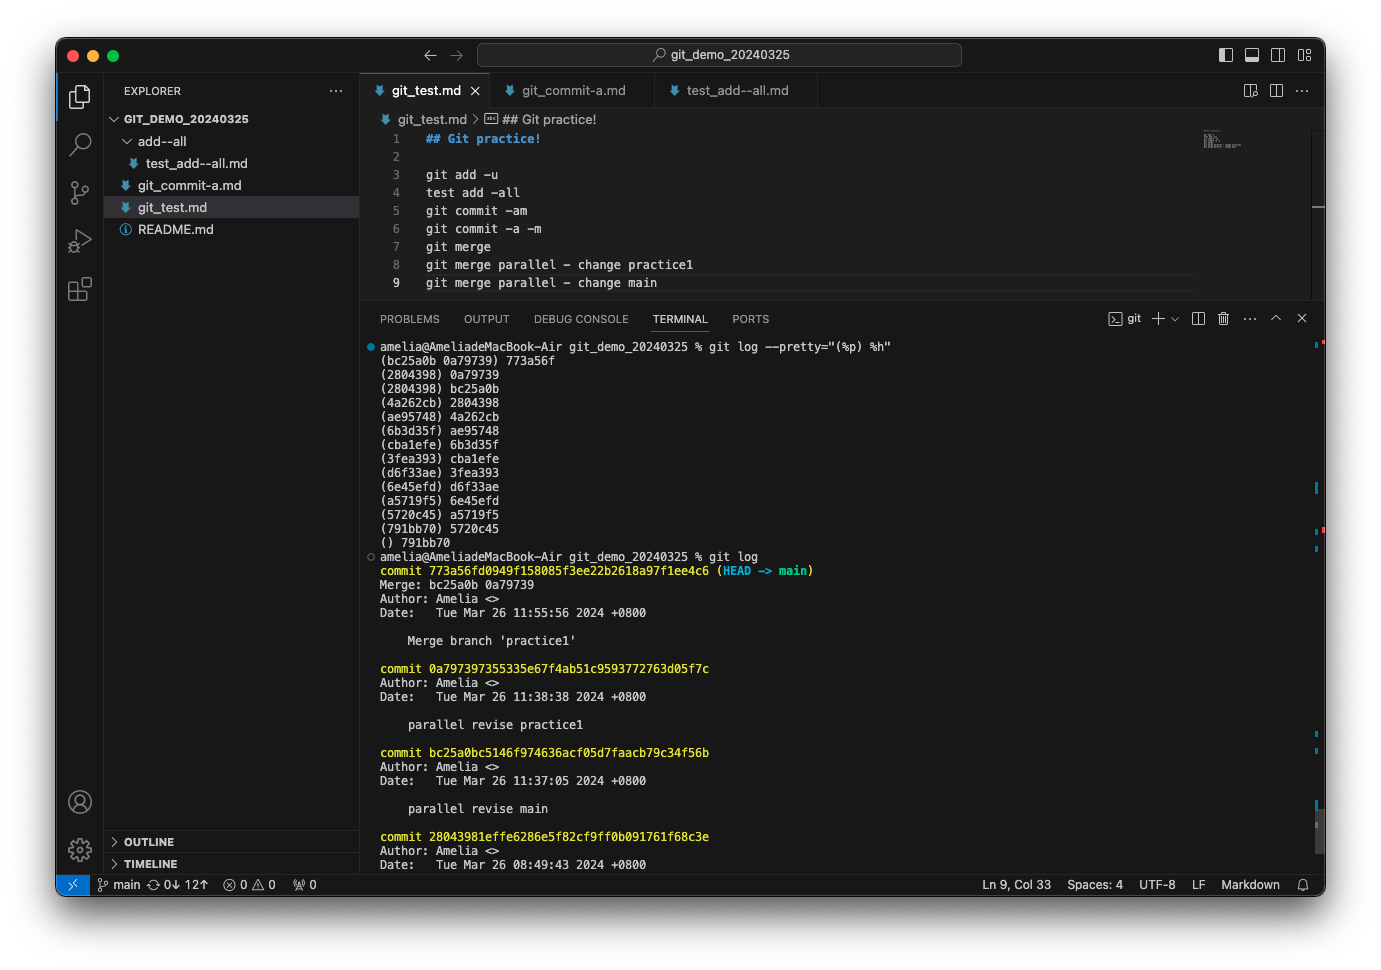
在執行以下指令之後:
可以看到 main 合併了 practice1 的修改,創建了新的 commit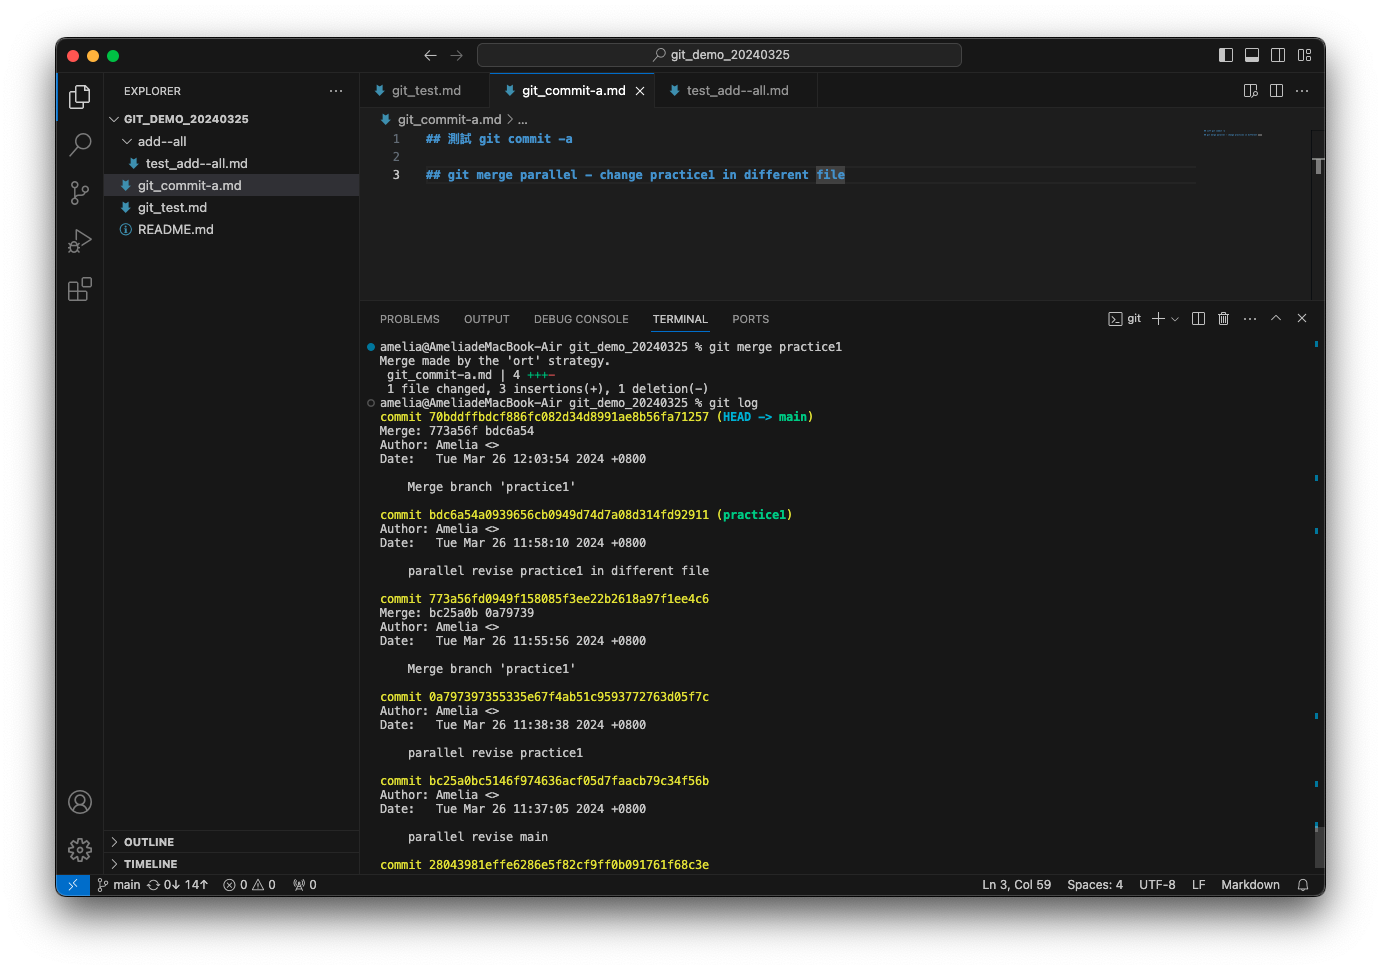
透過執行:
可清楚看到原 main 所在的 commit (773a56f) 以及 practice1 所在的 commit (bdc6a54) 都為現在 main 的 parent commit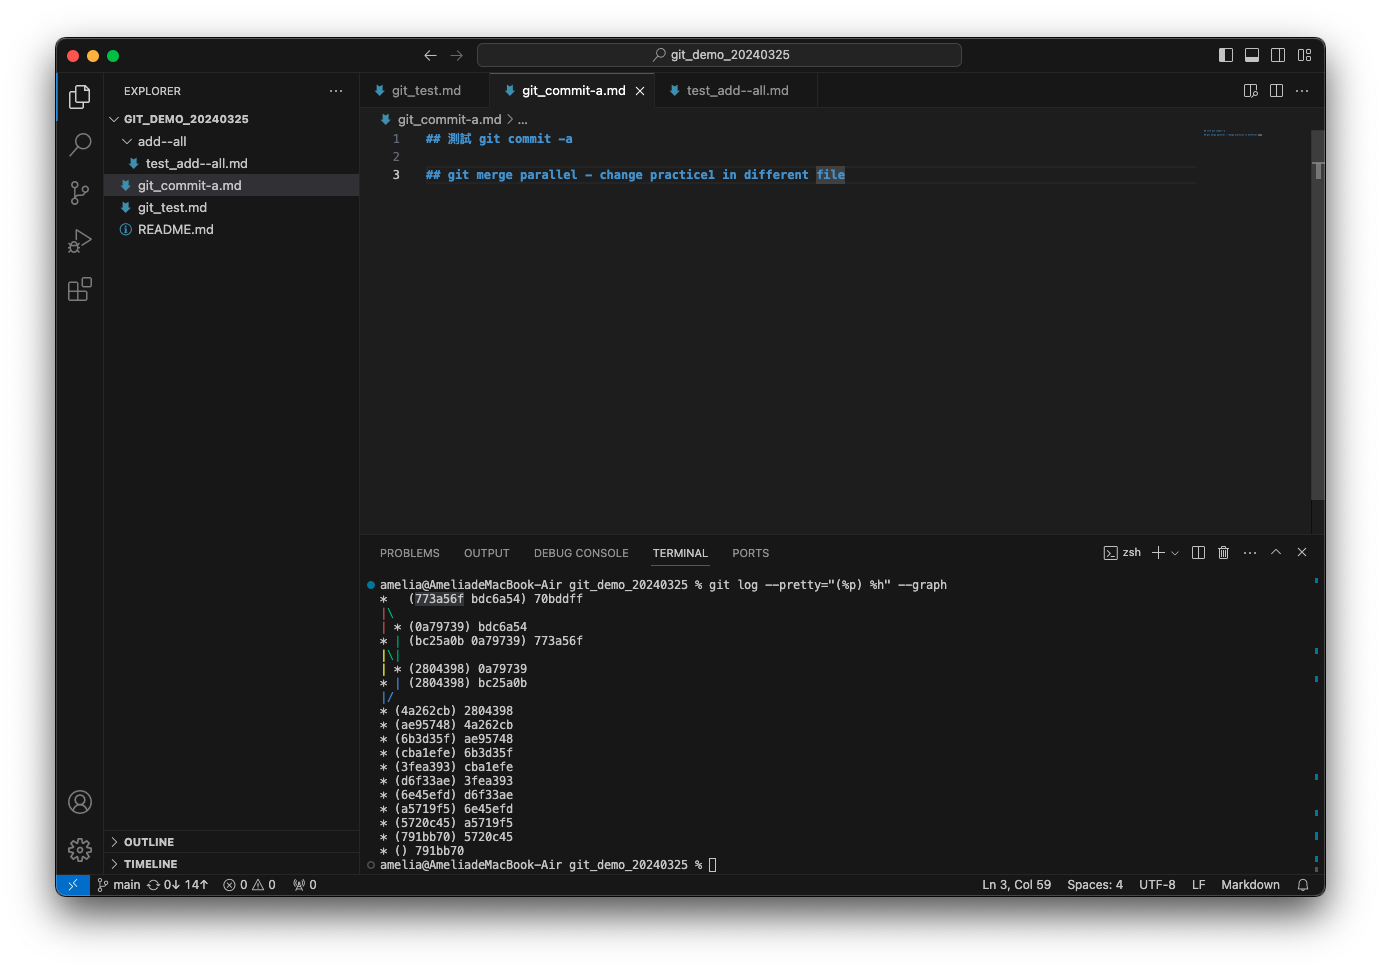
Merge Conflicts
若有兩個 commit 的修改包含同一行 code 時(如:main 及 practice2 皆 修改了 git_test.md 的第 10 行,practice2 還有另外修改 git_commit-a.md),在執行 git merge 時會出現 Merge Conflict 的情況(目前 HEAD 為 main)
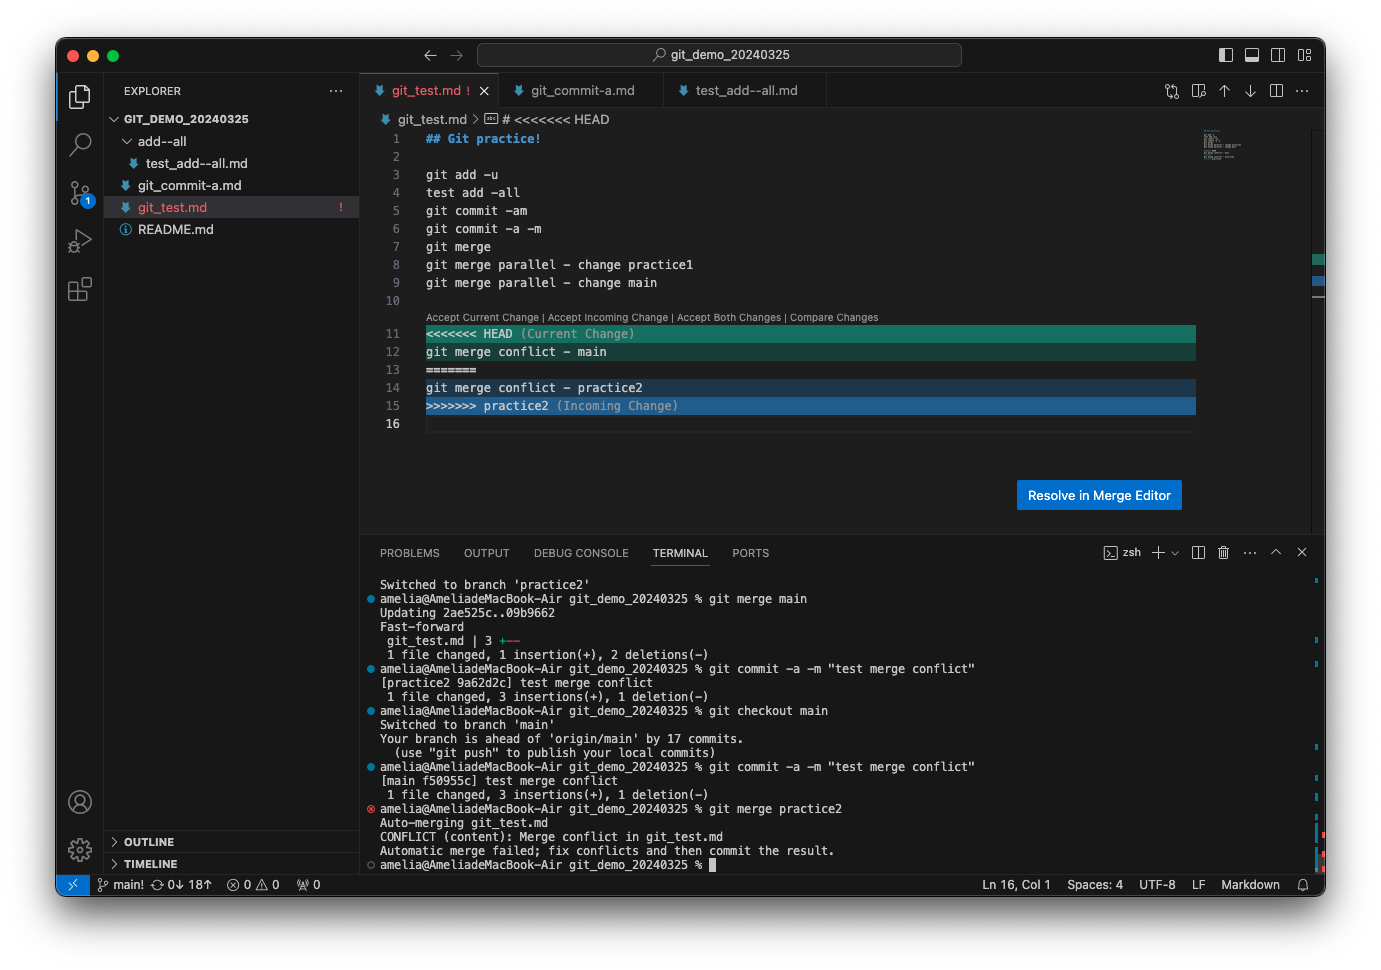
可透過以下方式解決:
-
vs code 提供的畫面可選擇衝突之處 Result 要保留哪個檔案的修改,或是兩者皆保留
保留 main:(此次選擇)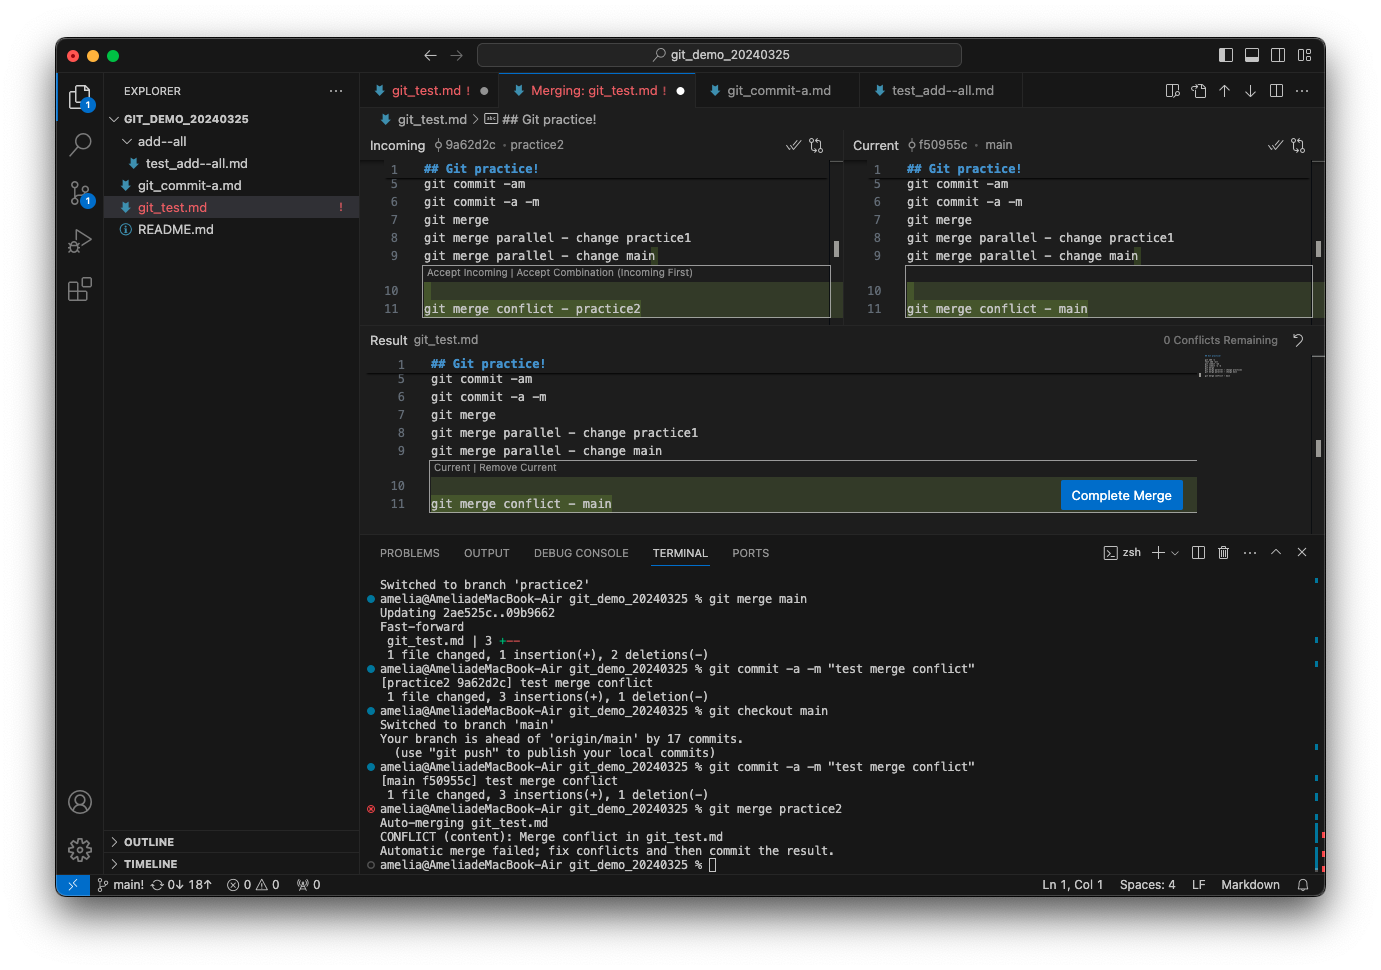
兩者修改皆保留:
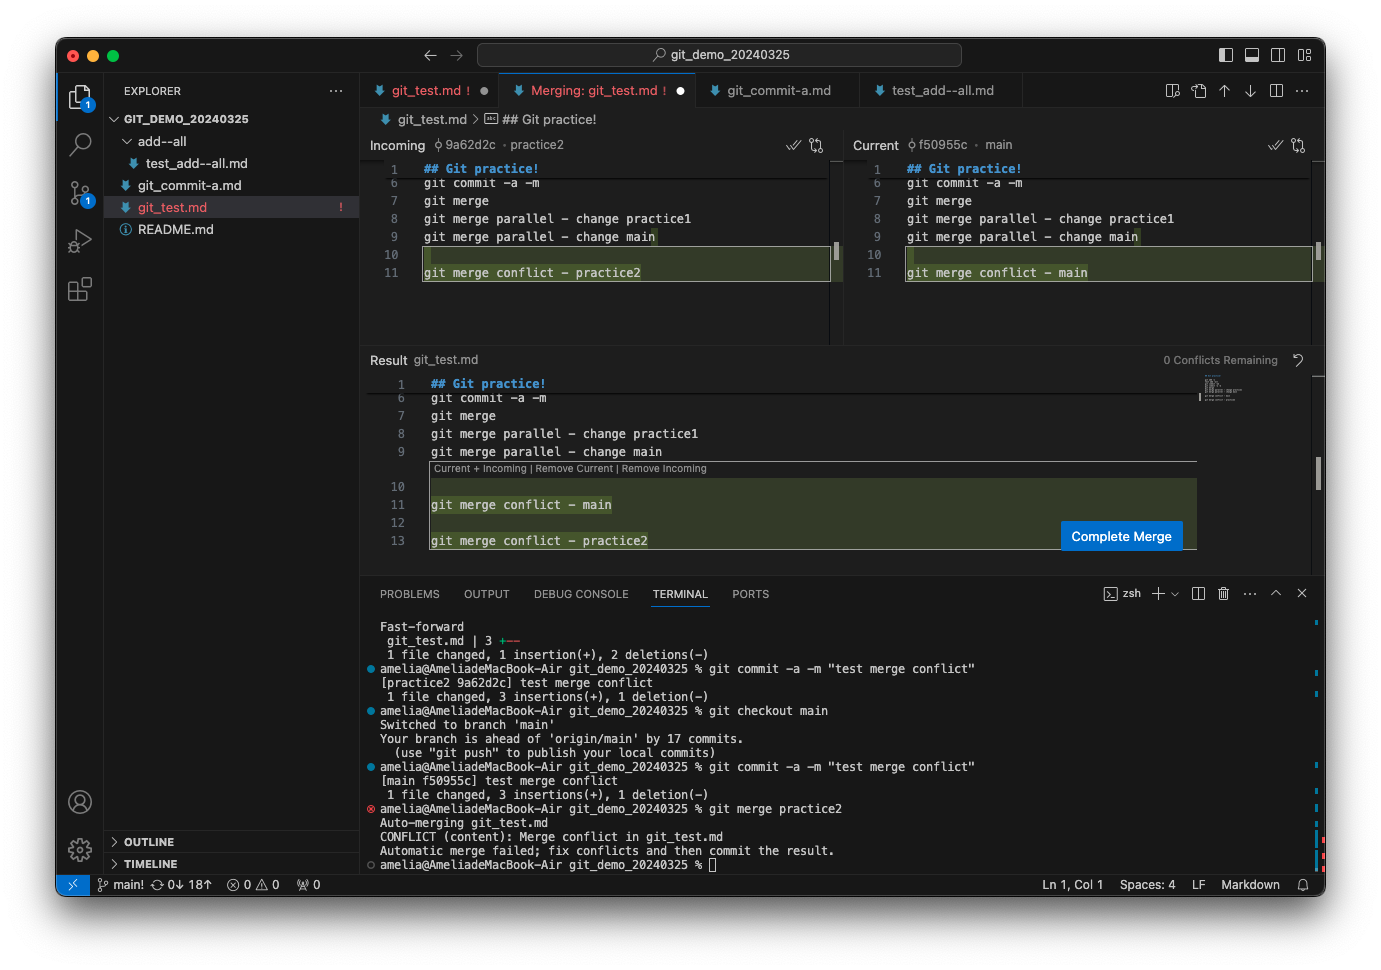
選擇後因 practice2 還有針對 git_commit-a.md 的修改,在 main 還要再 commit 一次

-
在出現 merge conflicts 情況後,輸入以下指令取消 merge:
將 merge 衝突處修改後再重新執行 merge。
-
-
git rebase "欲接上 commit 的目的地 branch":
Merge branch 的第二種方法,其為取出一連串的 commit 並複製他們,將他們接在別的地方。
注意!HEAD 要在欲複製 commit 歷史的 branch 上。- 優點:建立更線性的 commit history,使 commit log 或是 commit history 更加簡潔易查閱。
- 缺點:影響 commit 的真實歷史紀錄。
- -i:操作 commit 順序
merge vs rebase
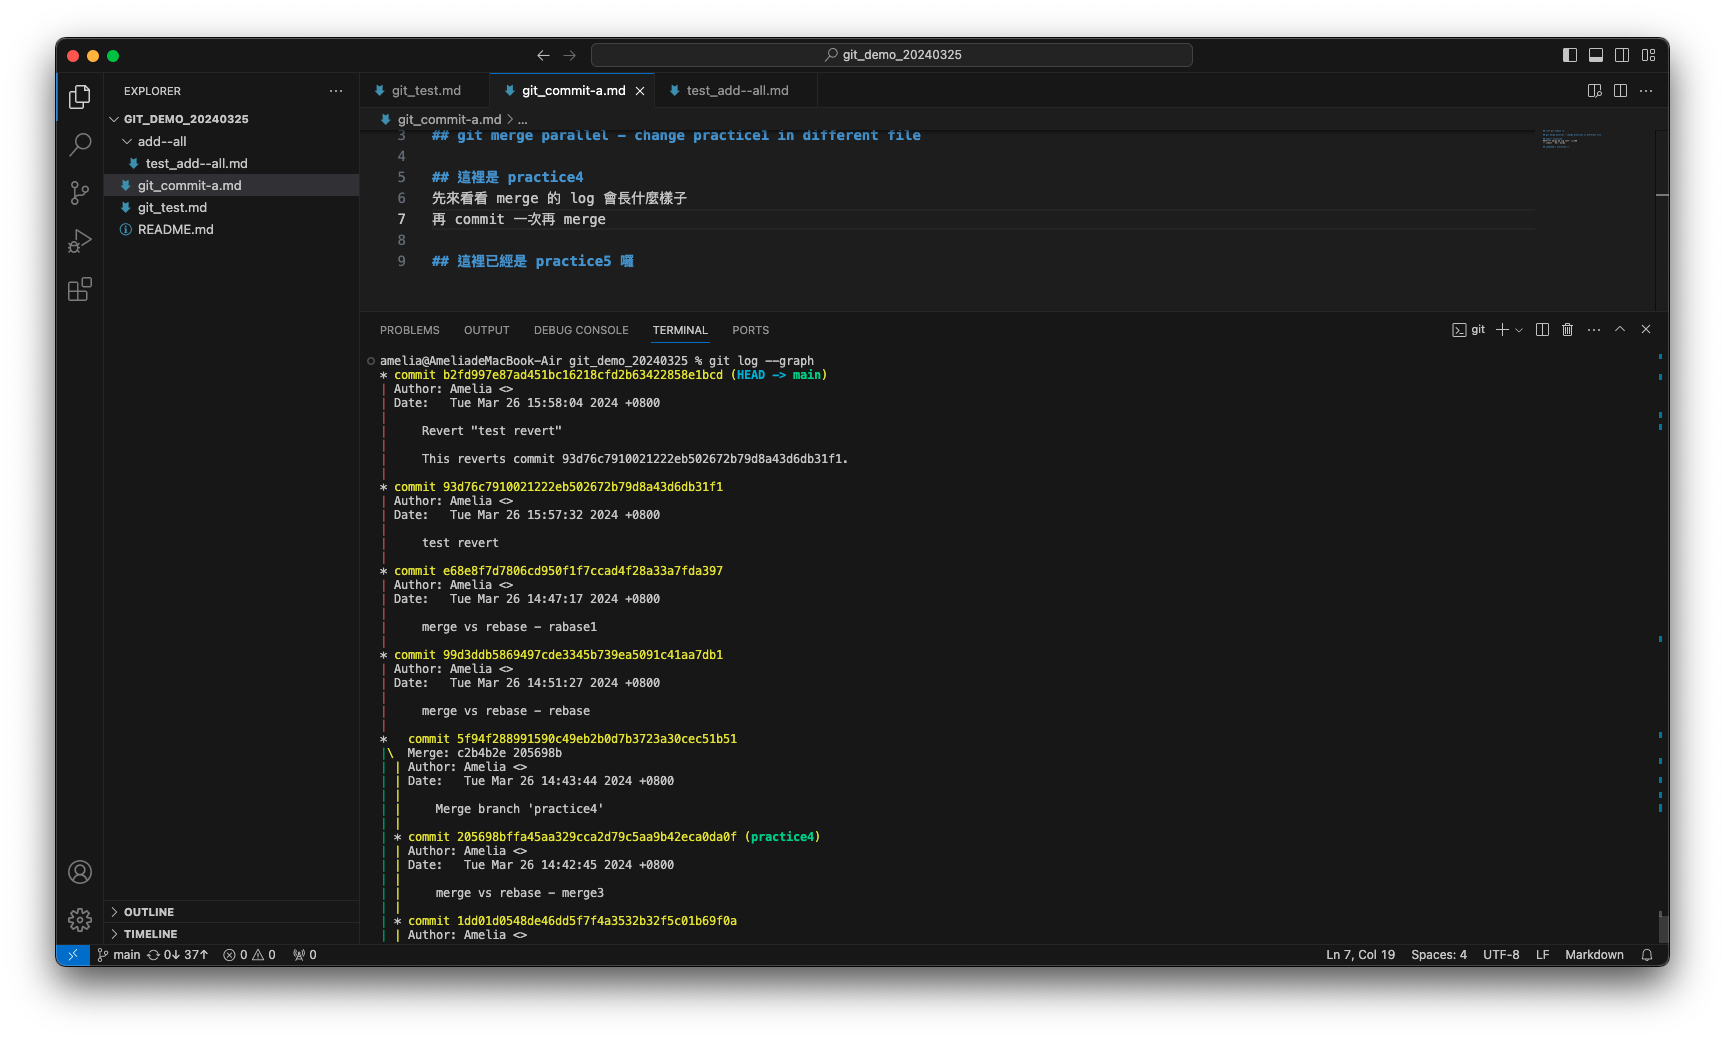
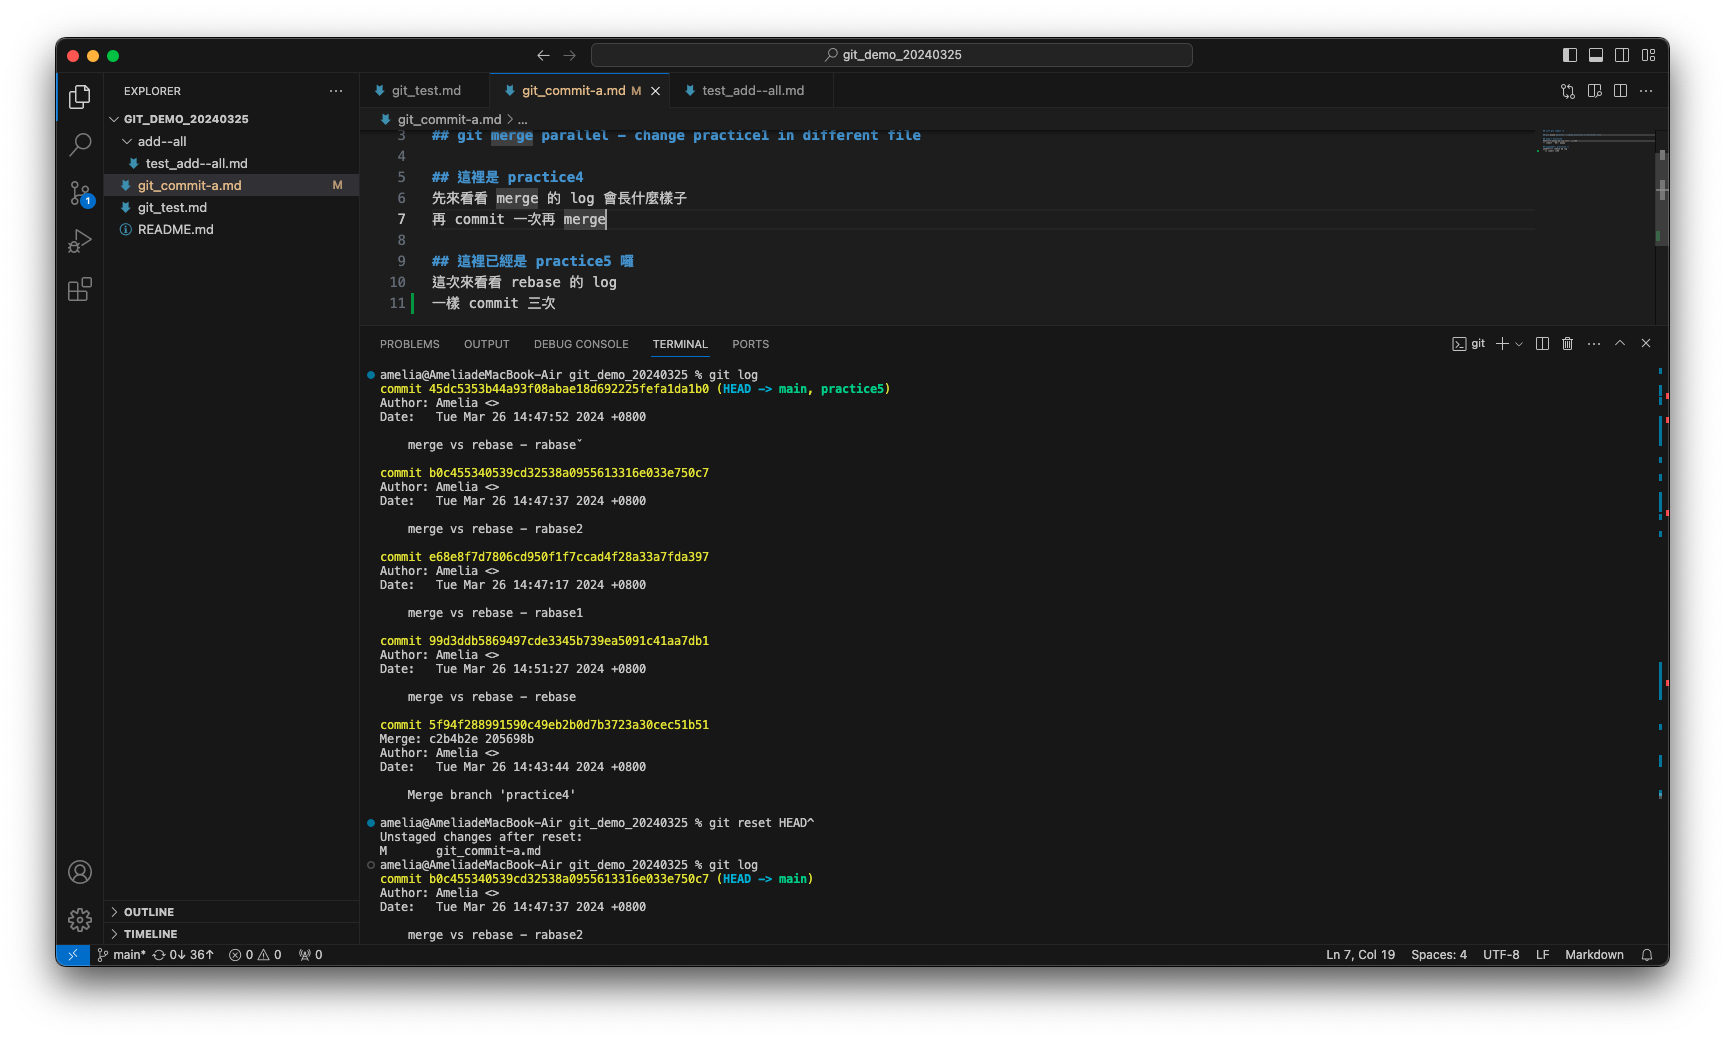
讓我們先來看看 merge:
main 及 practice4 兩者針對不同檔案進行修改,main commit 1 次,practice4 commit 3 次。HEAD 在 main 時執行 git merge practice4,後續使用 git log 查看,可以發現 merge 後是創建了一新的 commit (5f94f28),包含了 main (紅線) 及 practice4 (綠線) 的修改,並 main 指向新的 commit。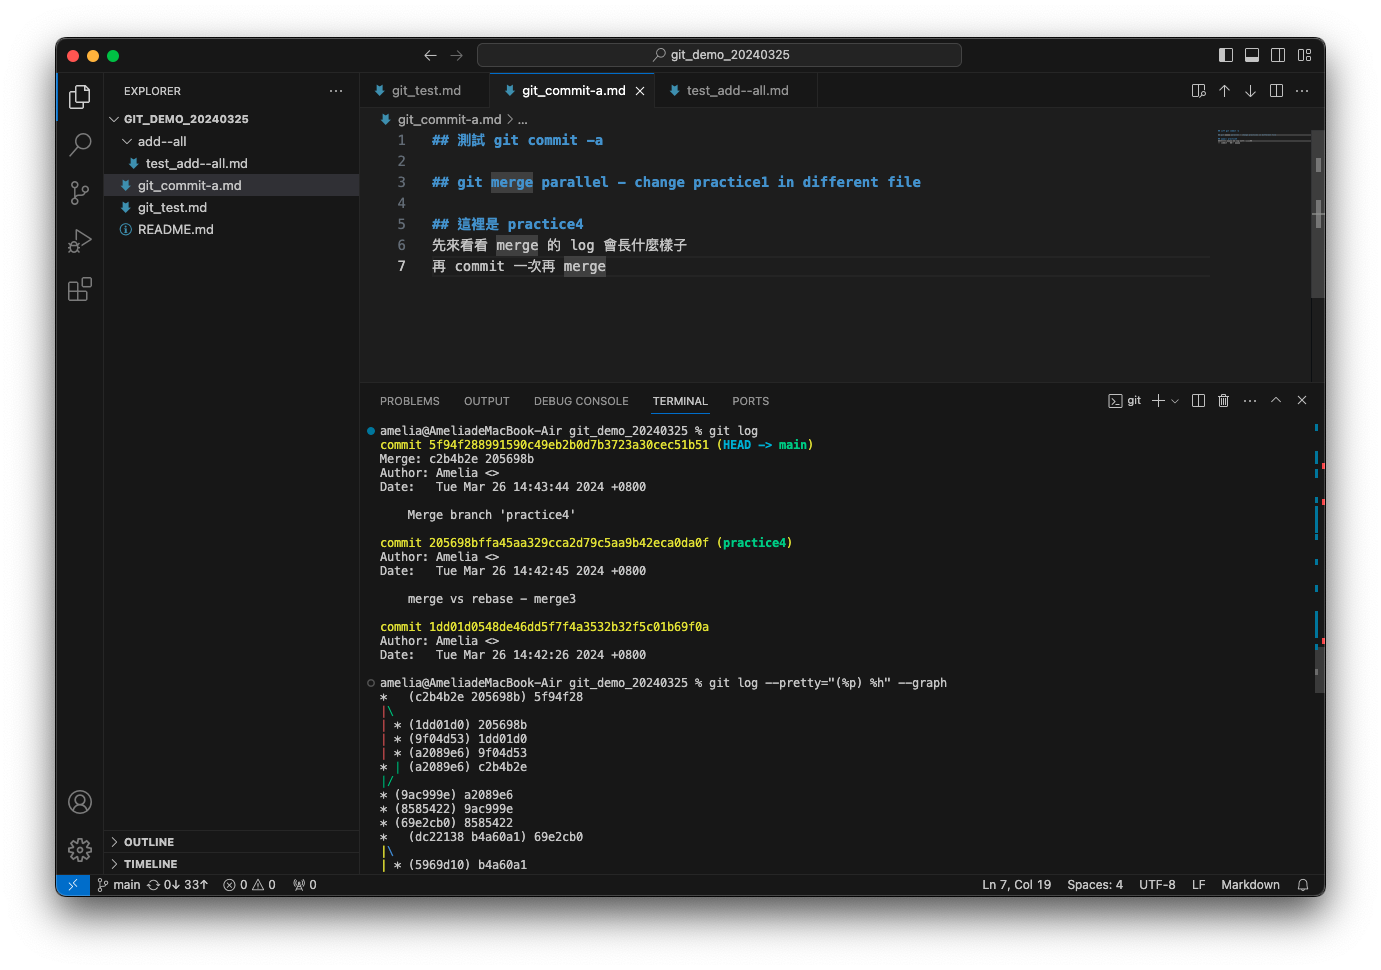
再來看看 rebase:
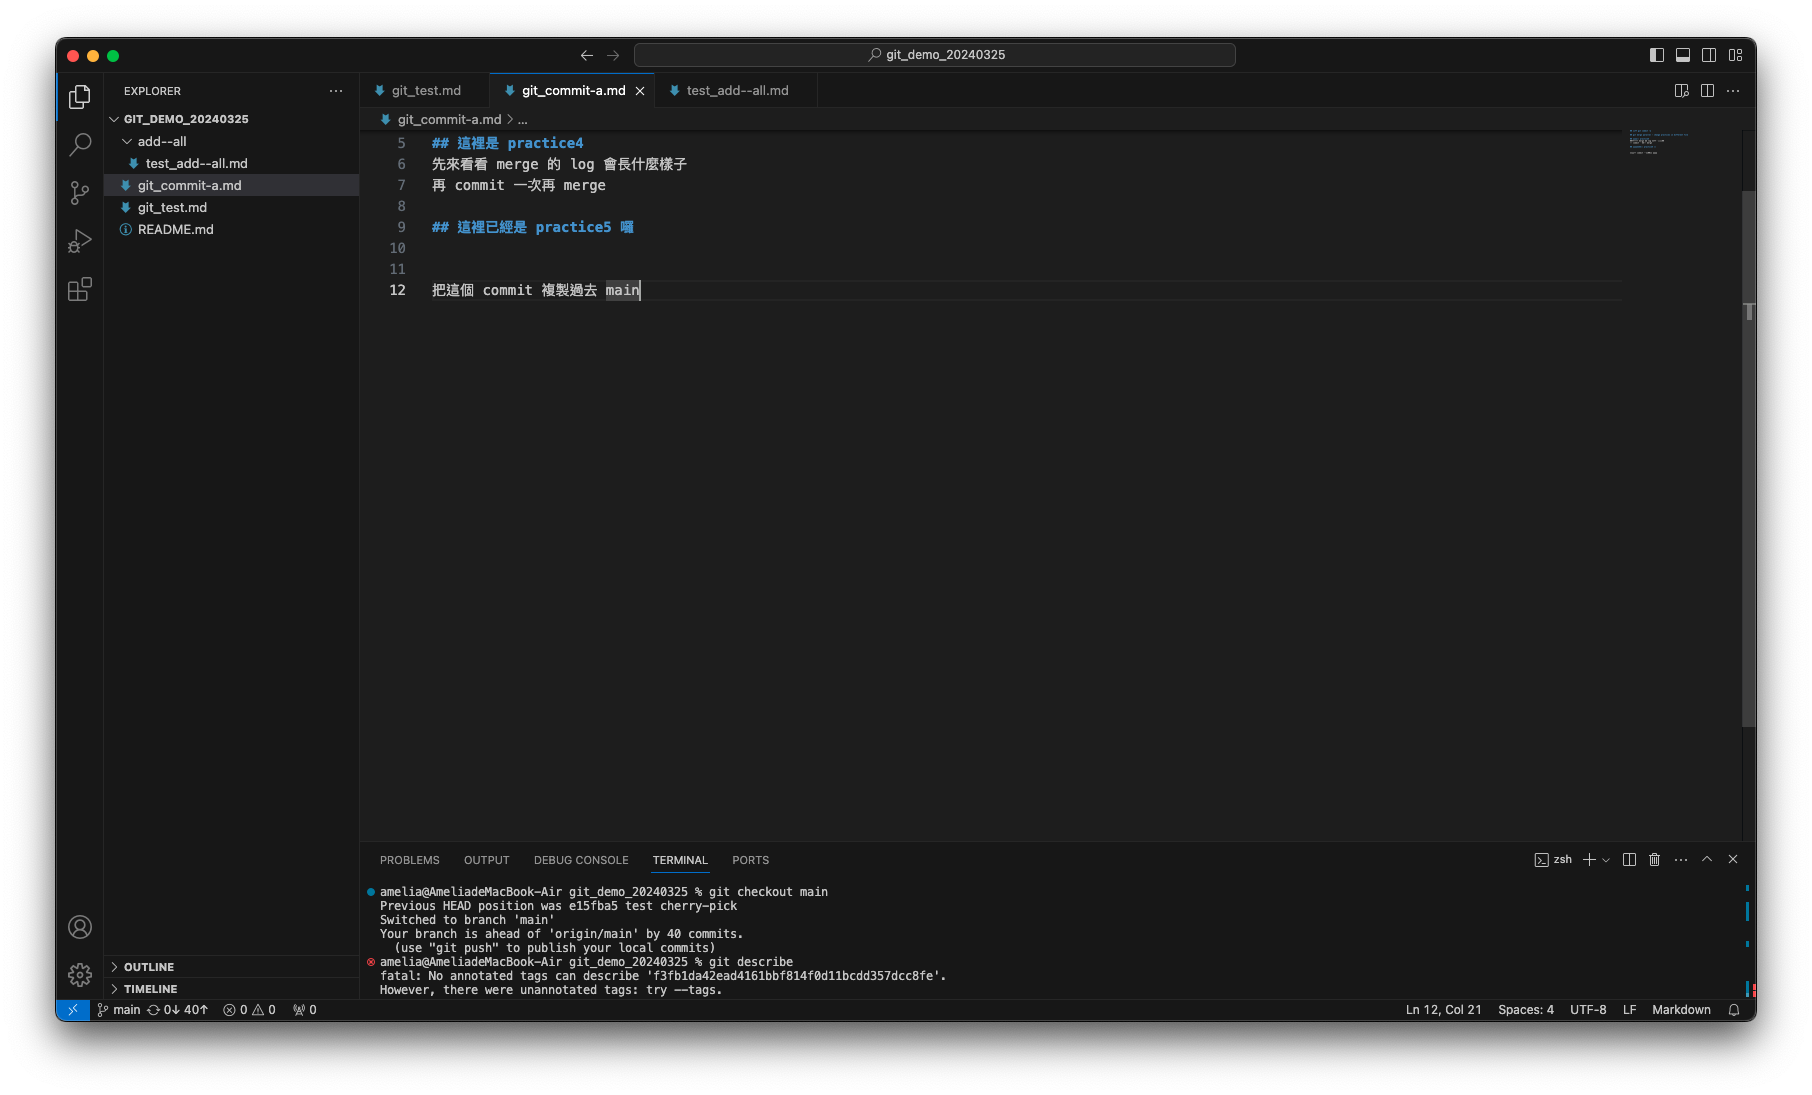
main 及 practice5 兩者針對不同檔案進行修改,main commit 1 次,practice5 commit 3 次。HEAD 在 practice5 時執行 git rebase main,後續使用 git log 查看,可以發現 rebase 的效果不像 merge,會有分支岔開,而是直接將 practice5 的 3 次 commit 複製後接到 main 所在的 commit 後面(紅框處)。複製後的 commit 跟原先 practice5 的 commit 不同!有不同的 SHA-1 雜湊值!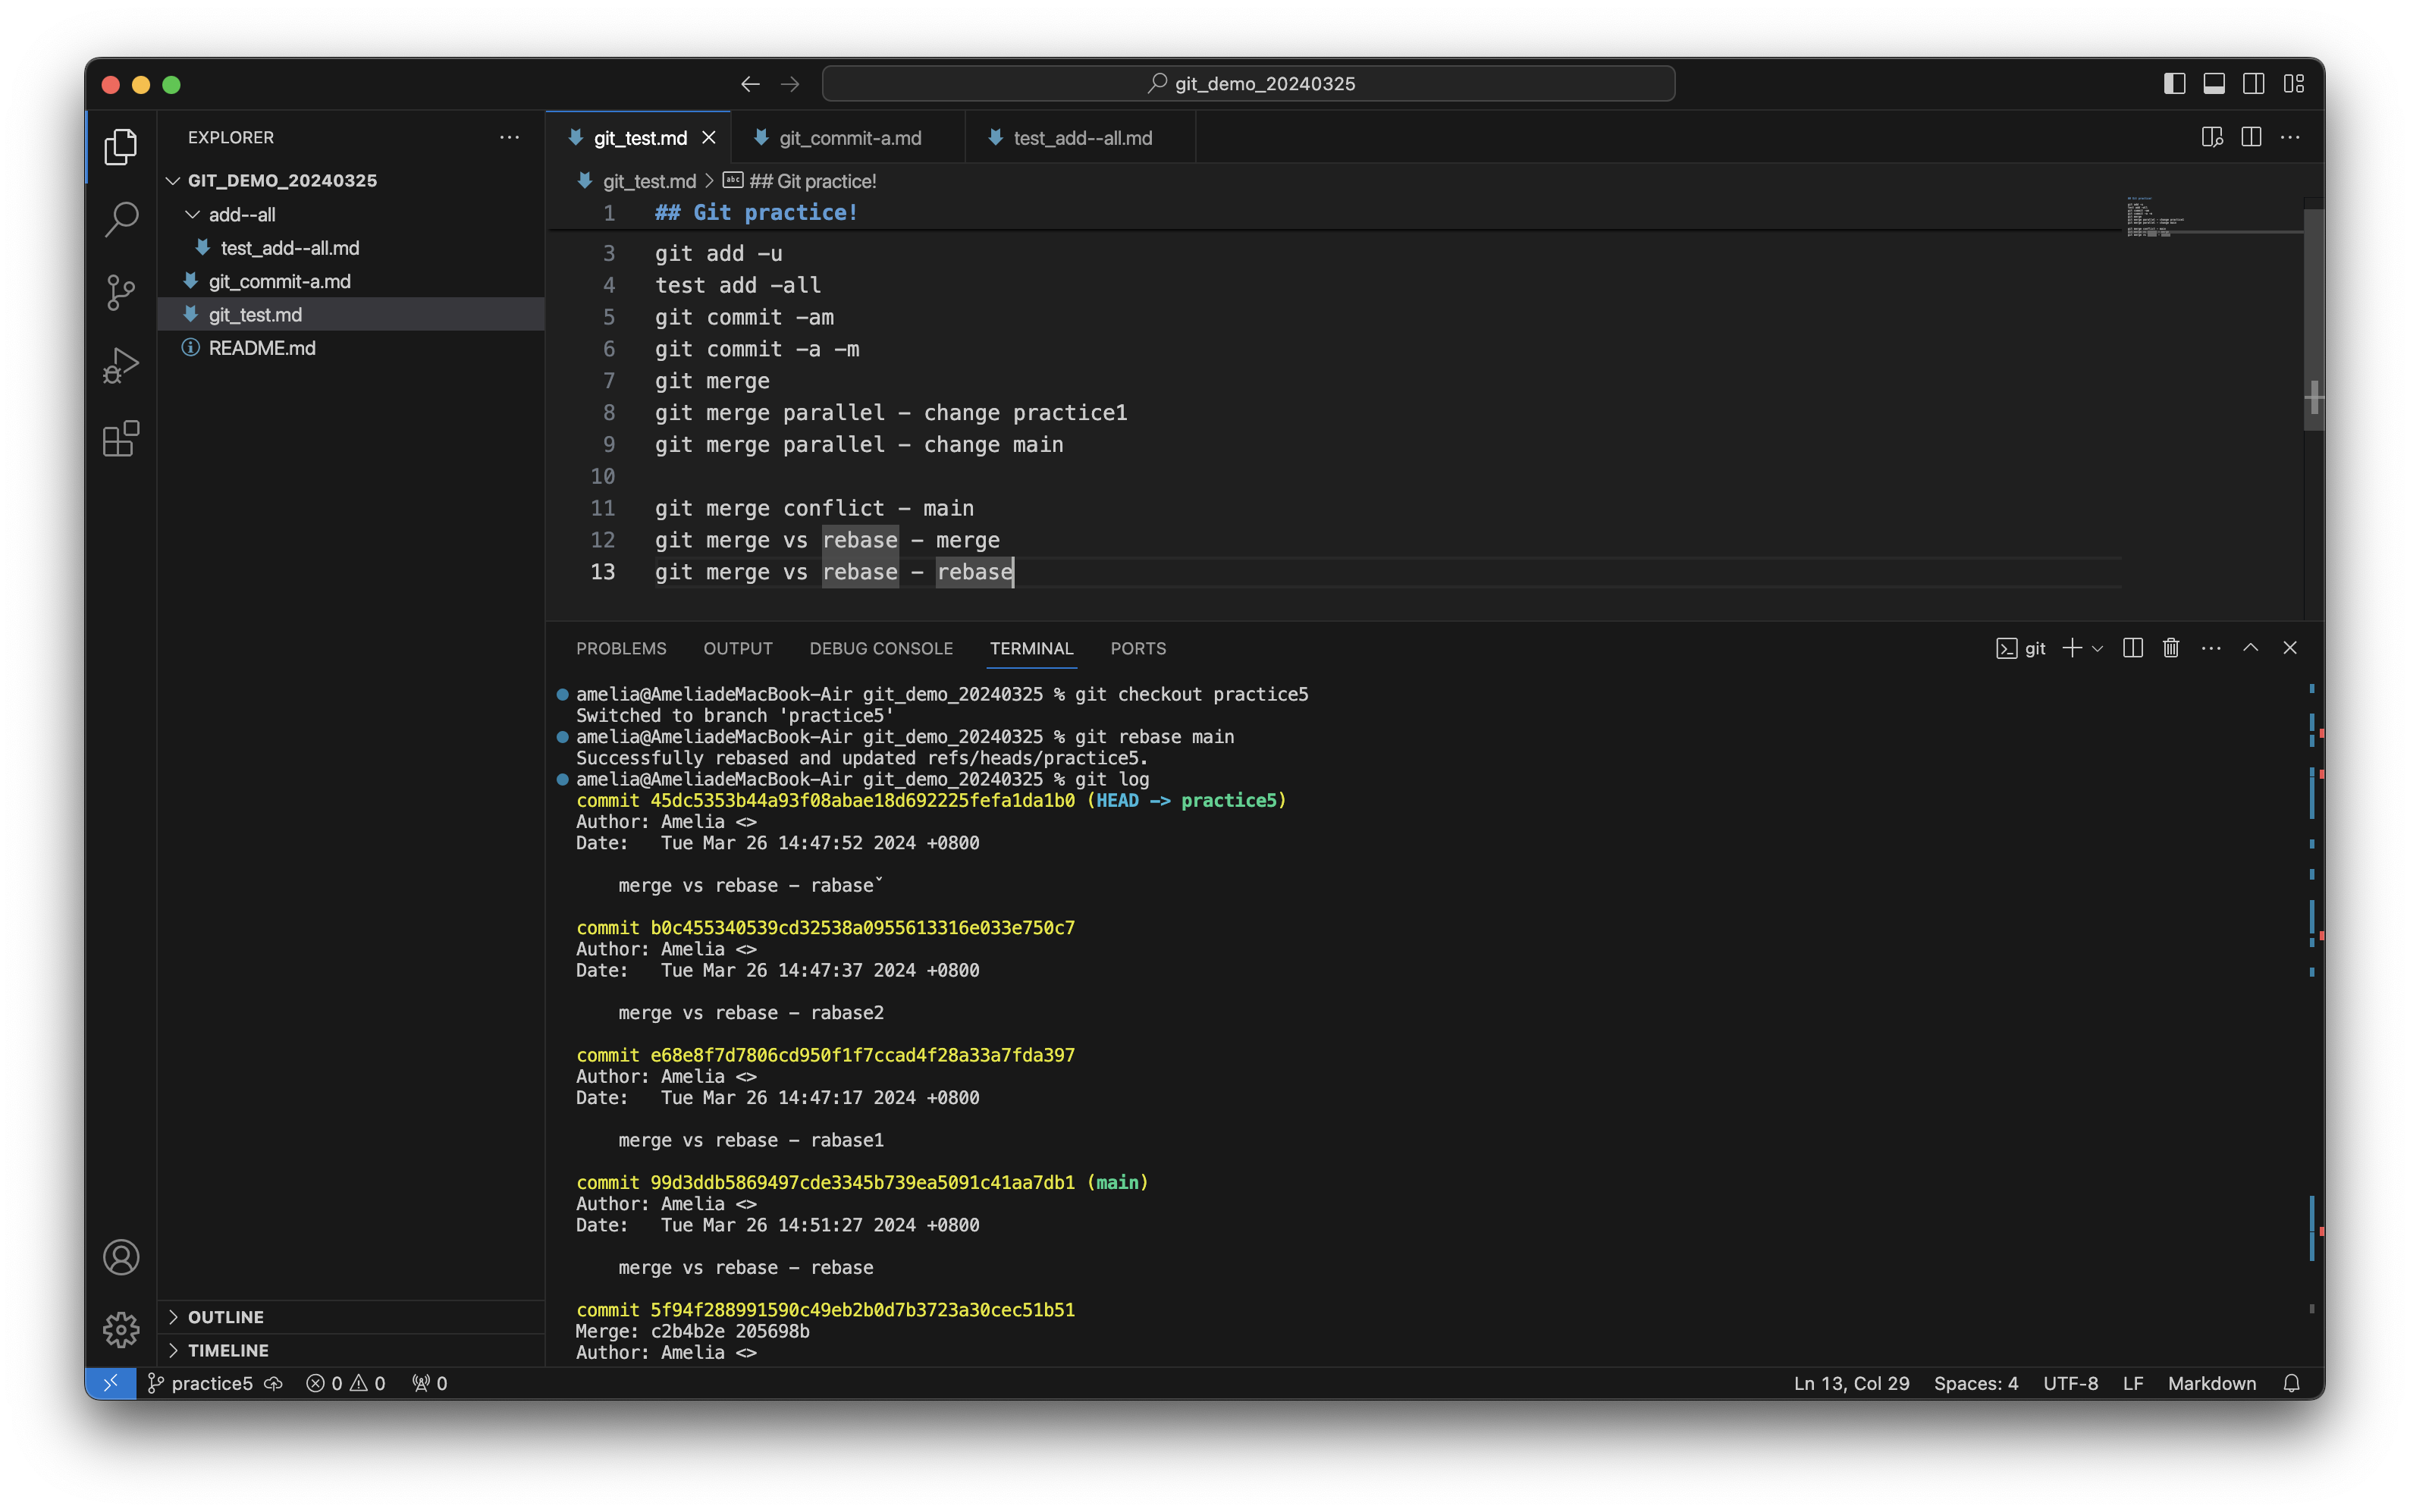
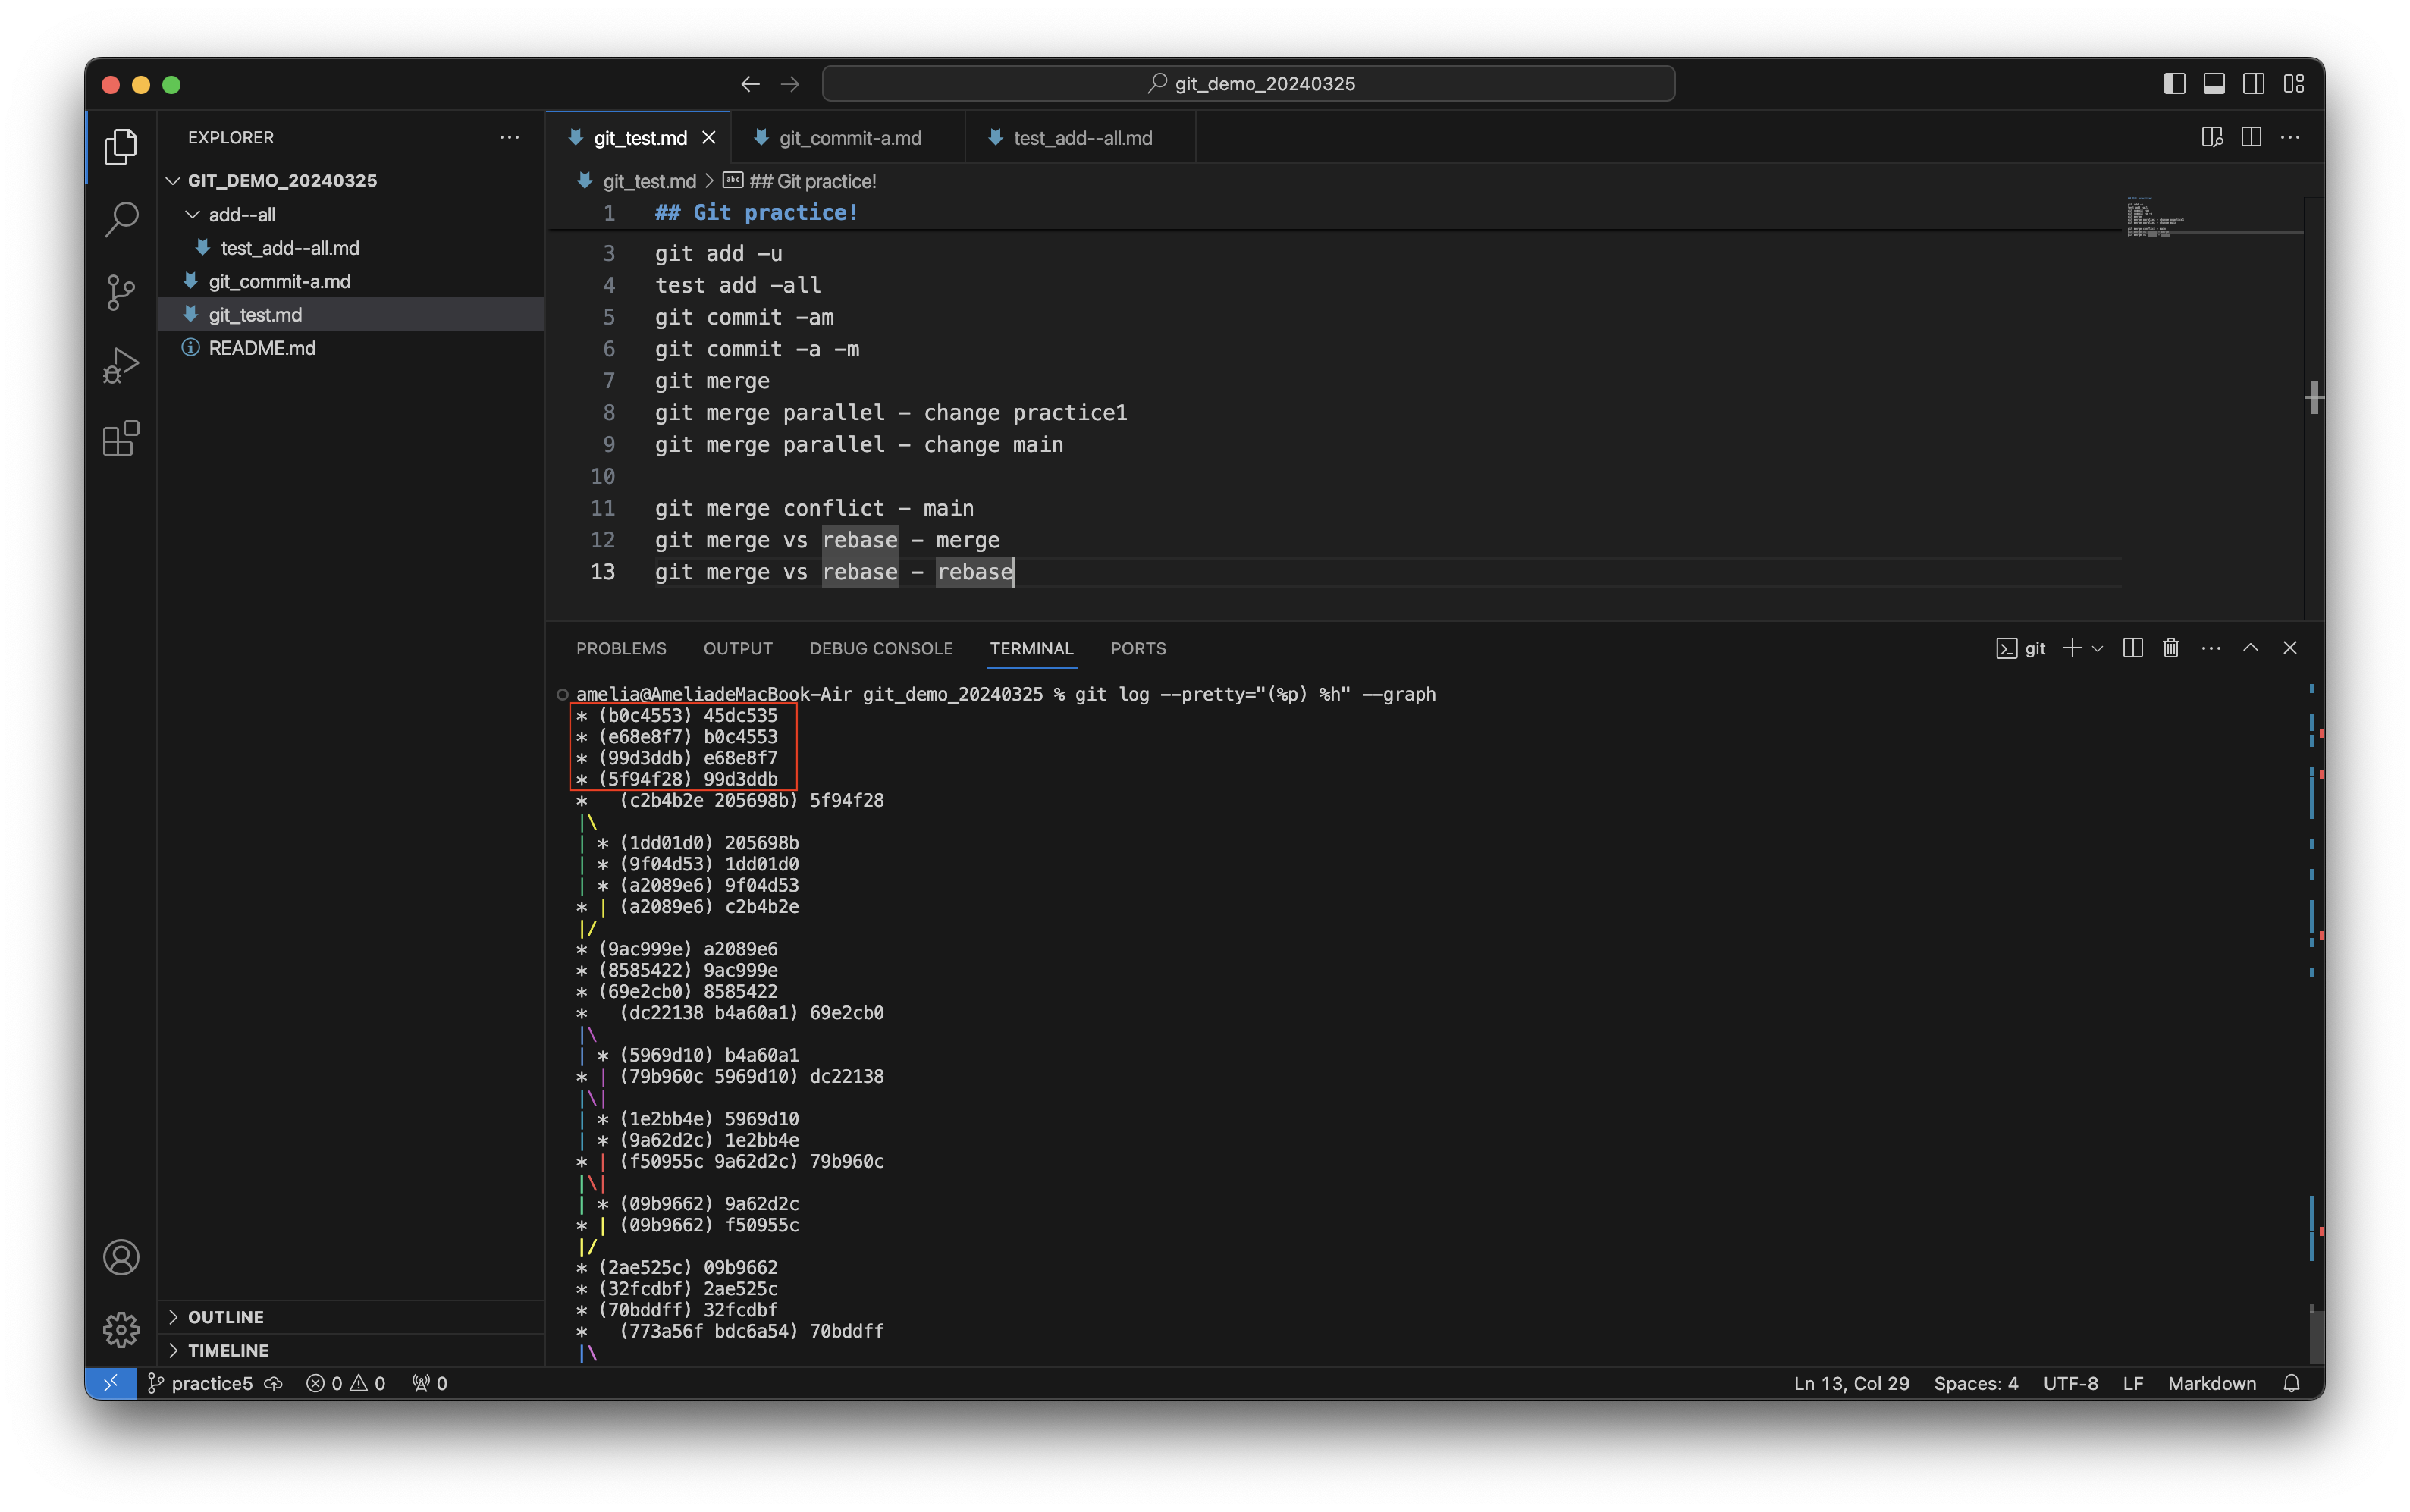
而目前 main 還在原來的 commit,需 git checkout main 後再執行 git rebase practice5。
因 main 為 practice5 的 parent commit,因此 git 會單純的將 main 移至 practice5 所指向的 commit。
-
git reset "指定 commit":
取消修改,將 branch 退回指定 commit 處,但對於 remote branch 無效。 -
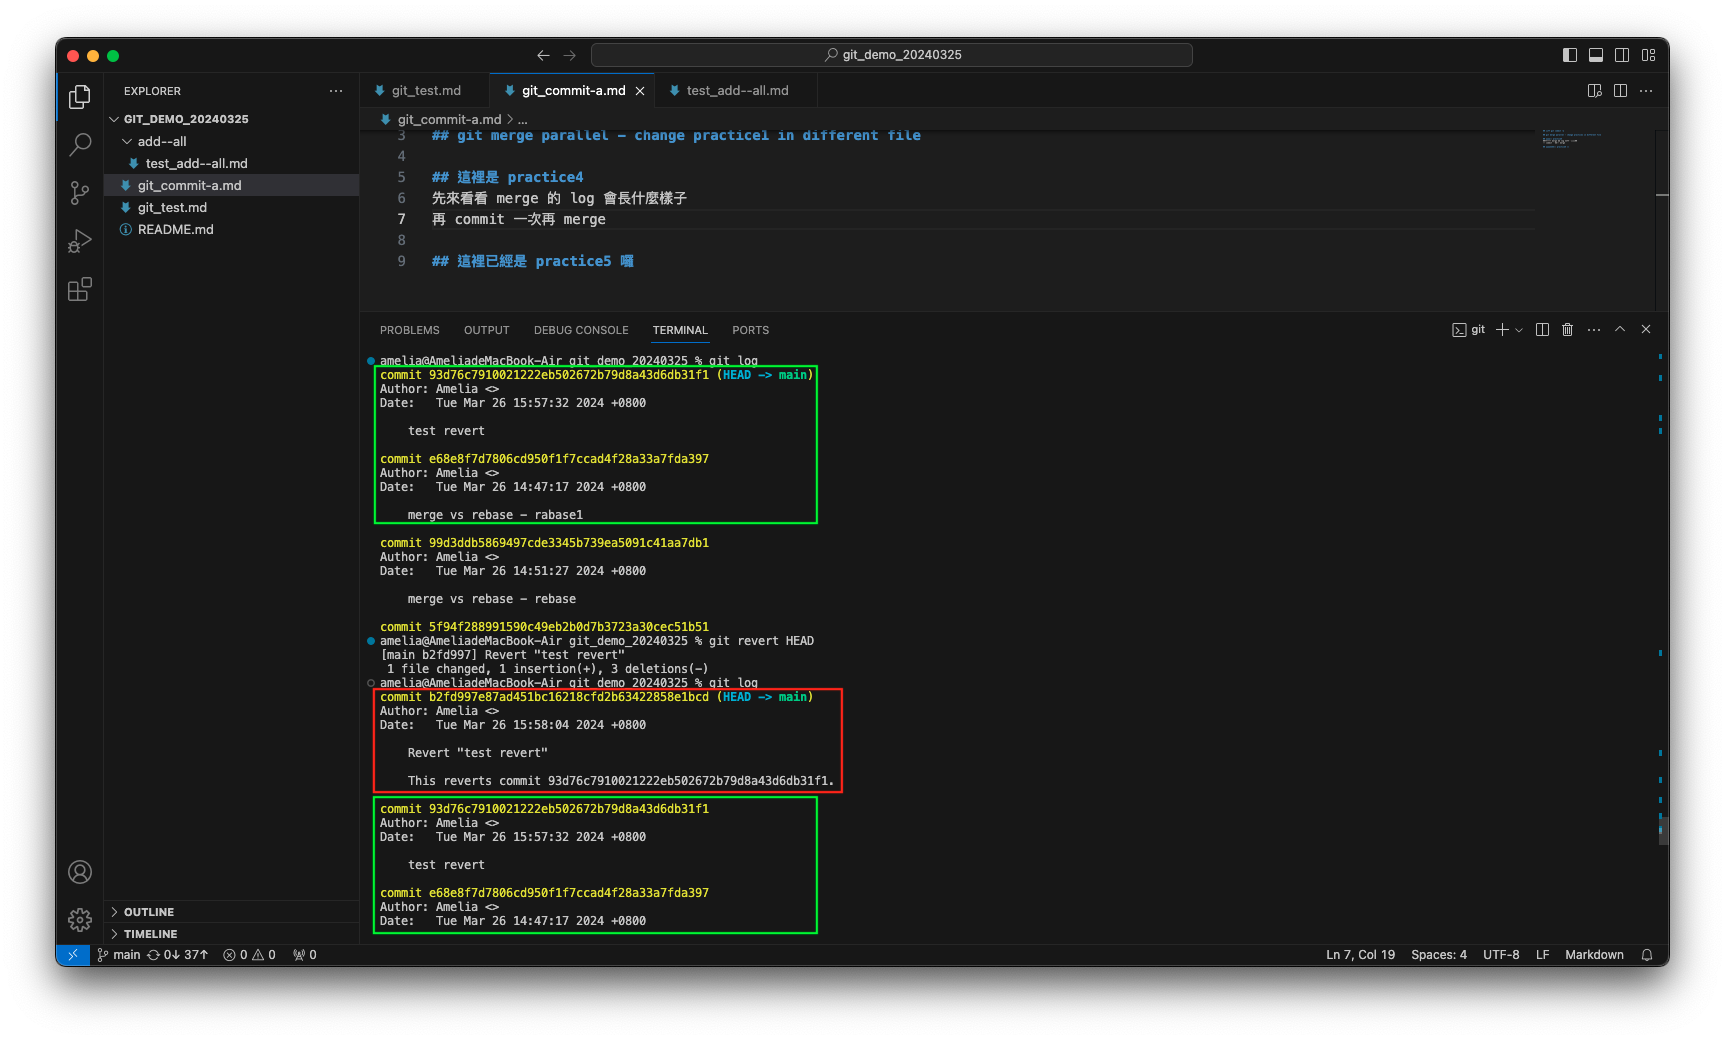
git revert "要取消的 commit":
取消指定 commit 的修改,其作用為創建一新的 commit,內容與想要復原的 commit 一致,因此可用於 remote branch。 -
git cherry-pick "欲複製的 commit":
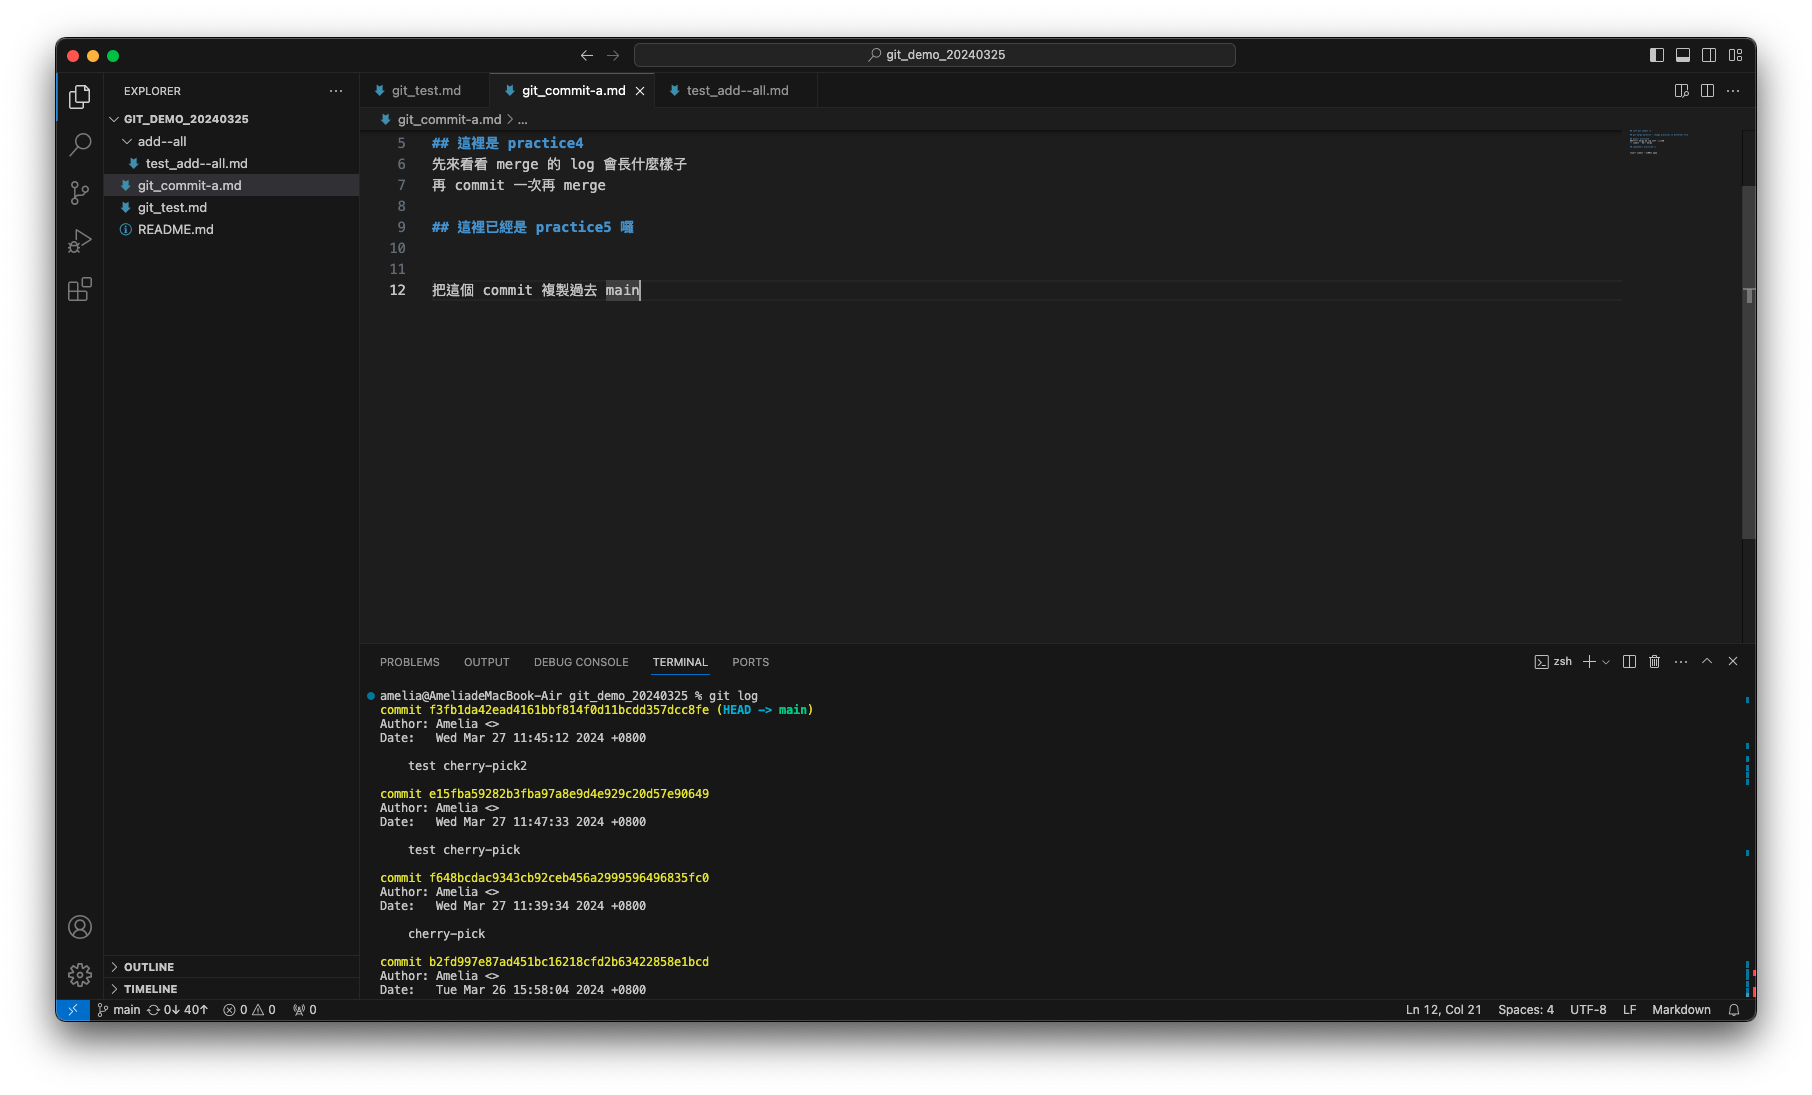
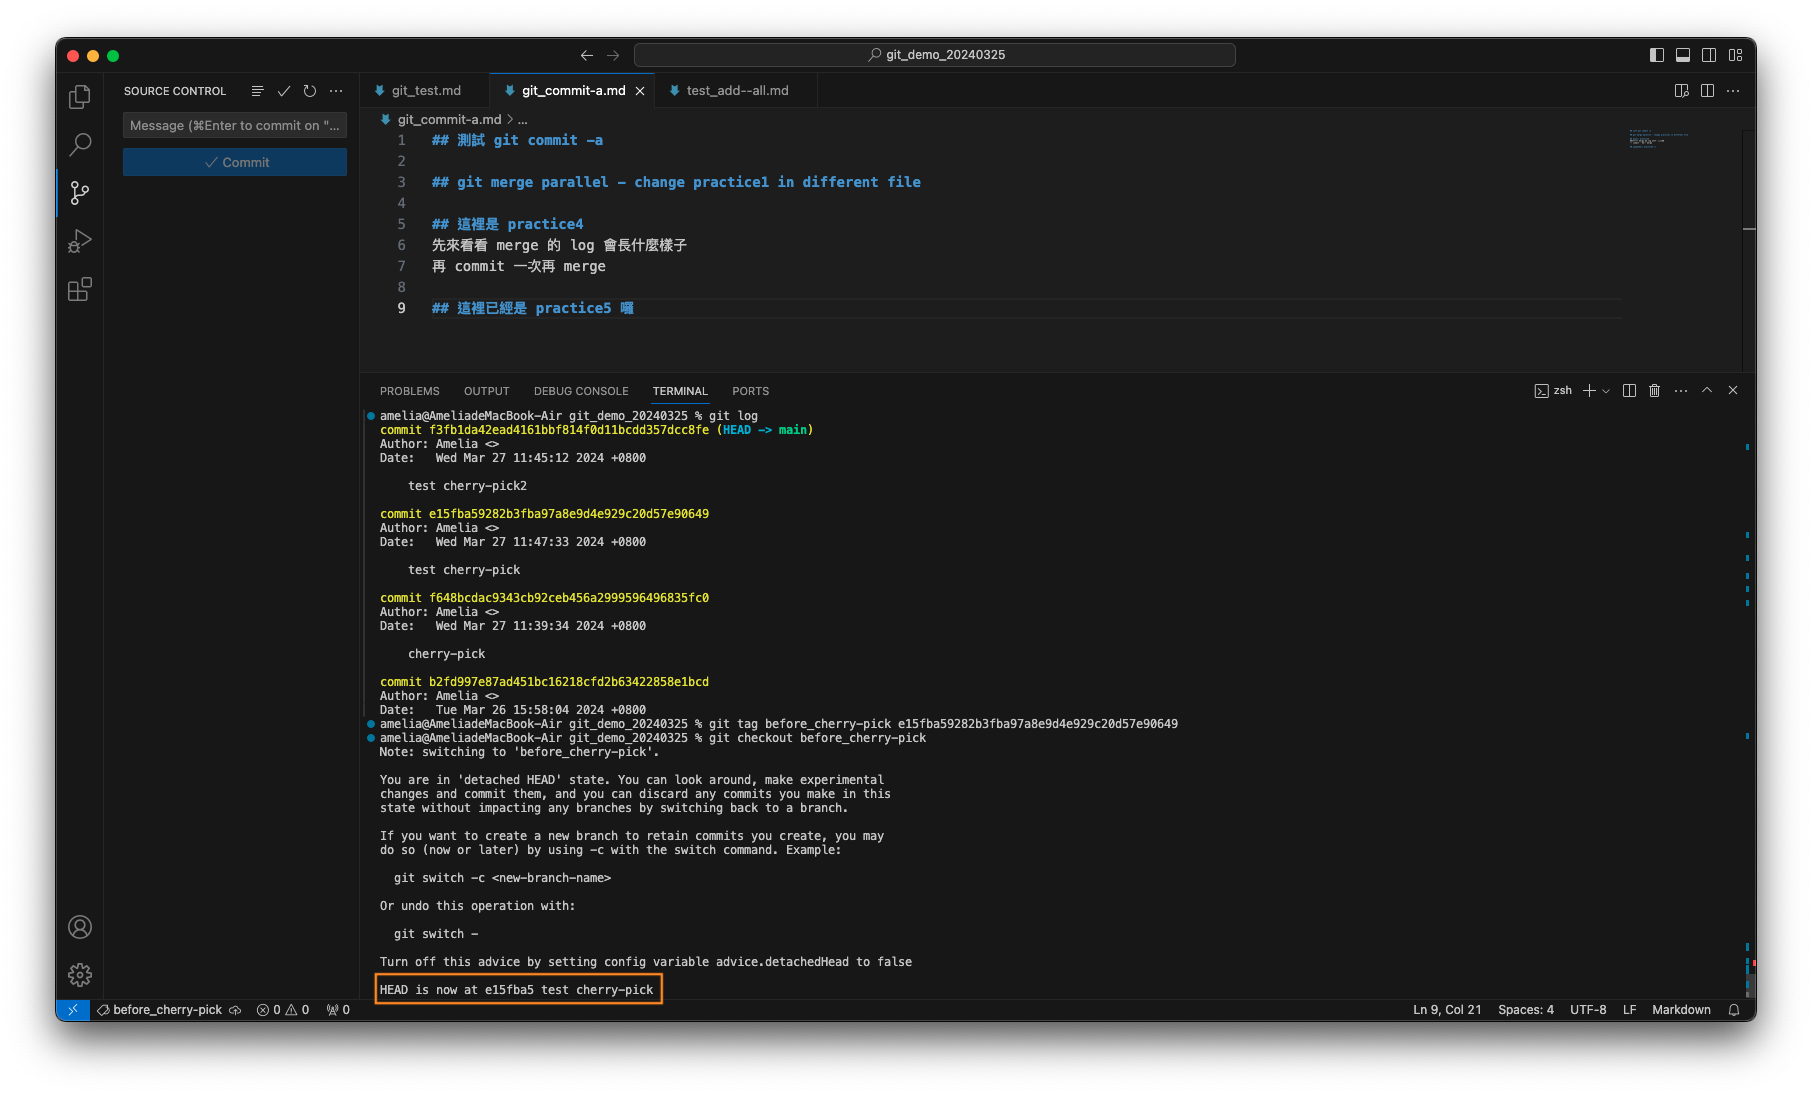
HEAD 切至欲接上複製 commit 的目標 branch。Example
創建一 practice_cherry-pick branch,並 commit 三次
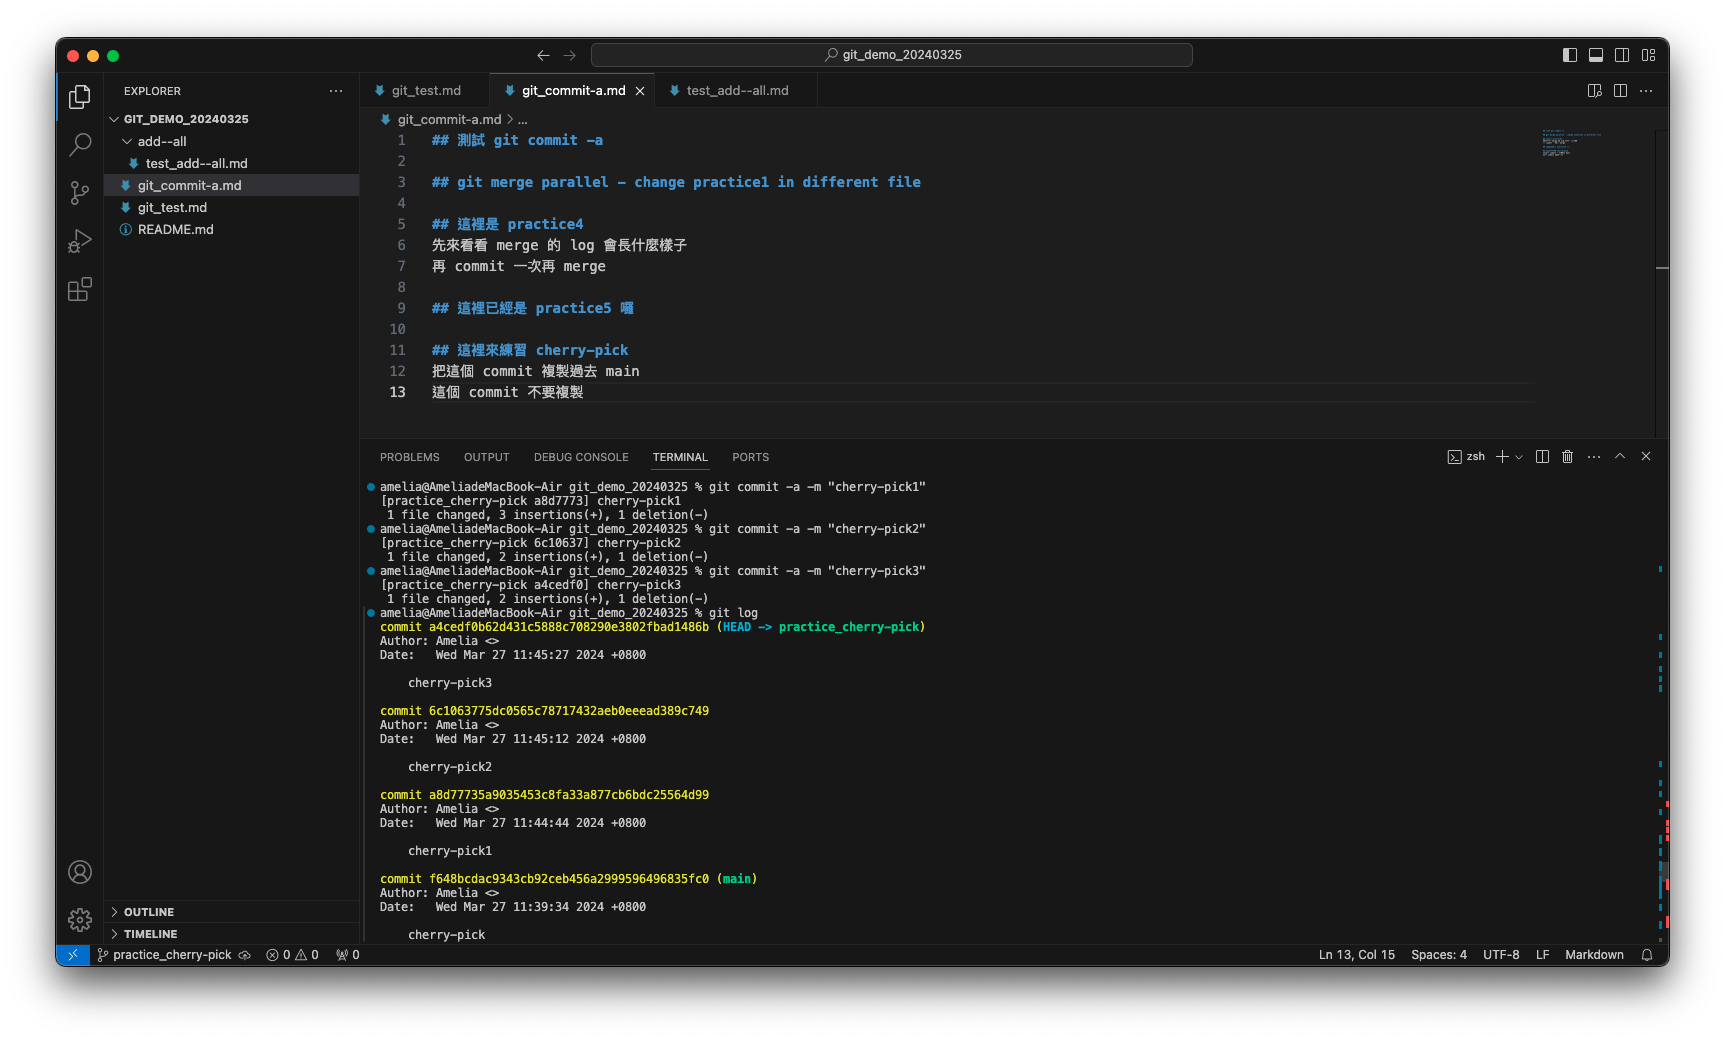
切換至 main 並 commit 一次
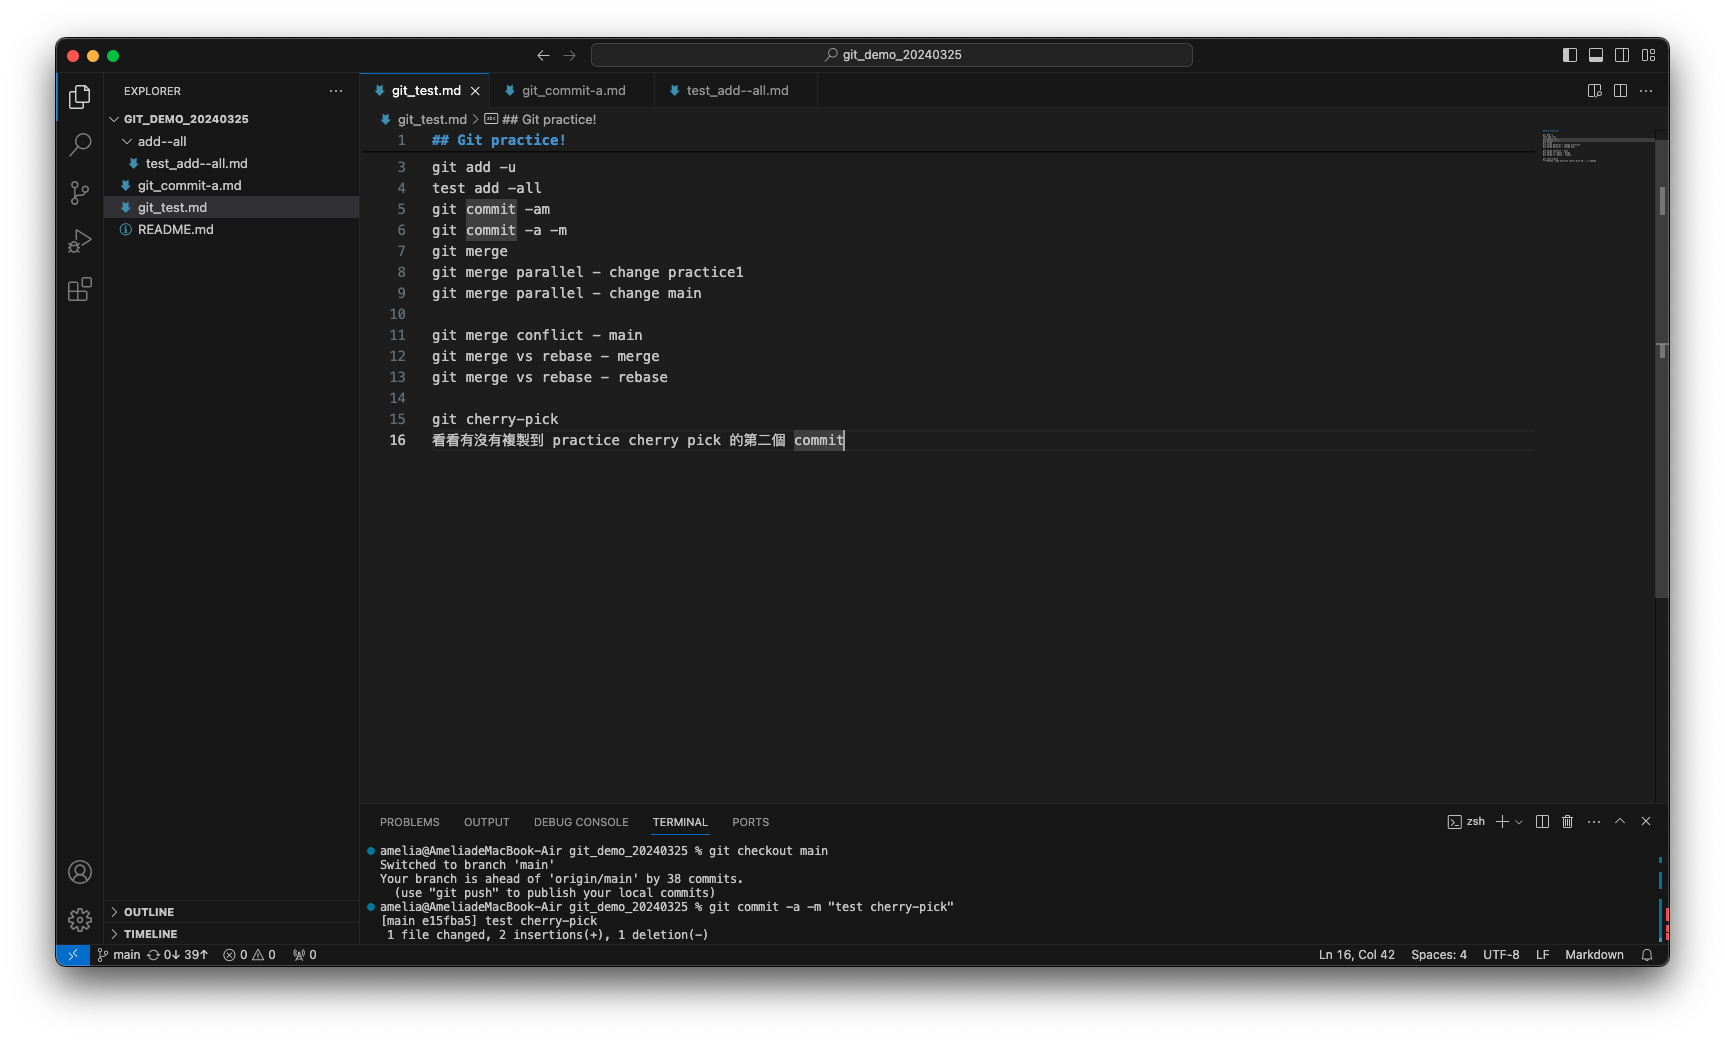
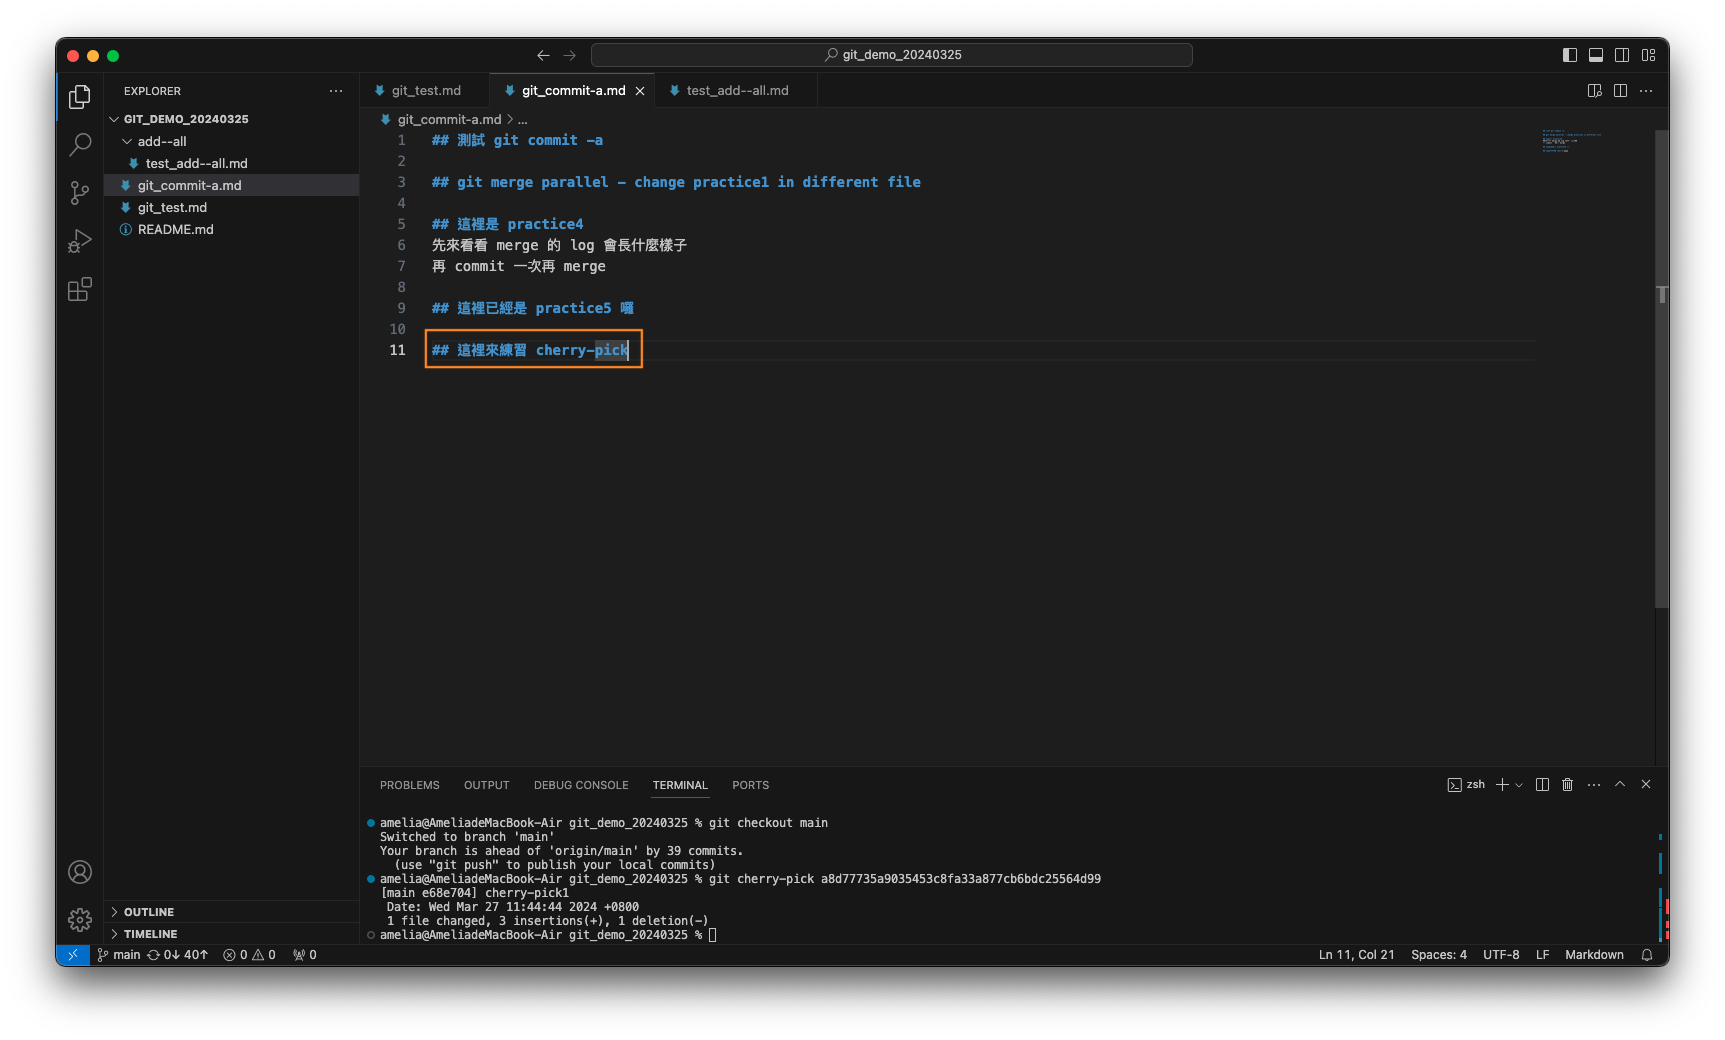

若直接 git cherry-pick 6c1063775dc0565c78717432aeb0eeead389c749 會怎麼樣呢?
出現衝突了!
先用 git reset 讓 main 回到 cherry-pick 前的狀態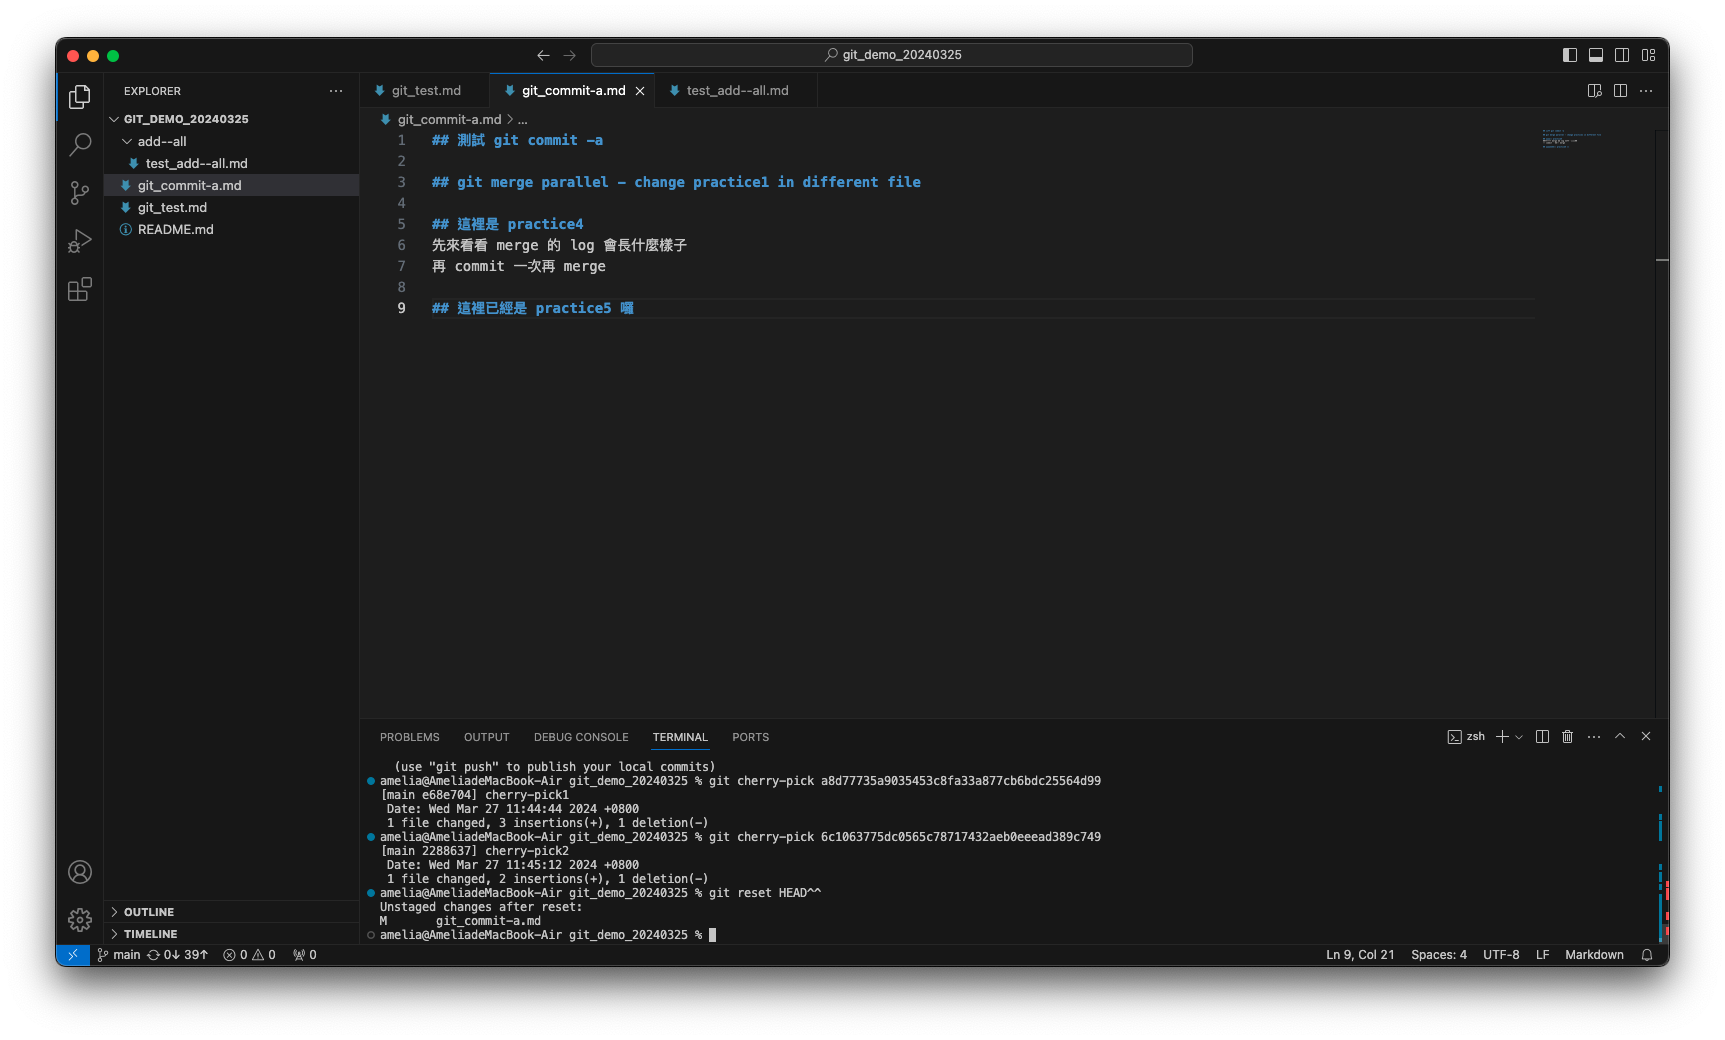
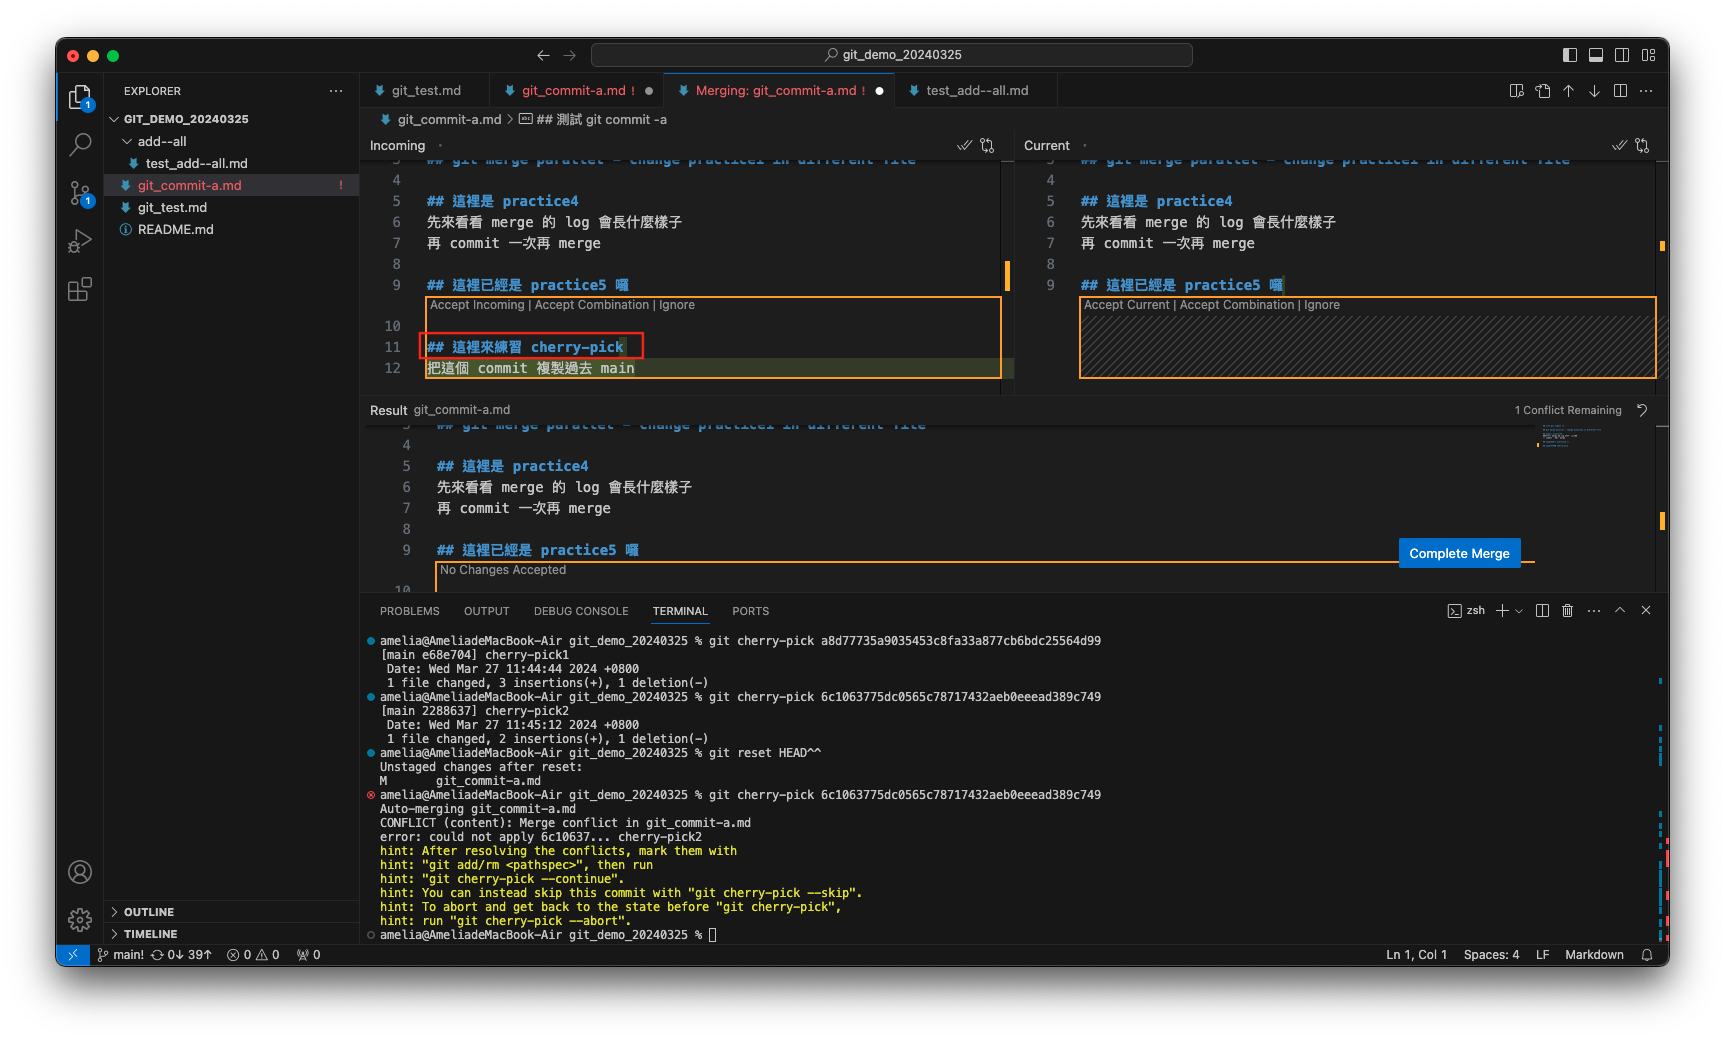
因 6c10637 是基於 a8d7773 的修改,而修改的內容只有綠底的 ”把這個 commit 複製過去 main“ 的字樣,而針對紅框處的 “## 這裡來練習 cherry-pick”,git 不知道要不要複製,所以出現了衝突。
解決衝突的方法一樣為修改檔案內容,將需要的內容留下後輸入以下指令:
完成 cherry-pick!git add . git commit -m "commit 訊息" #也可執行 git cherry-pick --continue,會出現需要輸入 commit 訊息之提示,可 :q! 退出,git 會帶入 6c10637 此 commit 當時的 commit 訊息)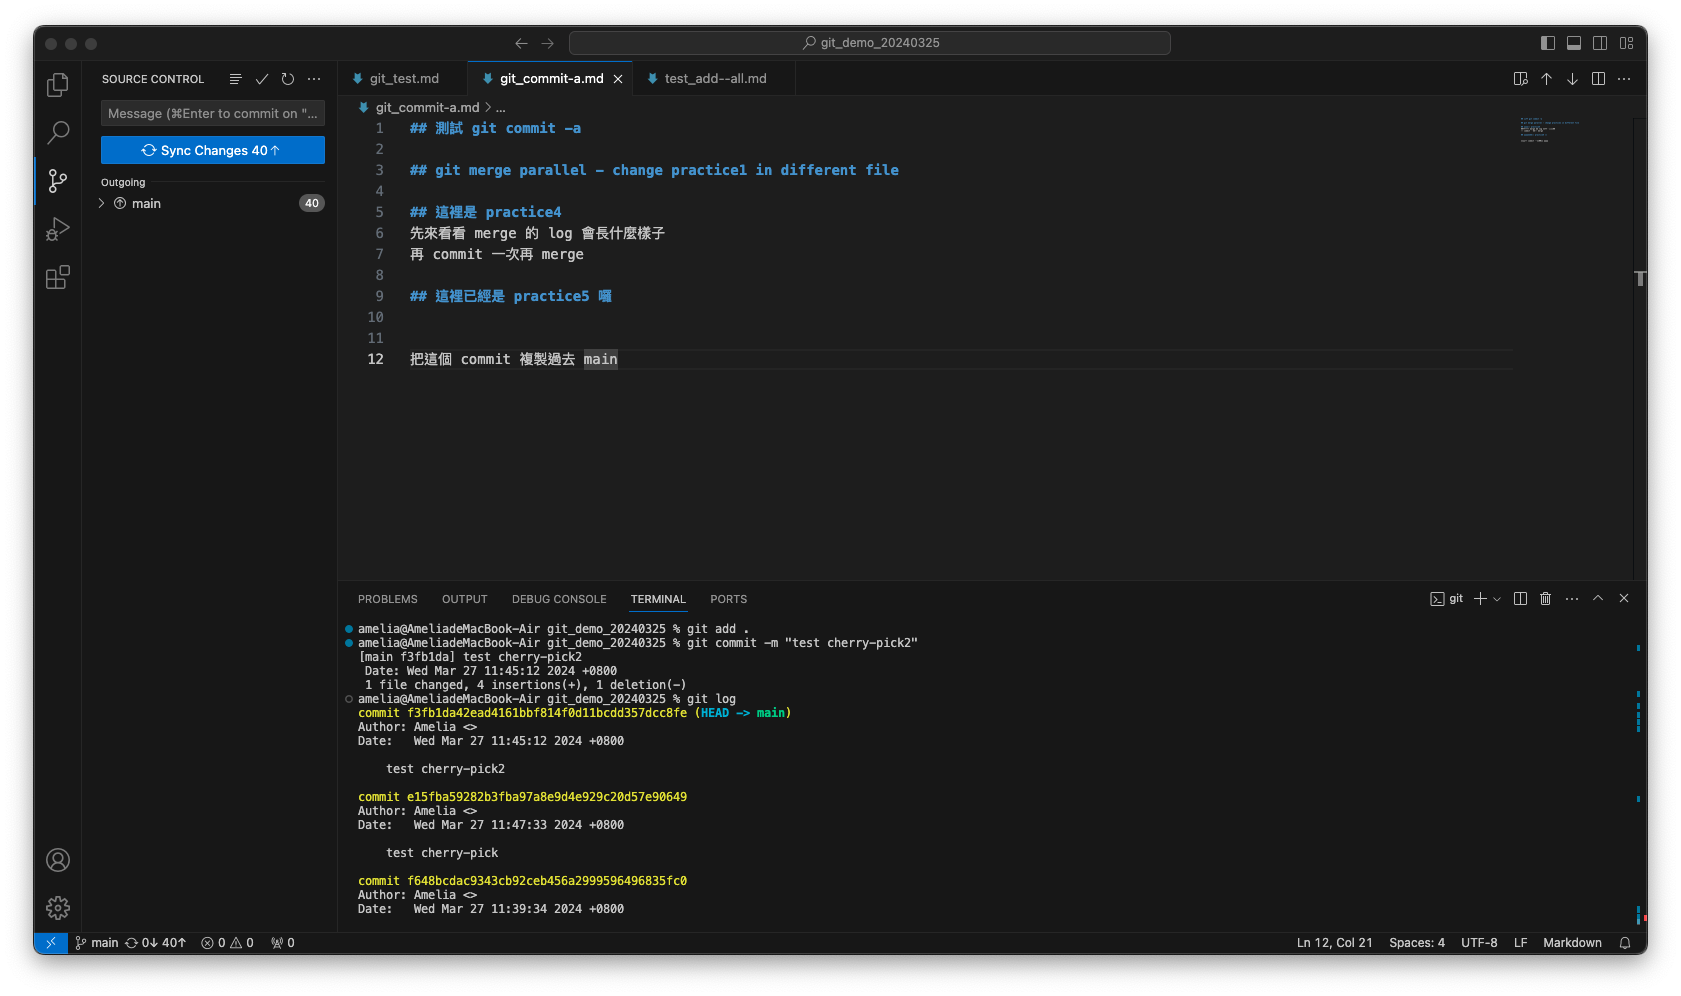
-
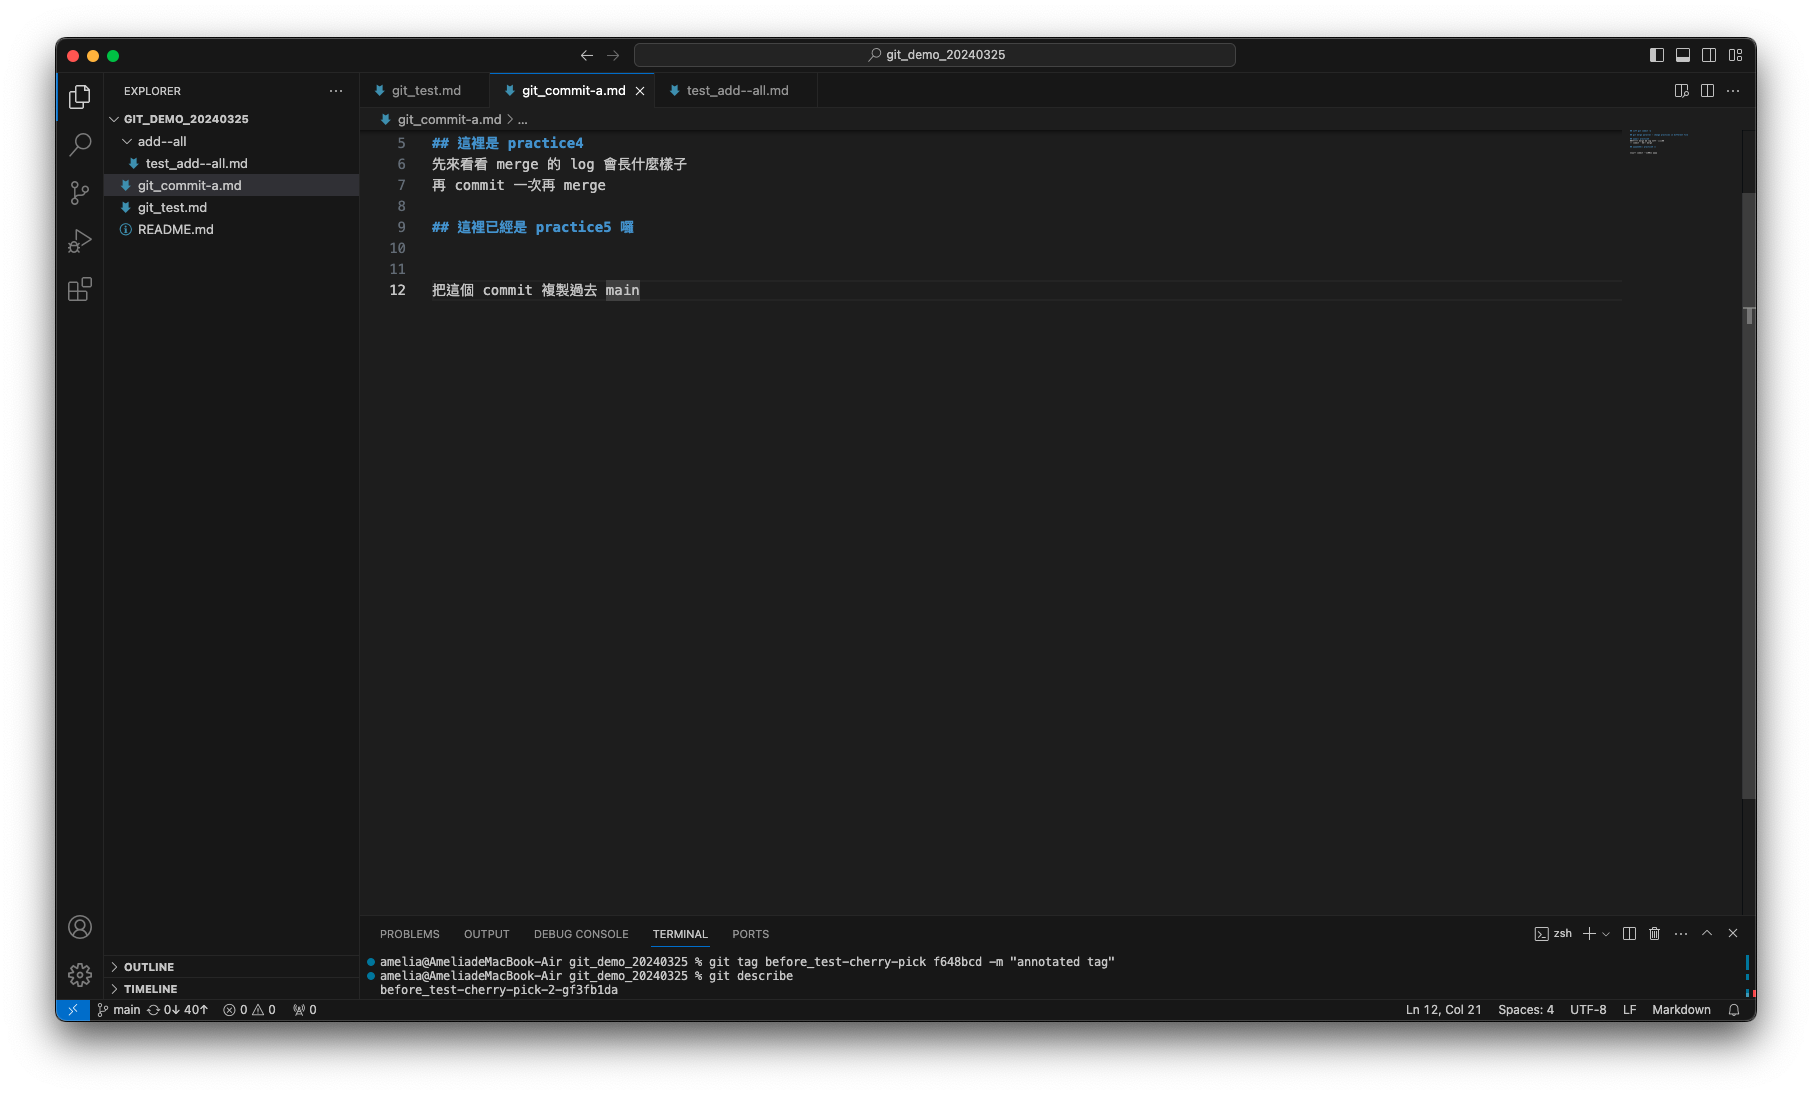
git tag "tag 名稱" "欲加上 tag 的 commit":
用來標記重要的 commit,即使沒有 branch 指向該 commit 也可以用 tag 找。- -m:加上對 tag 的描述。若沒有加上,則 tag 會是 unannotated 的狀態。
-
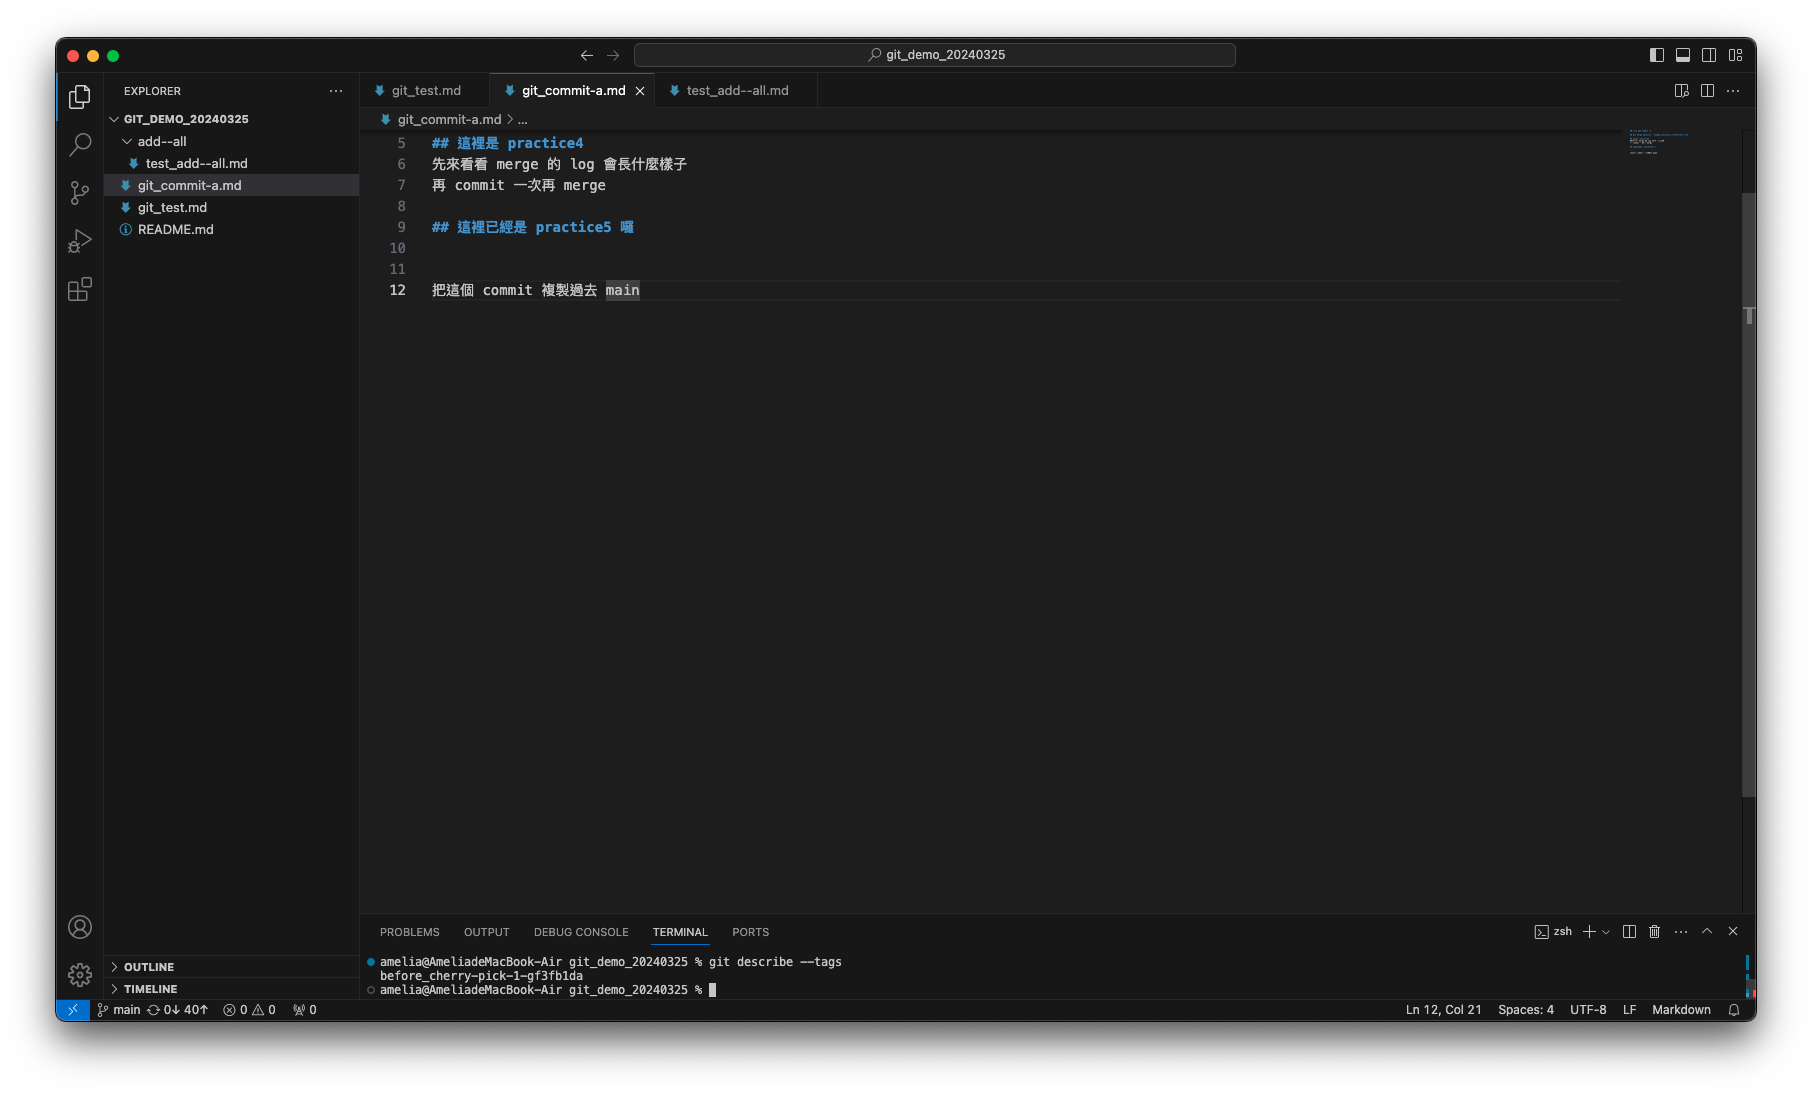
git describe "指定位置":
查詢距離指定位置最近的 tag。可不指定,預設會是目前位置,也就是 HEAD。- --tags:可查詢到 unannotated tags。
git 輸出的指令會如:"tag"_"numCommits"_g"hash",說明如下表格:
參數 說明 tag 離 "指定位置" 最近的 tag 名稱 numCommits 這個 tag 離 "指定位置" 有多少個 commit hash "指定位置" 的前七個 commit SHA-1 值 -
git clone:
將遠端的專案複製一份下來到本機,會產生一 remote branch,其會反映 remote repository 的狀態。若要 checkout 到 remote branch,會出現 detached HEAD 的狀態,再執行 commit 的話,remote branch 不會受影響,依舊會指向原本的 commit。 -
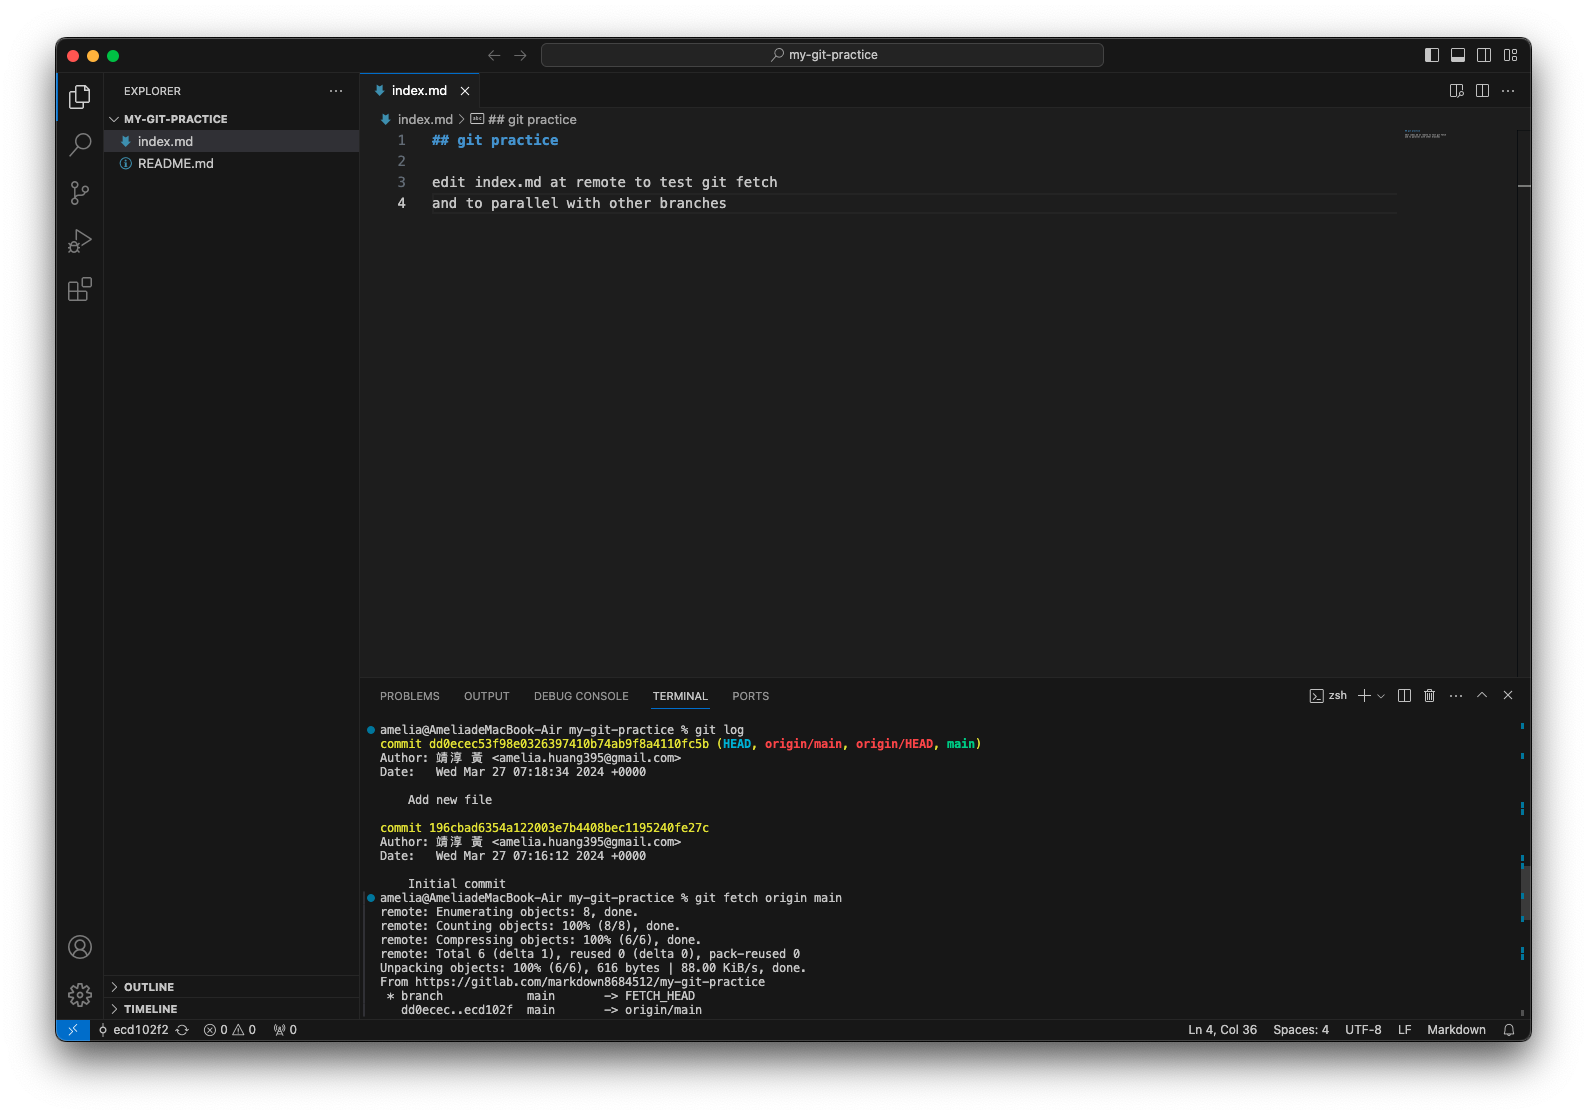
git fetch:
將 remote repository 的情況同步到 local repository,但不影響 local branch。-
主要是執行以下兩個動作:
- 下載 remote 端有,但 local 端沒有的 commit。
- 更新 remote branch 所指向的 commit。
-
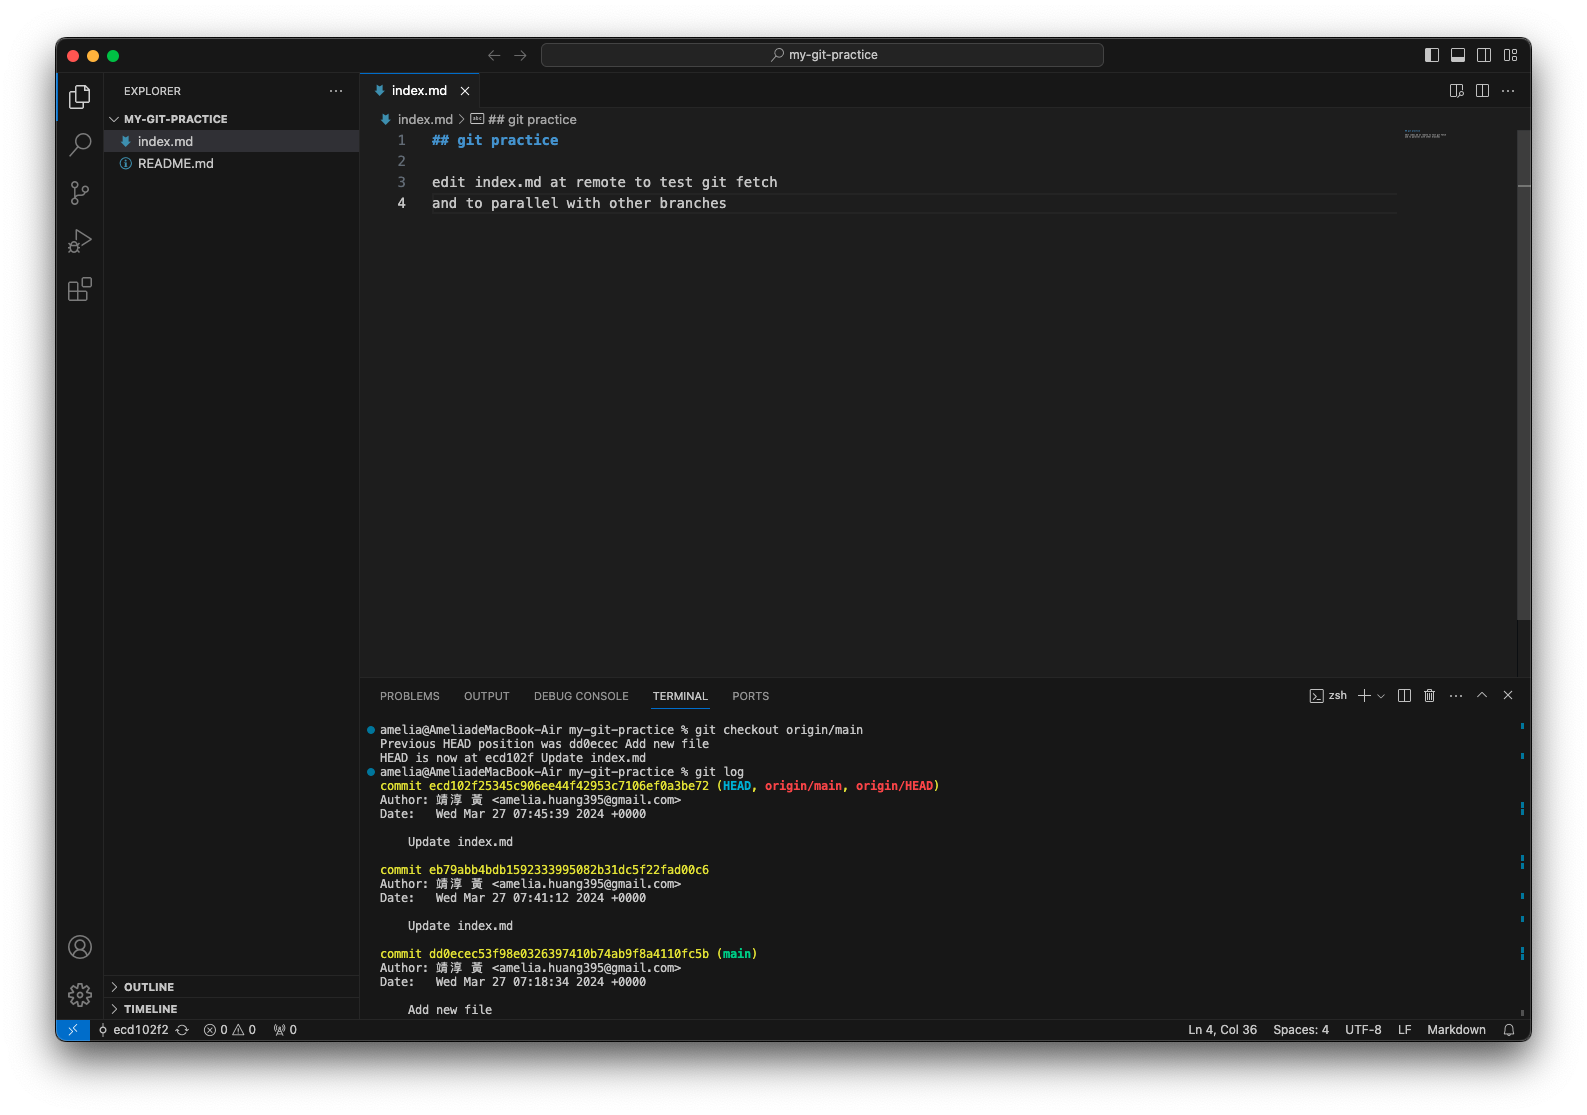
不接任何參數:下載所有 remote 端有,但 local 端沒有的 commit。
- git fetch "remote repository" "remote 端的 branch":單純要更新 local 端的 remote branch 時使用下載指定的 remote 端的 branch(一連串的 commit,local 端沒有的),並更新 local 端的 remote branch 指向的 commit。
- git fetch "remote repository" "remote source(可以是 branch 也可以是 commit)":"local destination(為與 remote source 為對應關係的 local branch 或是新的 branch,git 會協助建立)":可以不用理會目前 HEAD 指向的位置,直接下載指定的 remote source(一連串的 commit,local 端沒有的),並將指定的 local destination (branch) 指向下載的 remote source 的最後一個 commit。
- git fetch "remote repository" "(空白)":"新的 local branch":將 remote source 留空,git 會在 local 新增 branch。
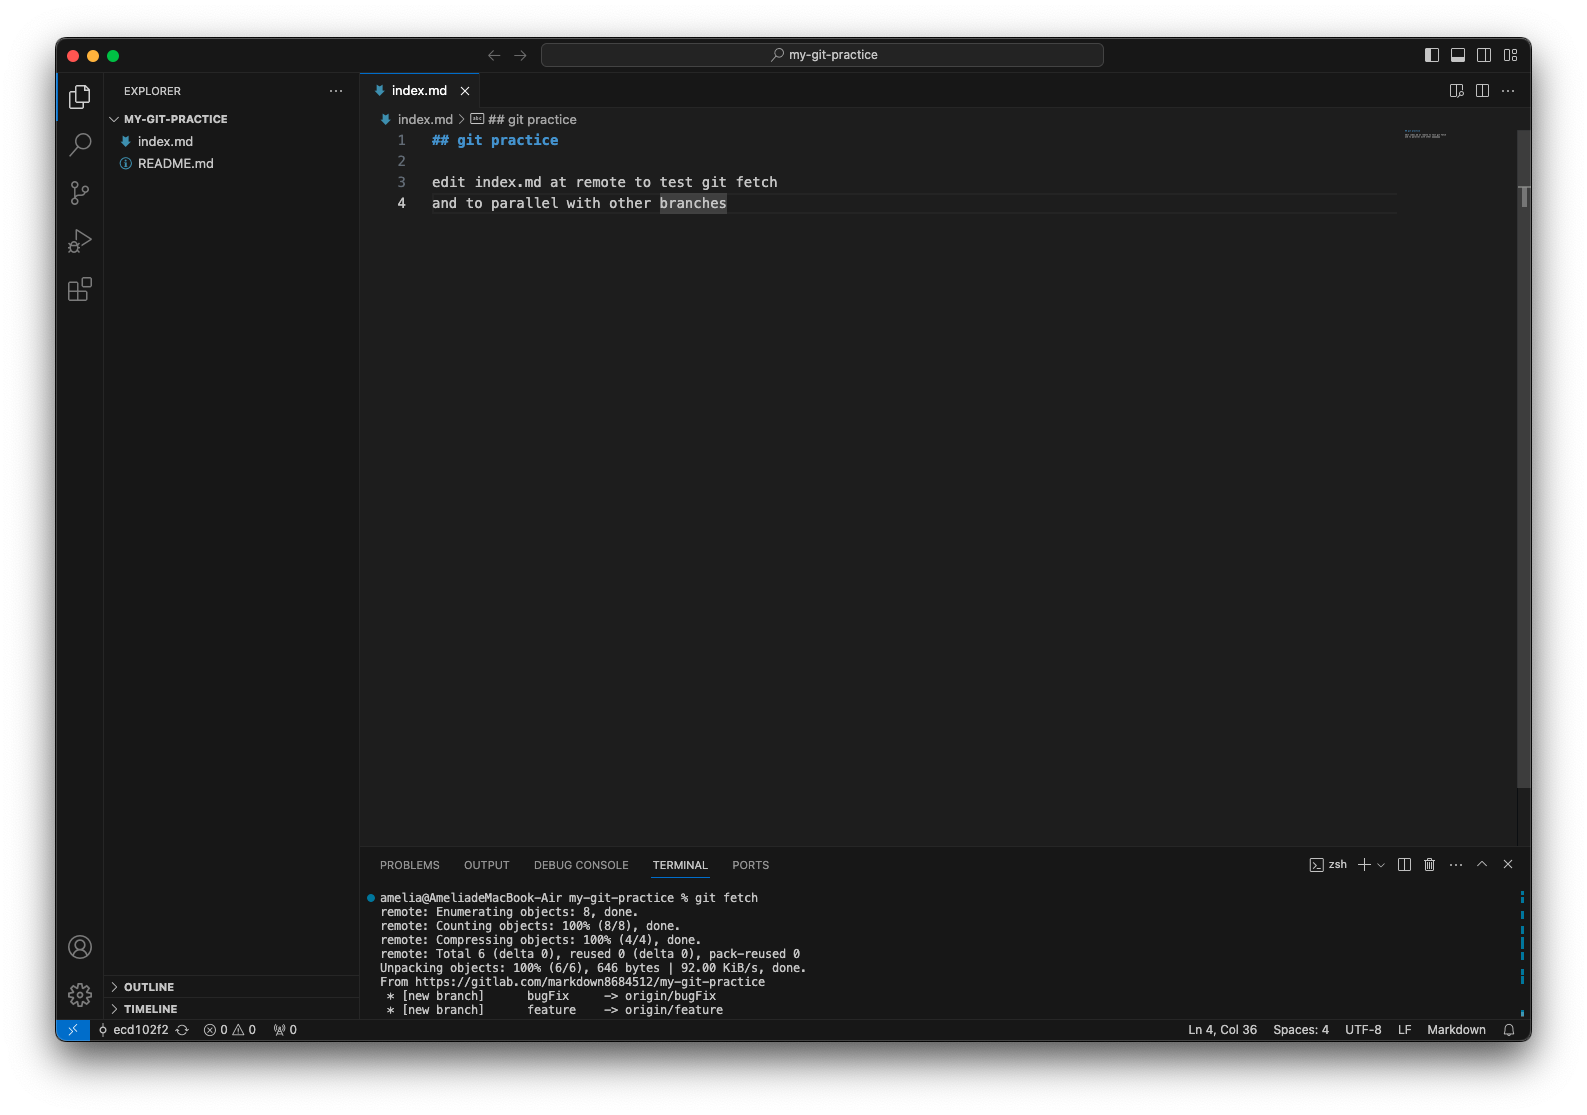
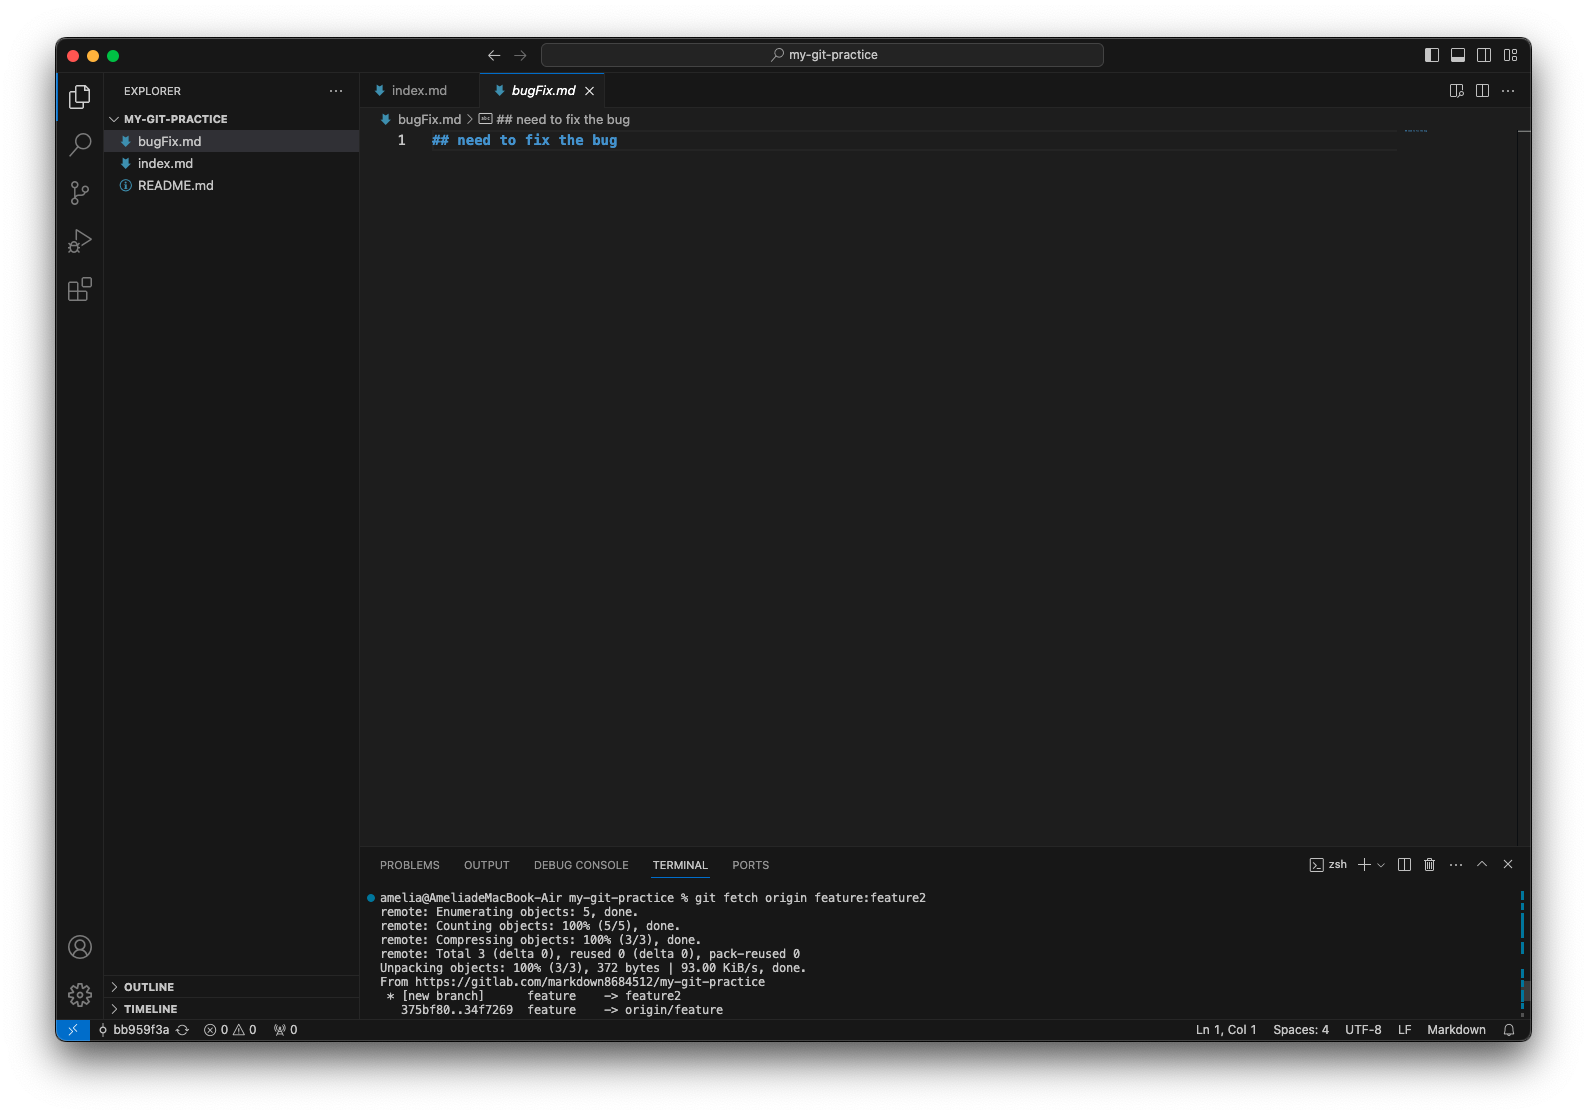
Example
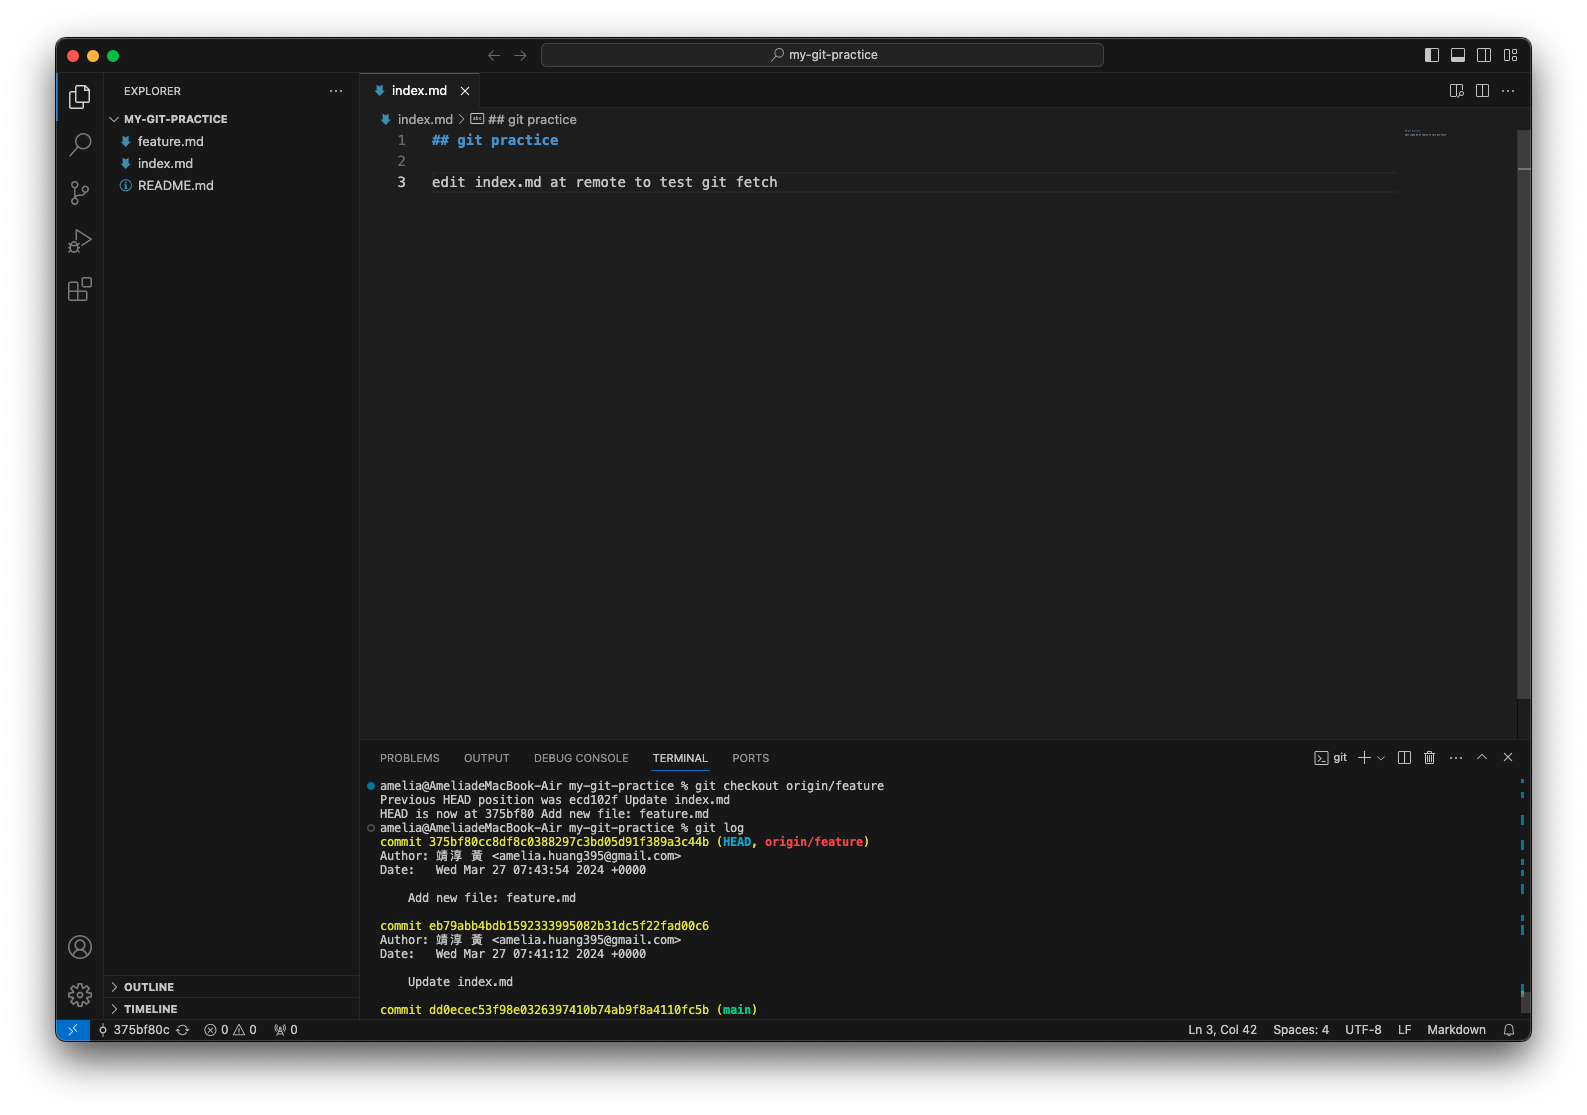
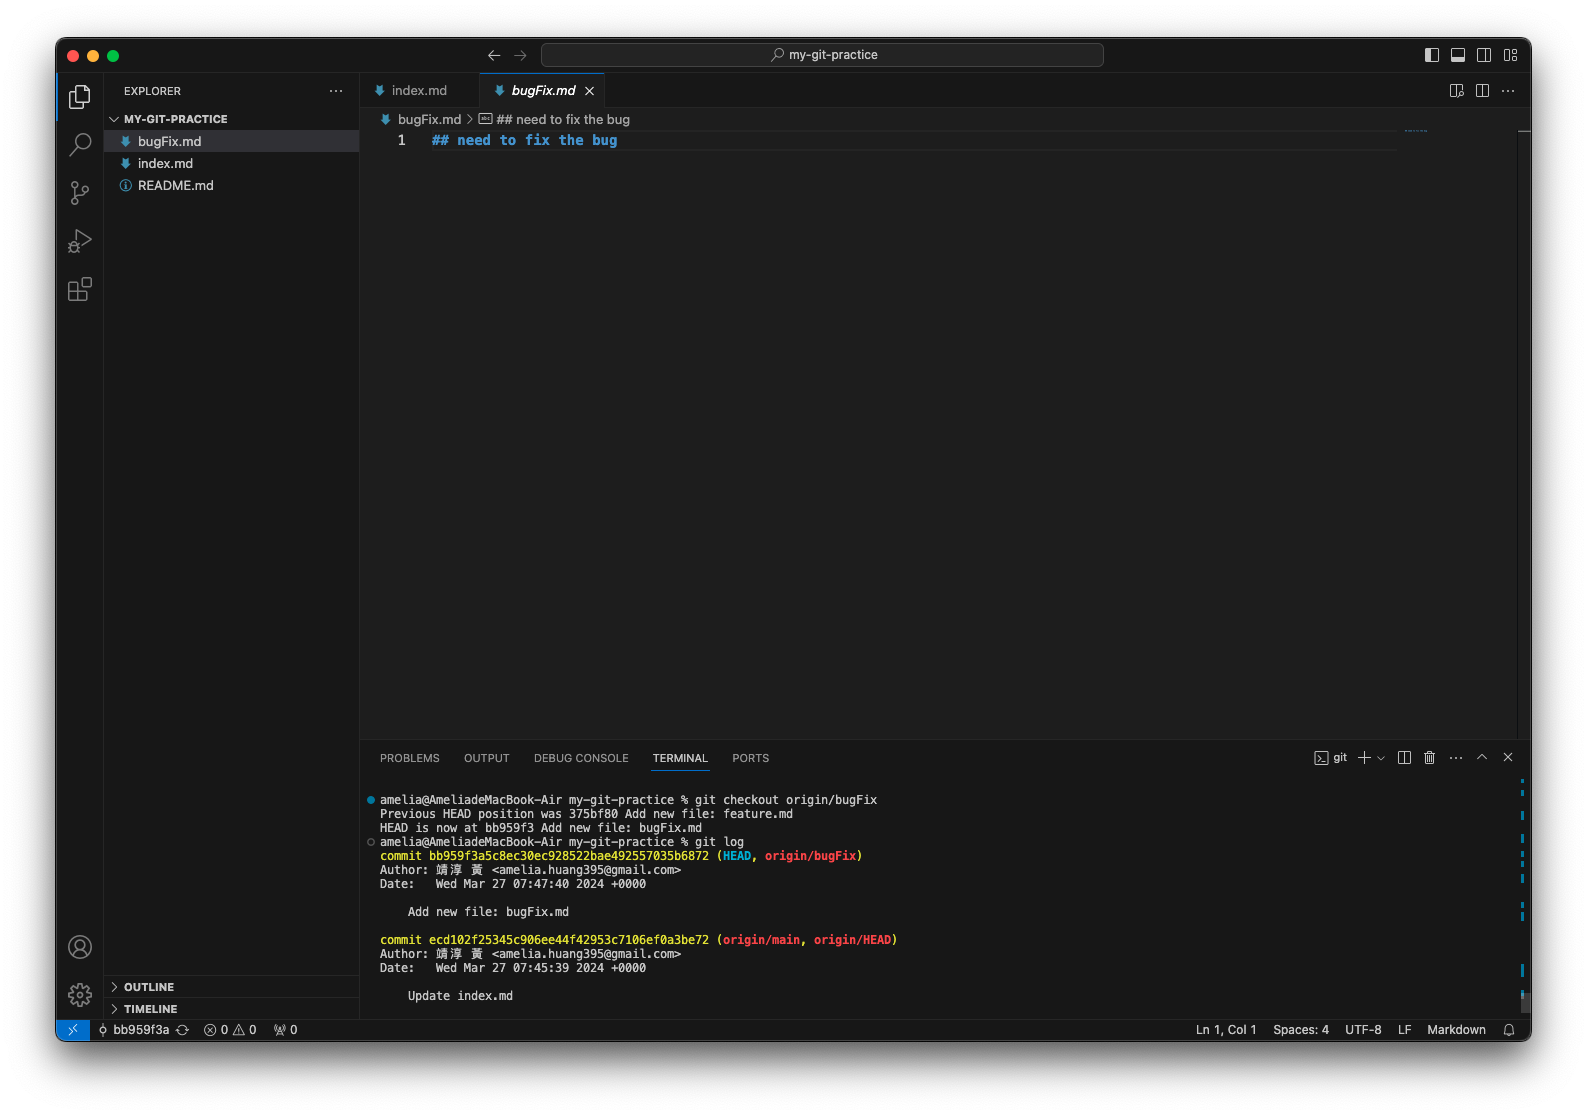
remote repository 有新的 feature 和 bugFix branch
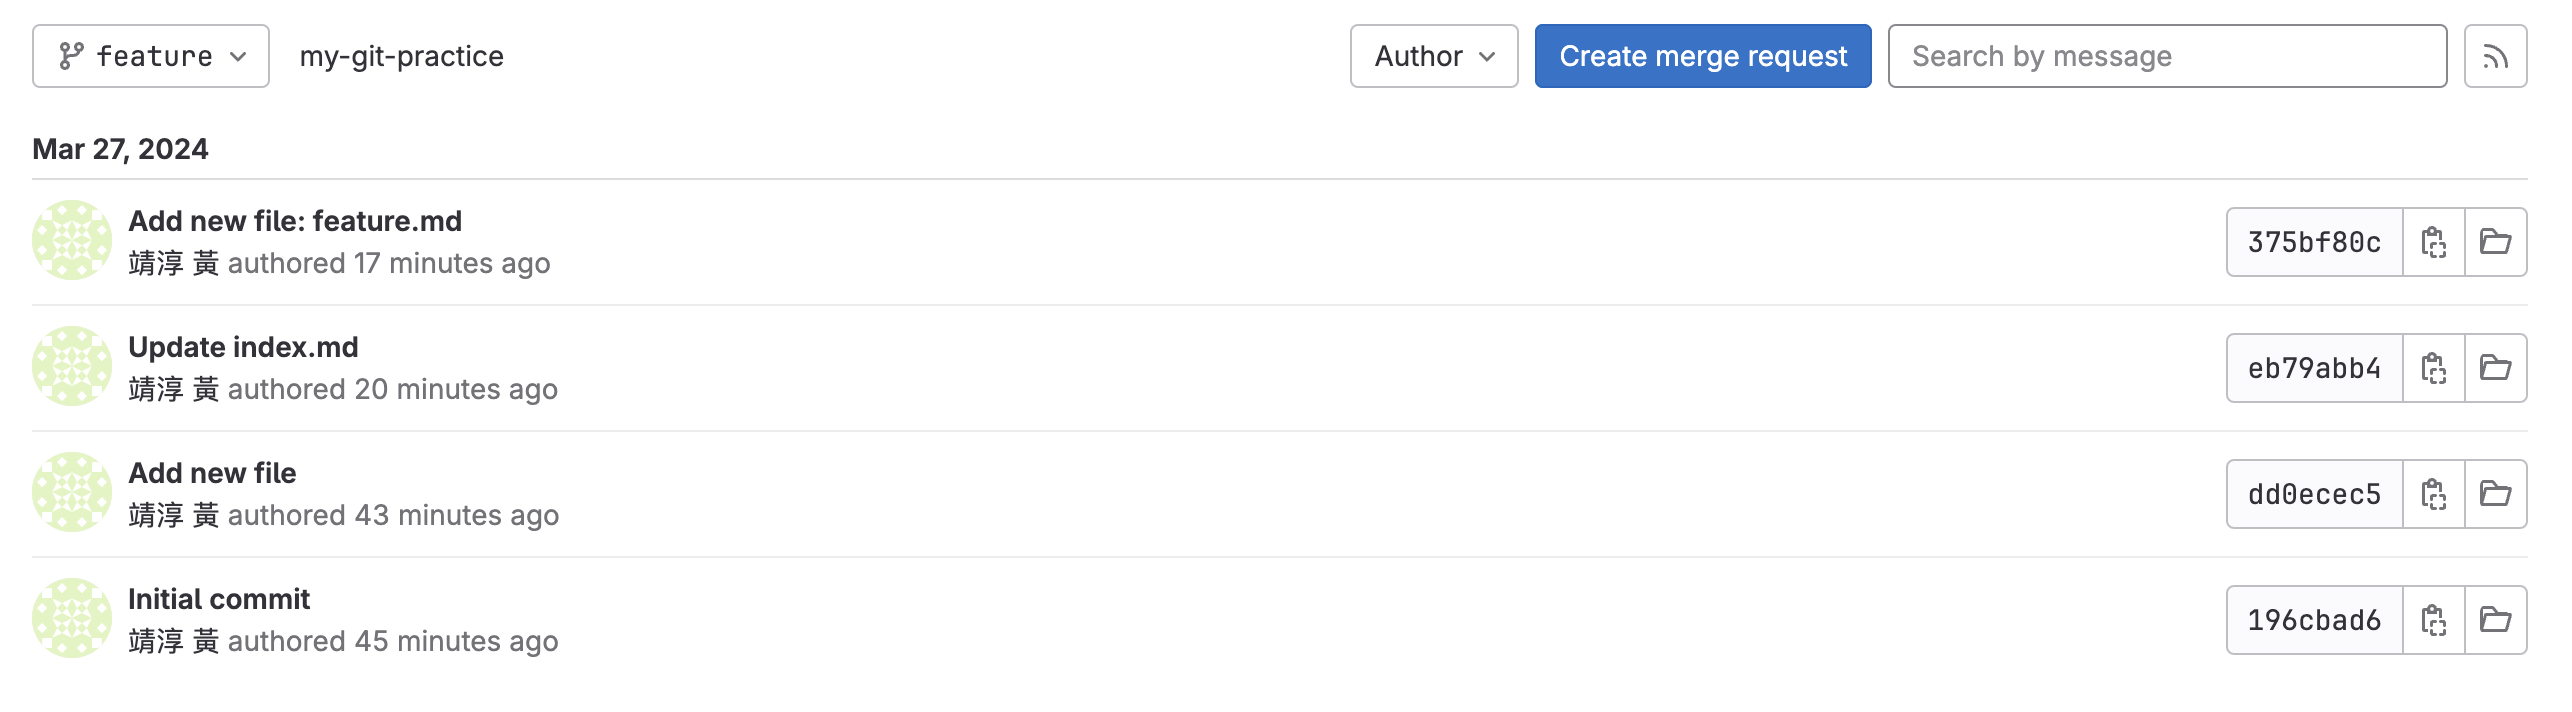
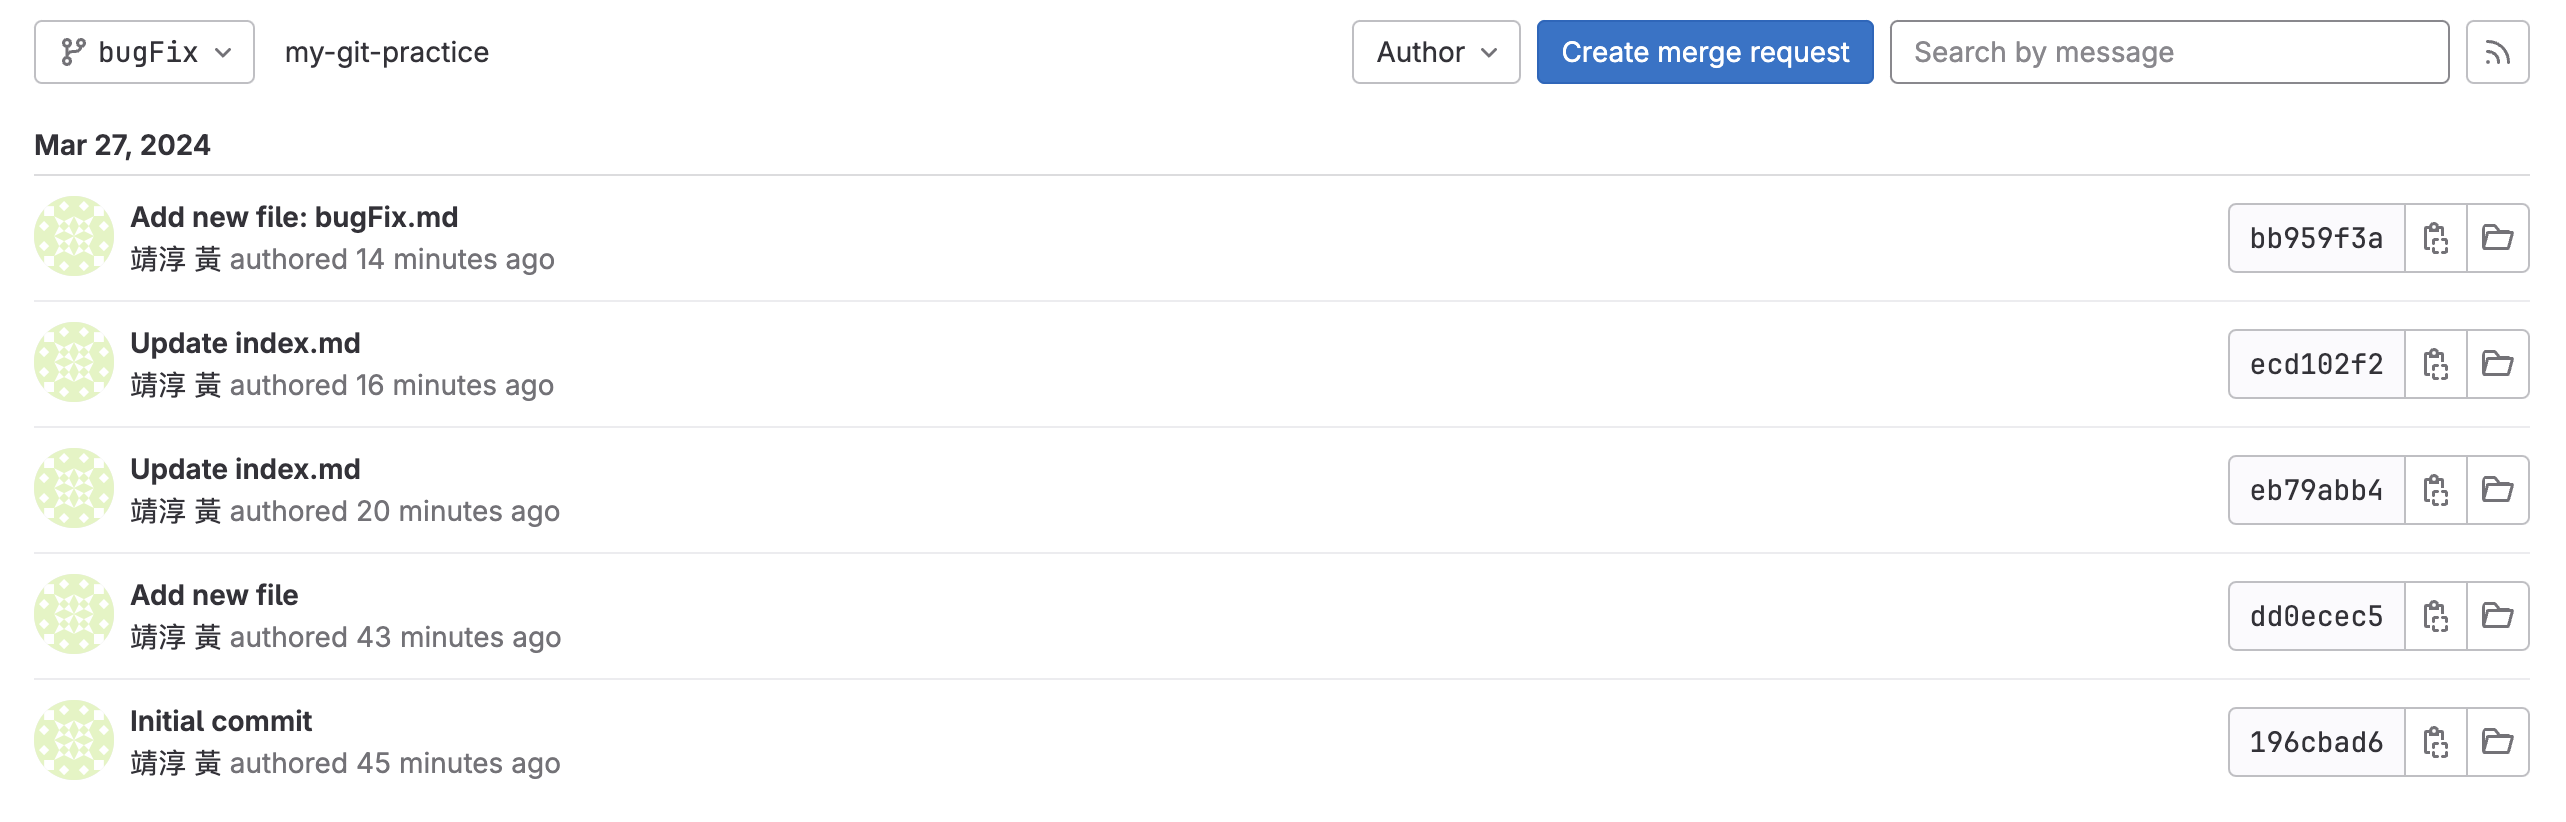
分別 checkout 到 origin/feature 和 origin/bugFix 查看 log,可以看到 origin/feature 有多 feature.md 的檔案;origin/bugFix 有多 bugFix.md 的檔案
-
-
git pull:
可透過 git config 來設定 pull 預設會進行的動作,此次設定為執行 git fetch + git merge,設定方式請見下方 Example。- --rebase:若預設 pull 會執行 merge,在命令中加入 --rebase 可使 git pull 執行 git fetch + git rebase,而不是執行 git merge。
- git pull "remote repository" "remote 端的 branch":要注意現在 (HEAD) 位置! 要 fetch 的 remote source 和 接受 fetch 的 local destination 非連接關係時使用。
下載指定的 remote 端的 branch(一連串的 commit,local 端沒有的),並更新 local 端的 remote branch 指向的 commit。再將 remote branch 指向的 commit merge 到現在位置(HEAD)。 - git pull "remote repository" "remote source(可以是 branch 也可以是 commit)":"local destination(注意:只能是 remote source 對應的 local branch 或是 新的 branch 名稱 (git 會協助建立))":要注意現在 (HEAD) 位置!,下載指定的 remote source(一連串的 commit,local 端沒有的),並將指定的 local destination (branch) 指向下載的 remote source 的最後一個 commit。再將該 local destination (branch) 指向的 commit merge 到現在位置(HEAD)。
Example
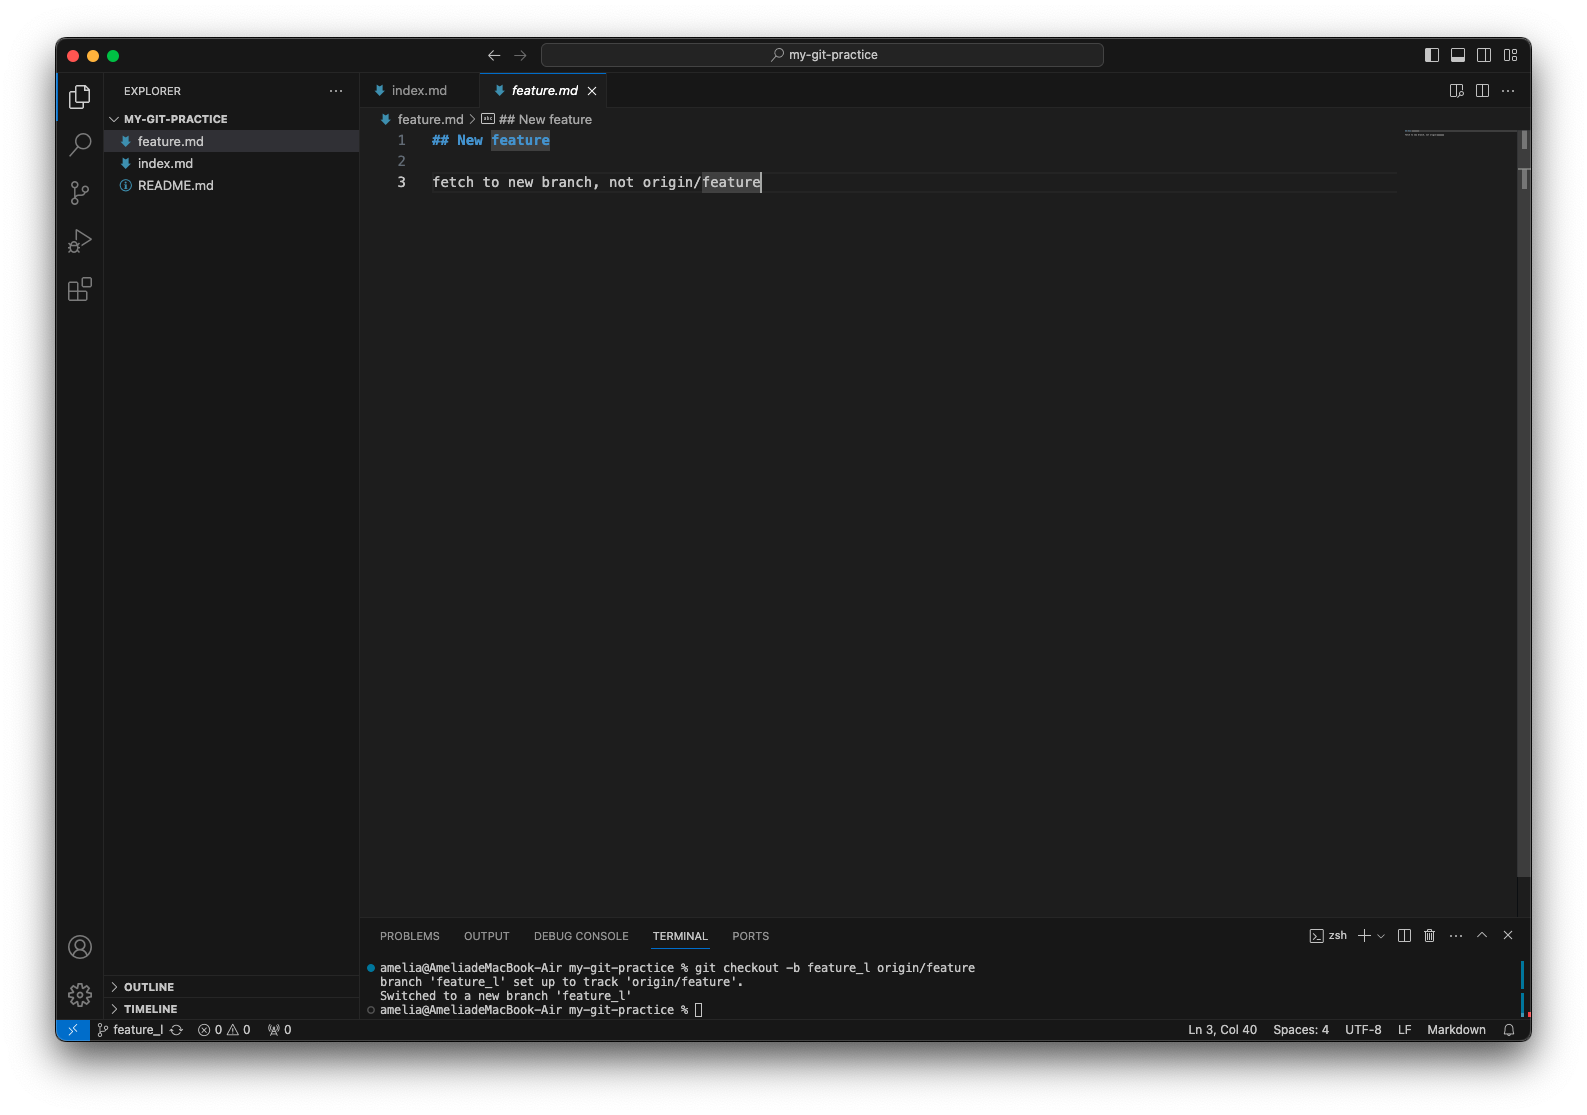
remote repository 的 feature 有新的 commit

在 local 新增 feature_l branch,以追蹤 origin/feature,並切到他身上
local repository 也針對 feature_l branch 進行了修改
直接進行 pull
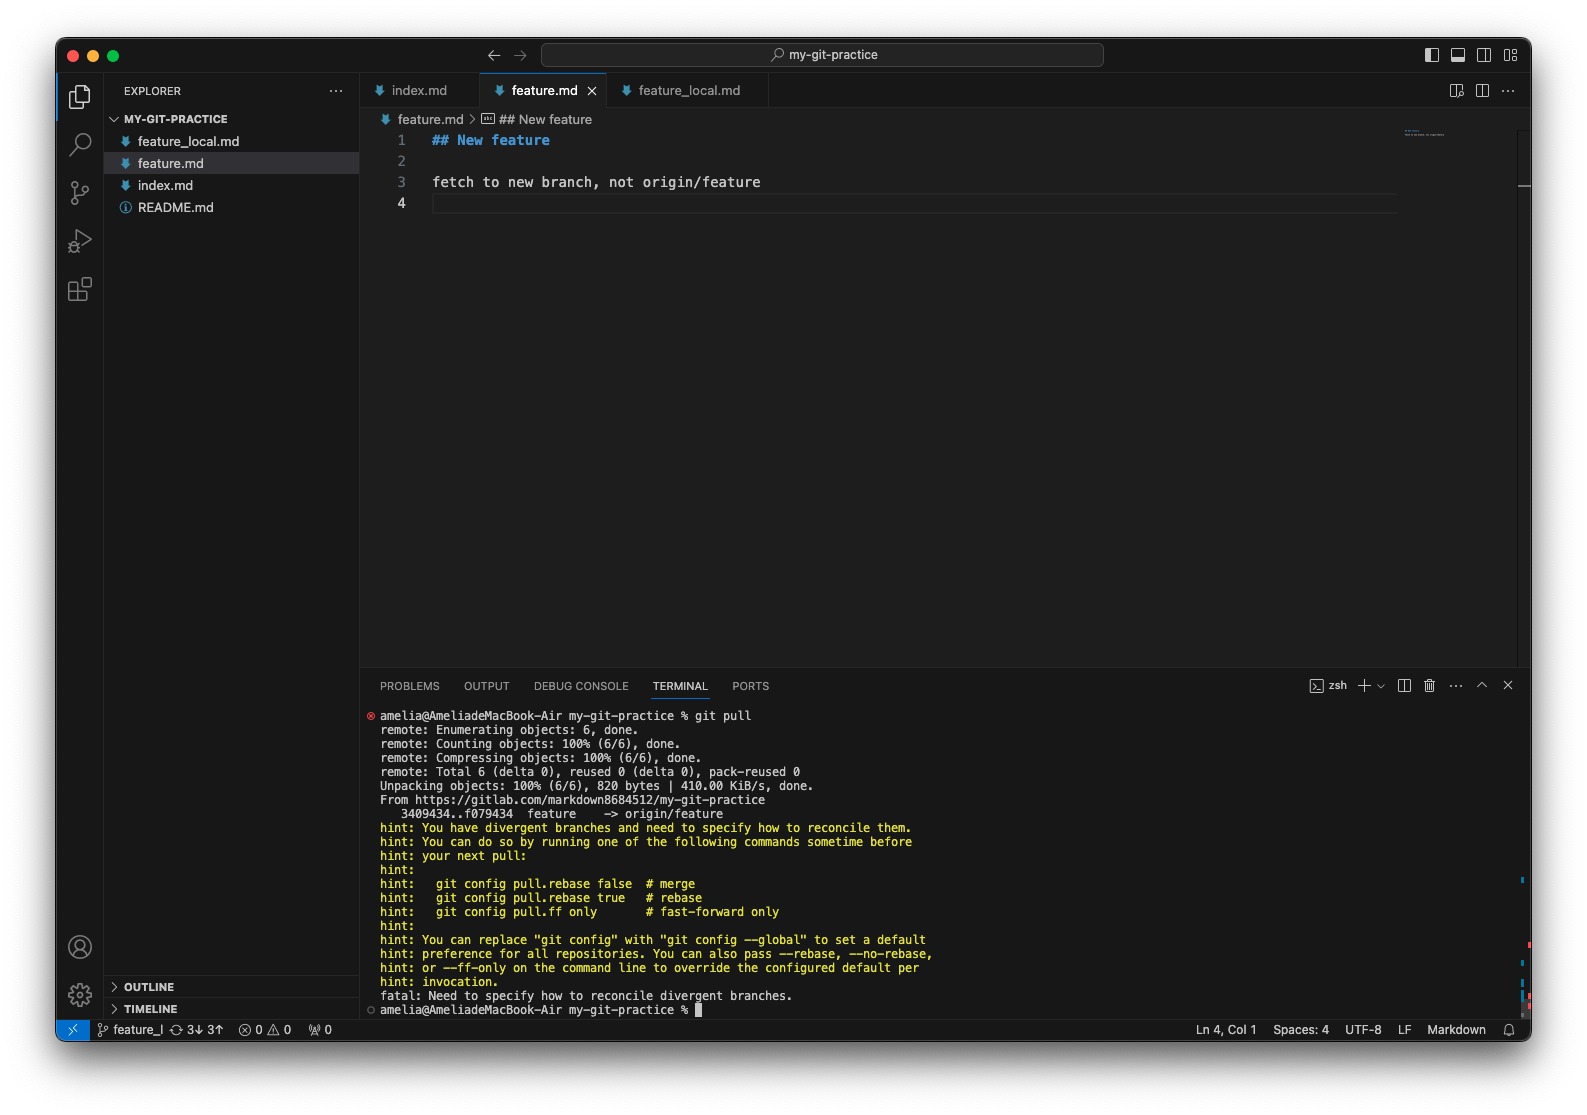
出現了上述訊息!
因 remote repository 和 local repository 的內容有分歧,需指定 git 要如何處理,可選擇以下其中一個命令:git config pull.rebase false # merge git config pull.rebase true # rebase git config pull.ff only # fast-forward only另也可將 git config 換成 git config --global,以設定對於所有 repository 的預設 pull 設定。
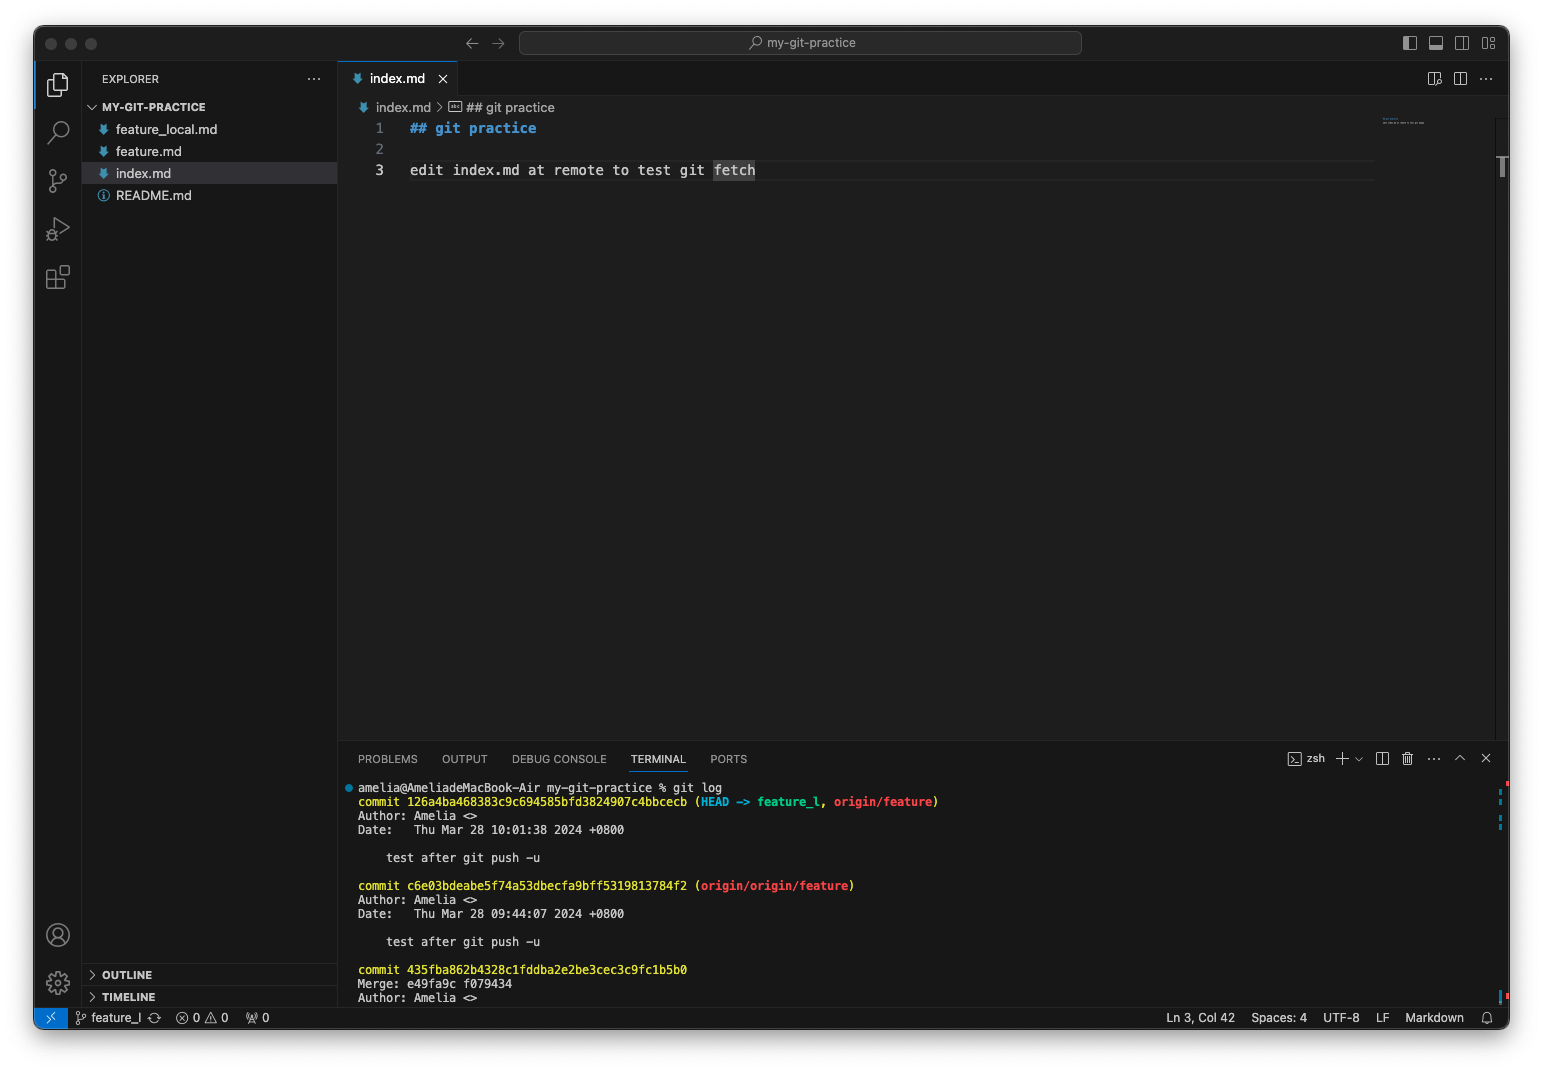
設定後也可在每次下 git pull 命令時透過 --rebase, --no-rebase, --ff-only 來覆寫預設值。此時 remote branch 的狀態是如何呢?
在設定 pull 預設值以及再次進行 pull 前,先來看看 origin/feature 的狀態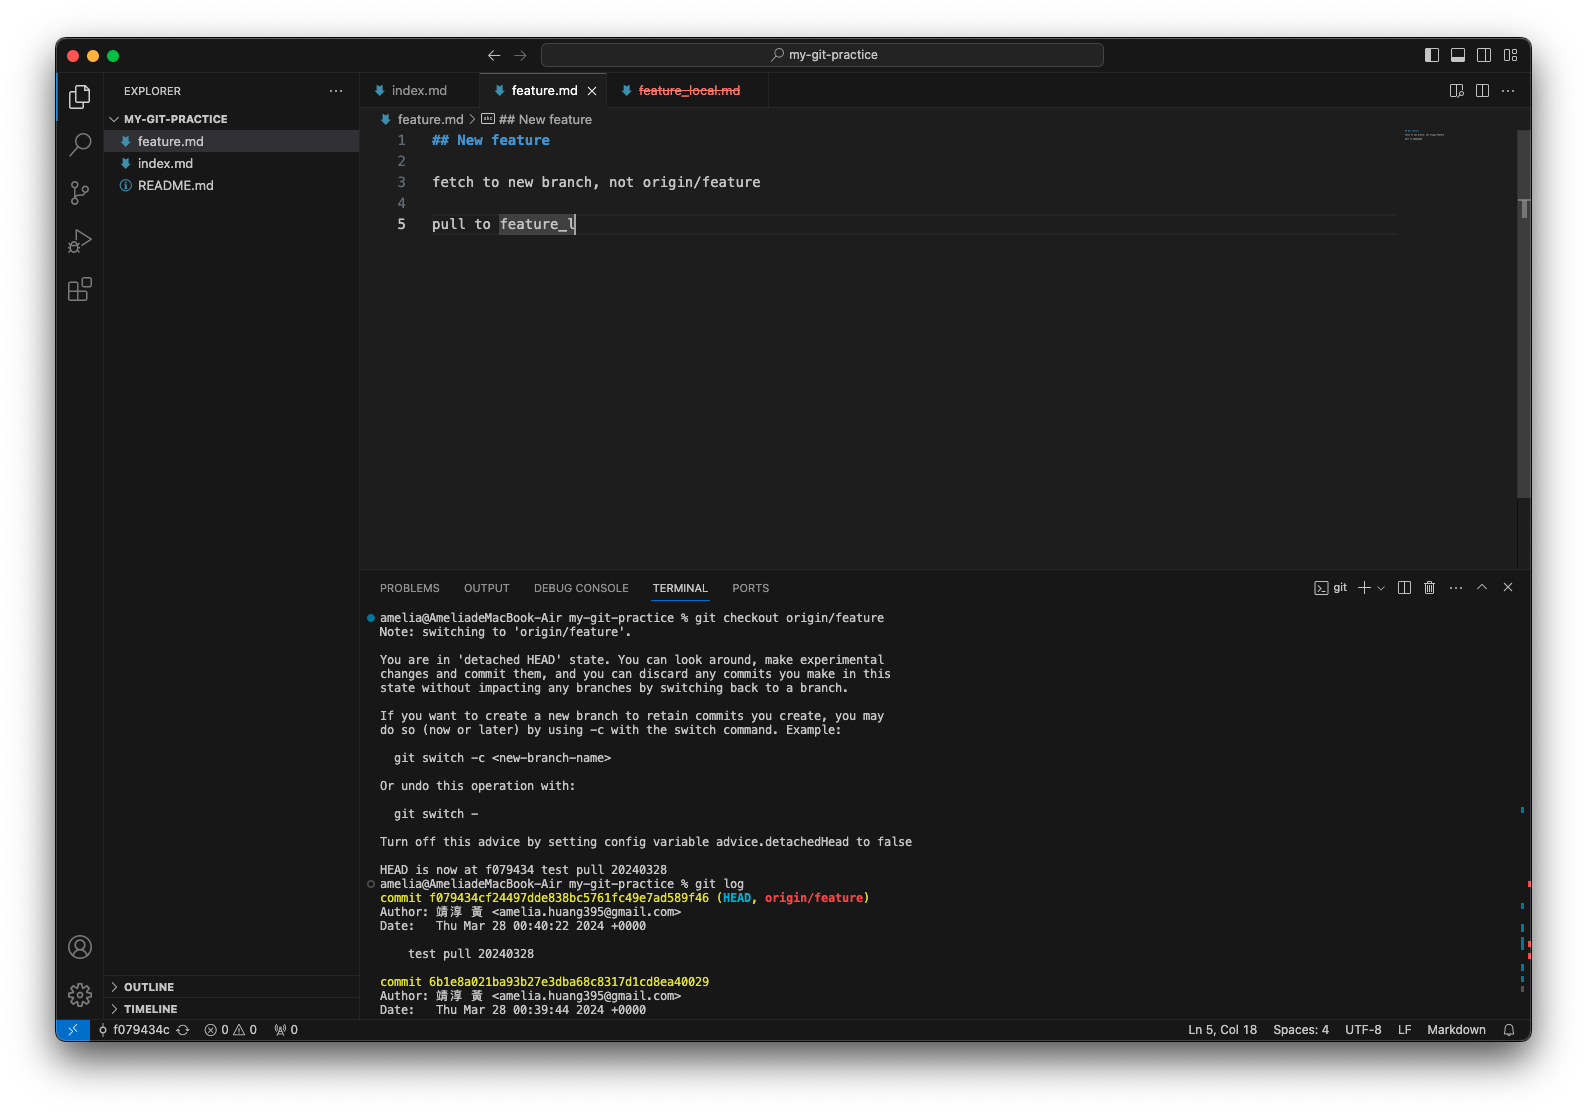
可以發現 origin/feature 其實已經跟 remote repository 同步了!pull 只差在還沒執行後半的 merge/rebase。
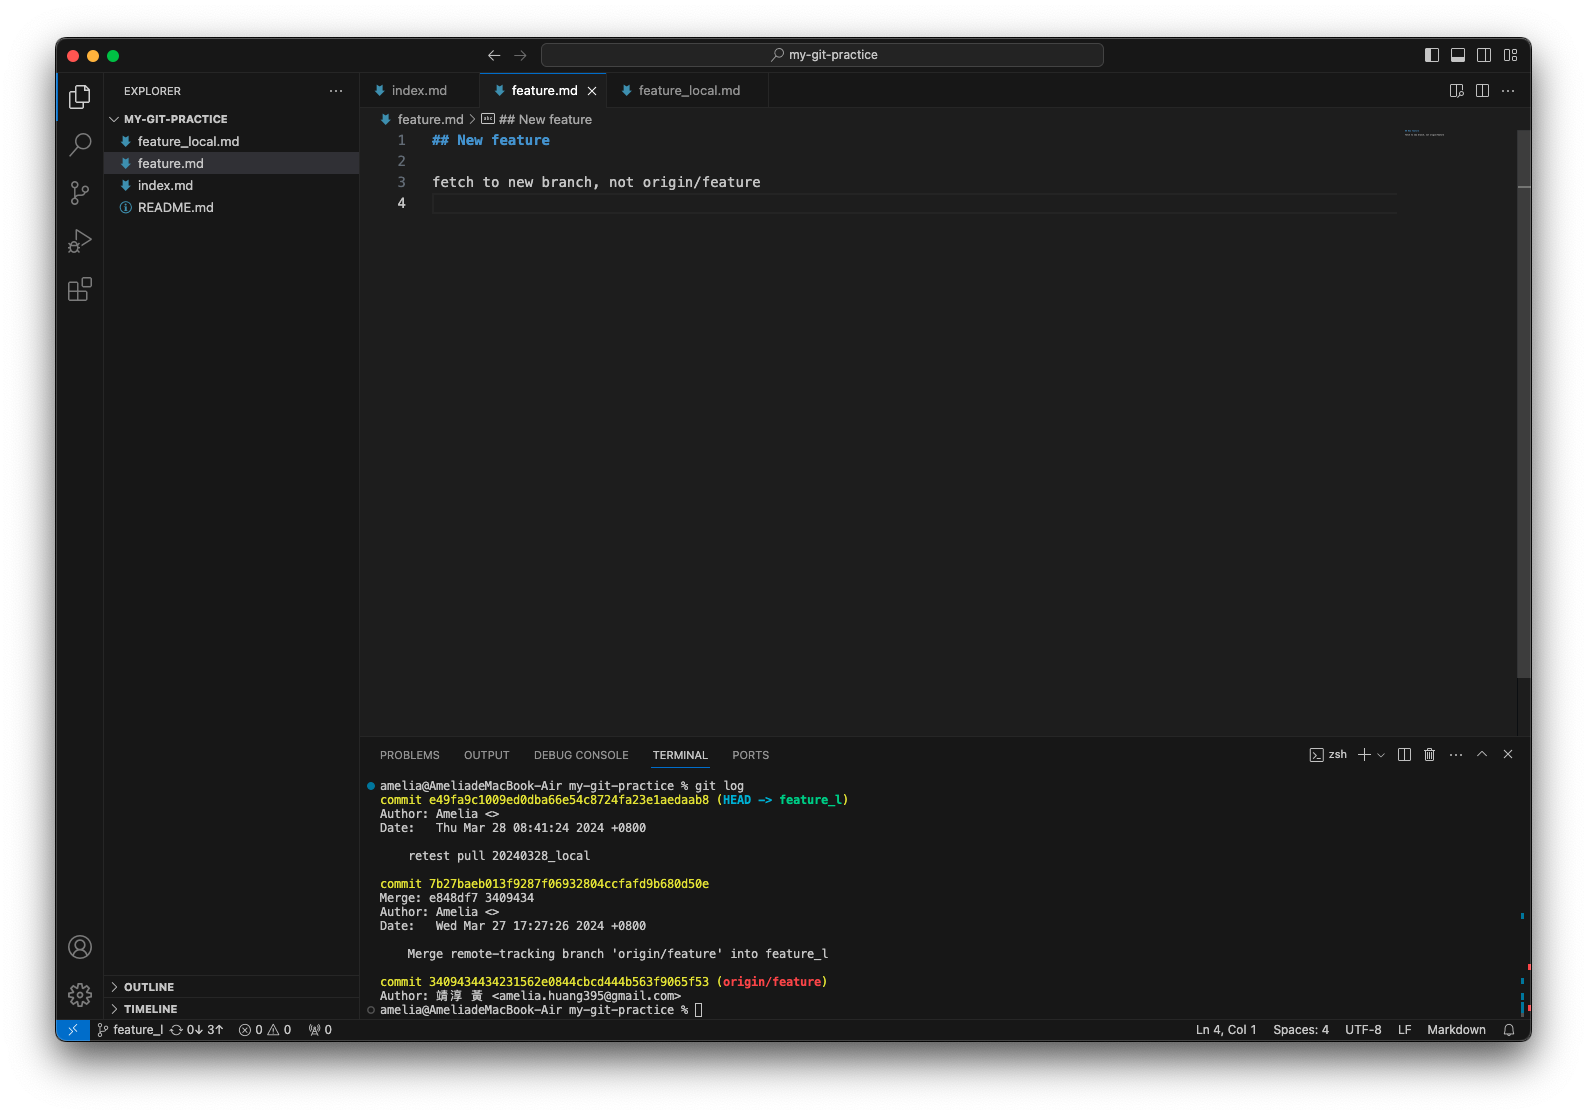
選擇讓 pull 預設執行 merge,切回 feature_l(記得!),並再次執行 pull
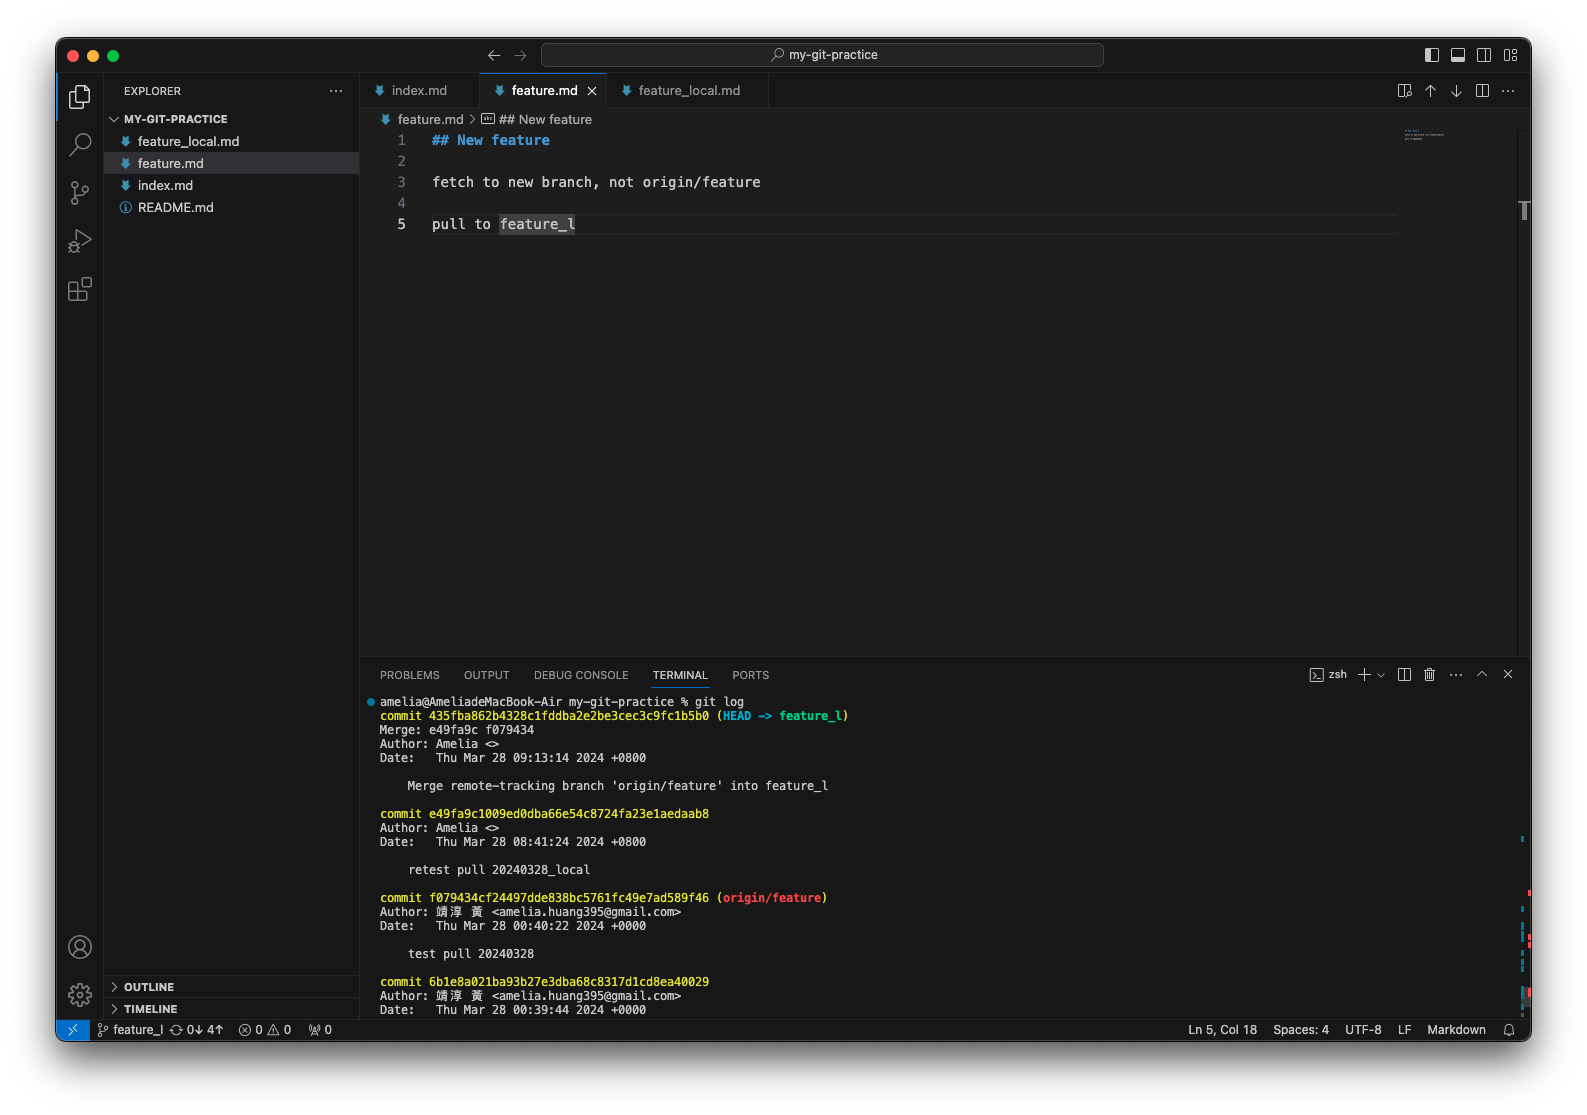
可以看到因 merge 產生了新的 commit (435fba8),其有兩個 parent commit (e49fa9c f079434)。
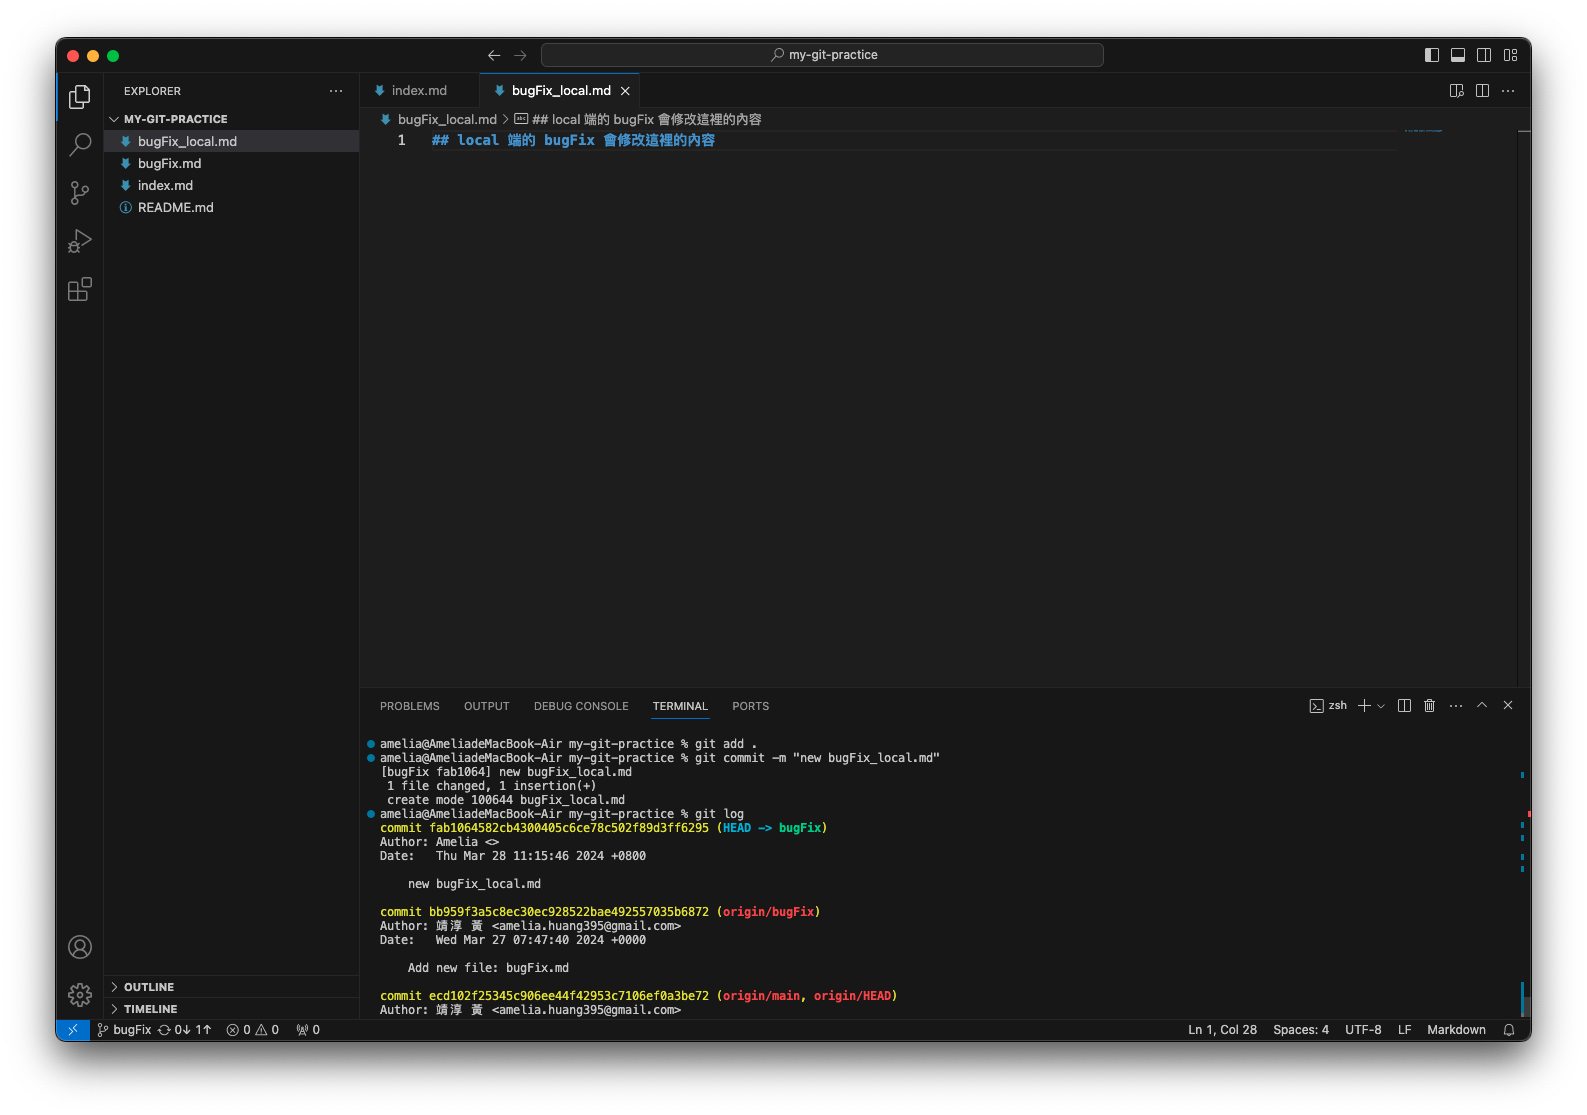
remote repository 的 bugFix 做了一次 commit,local 端的 bugFix 也 commit 了一次

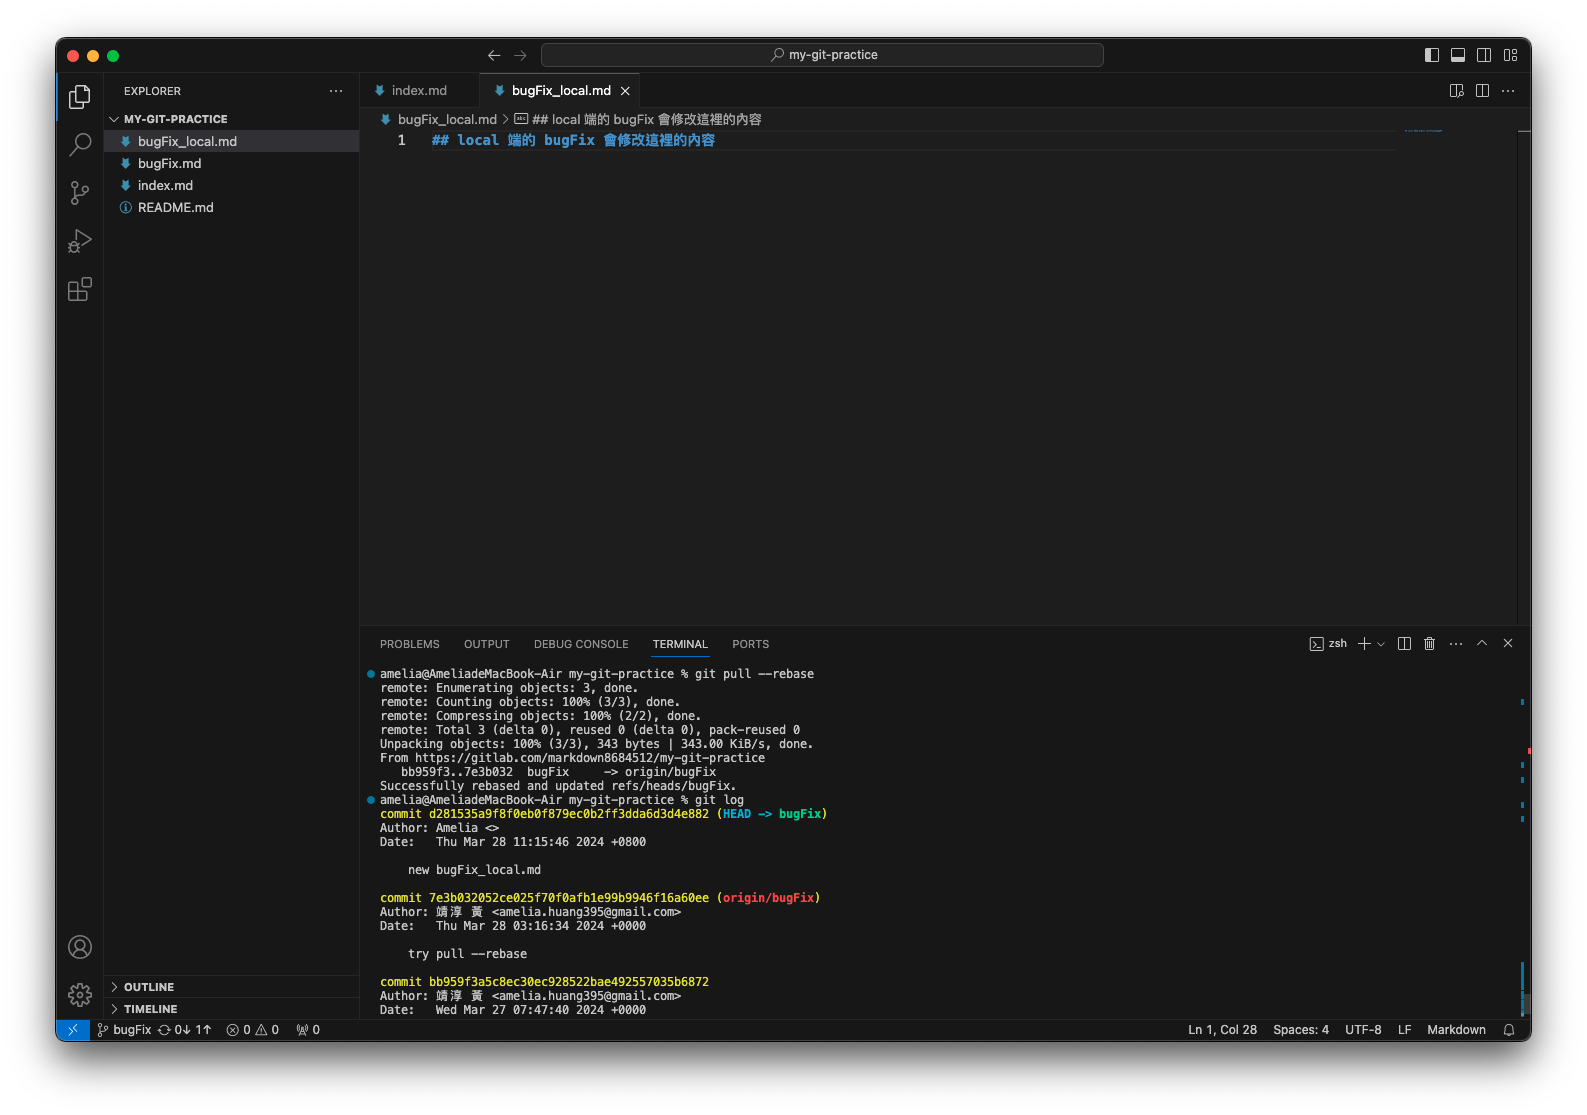
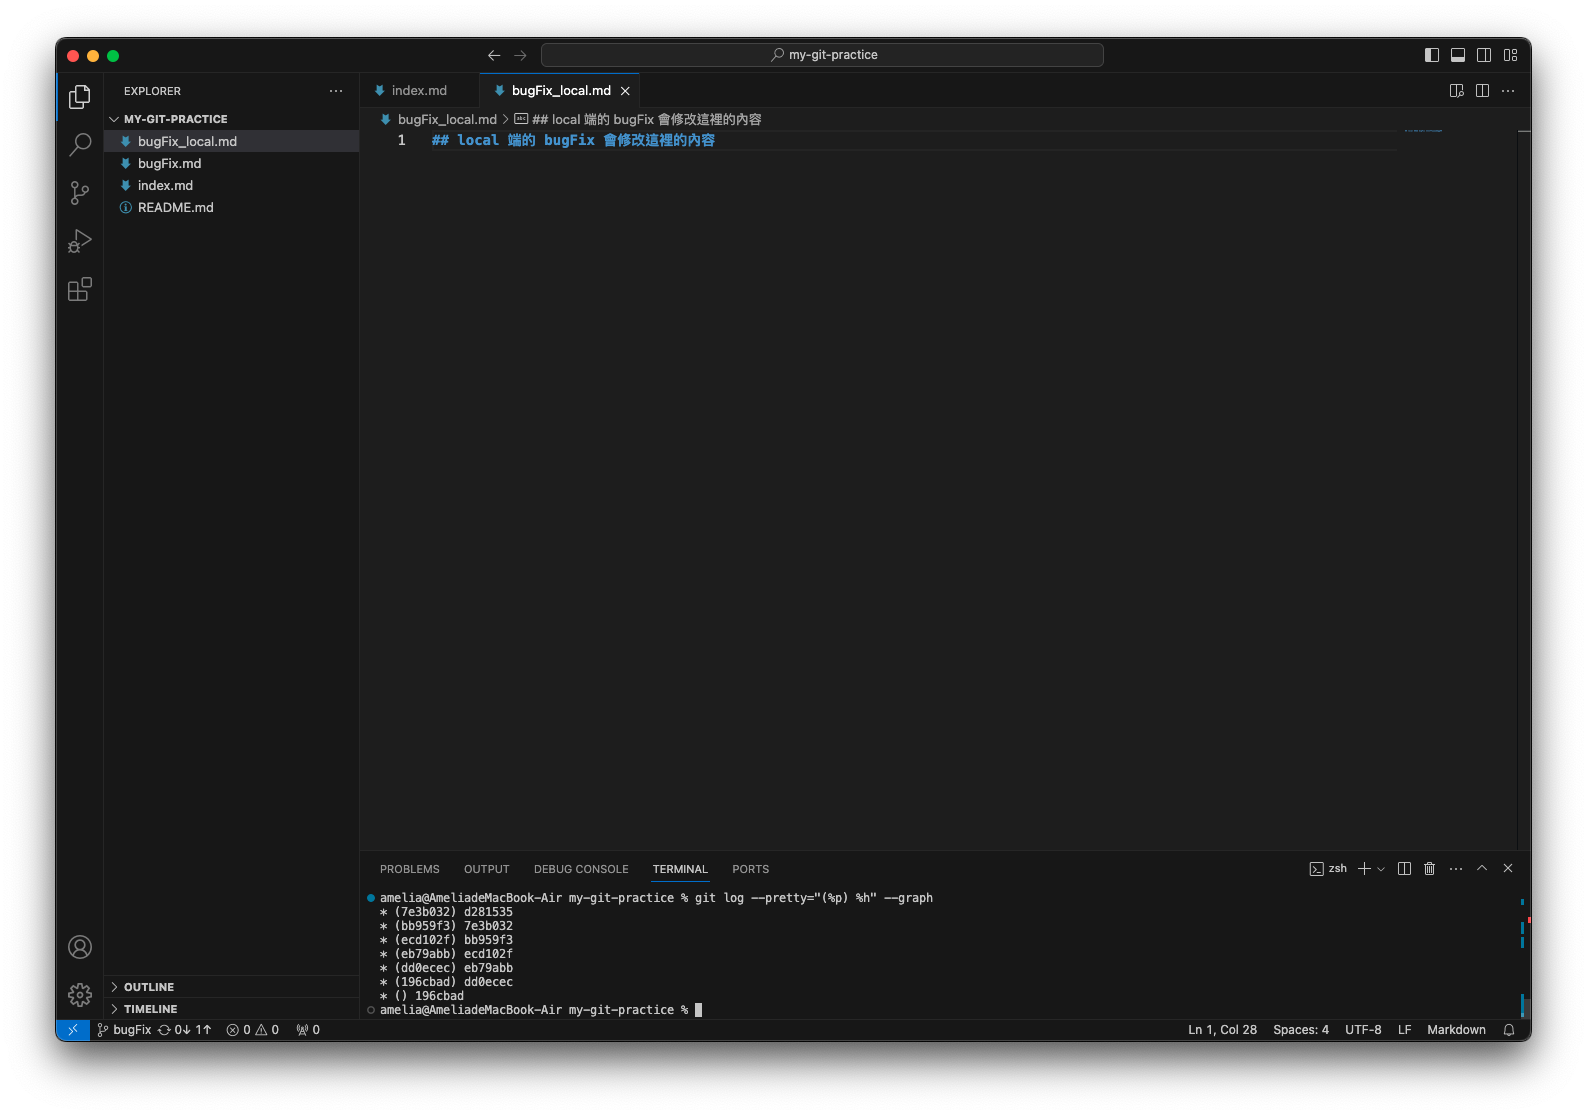
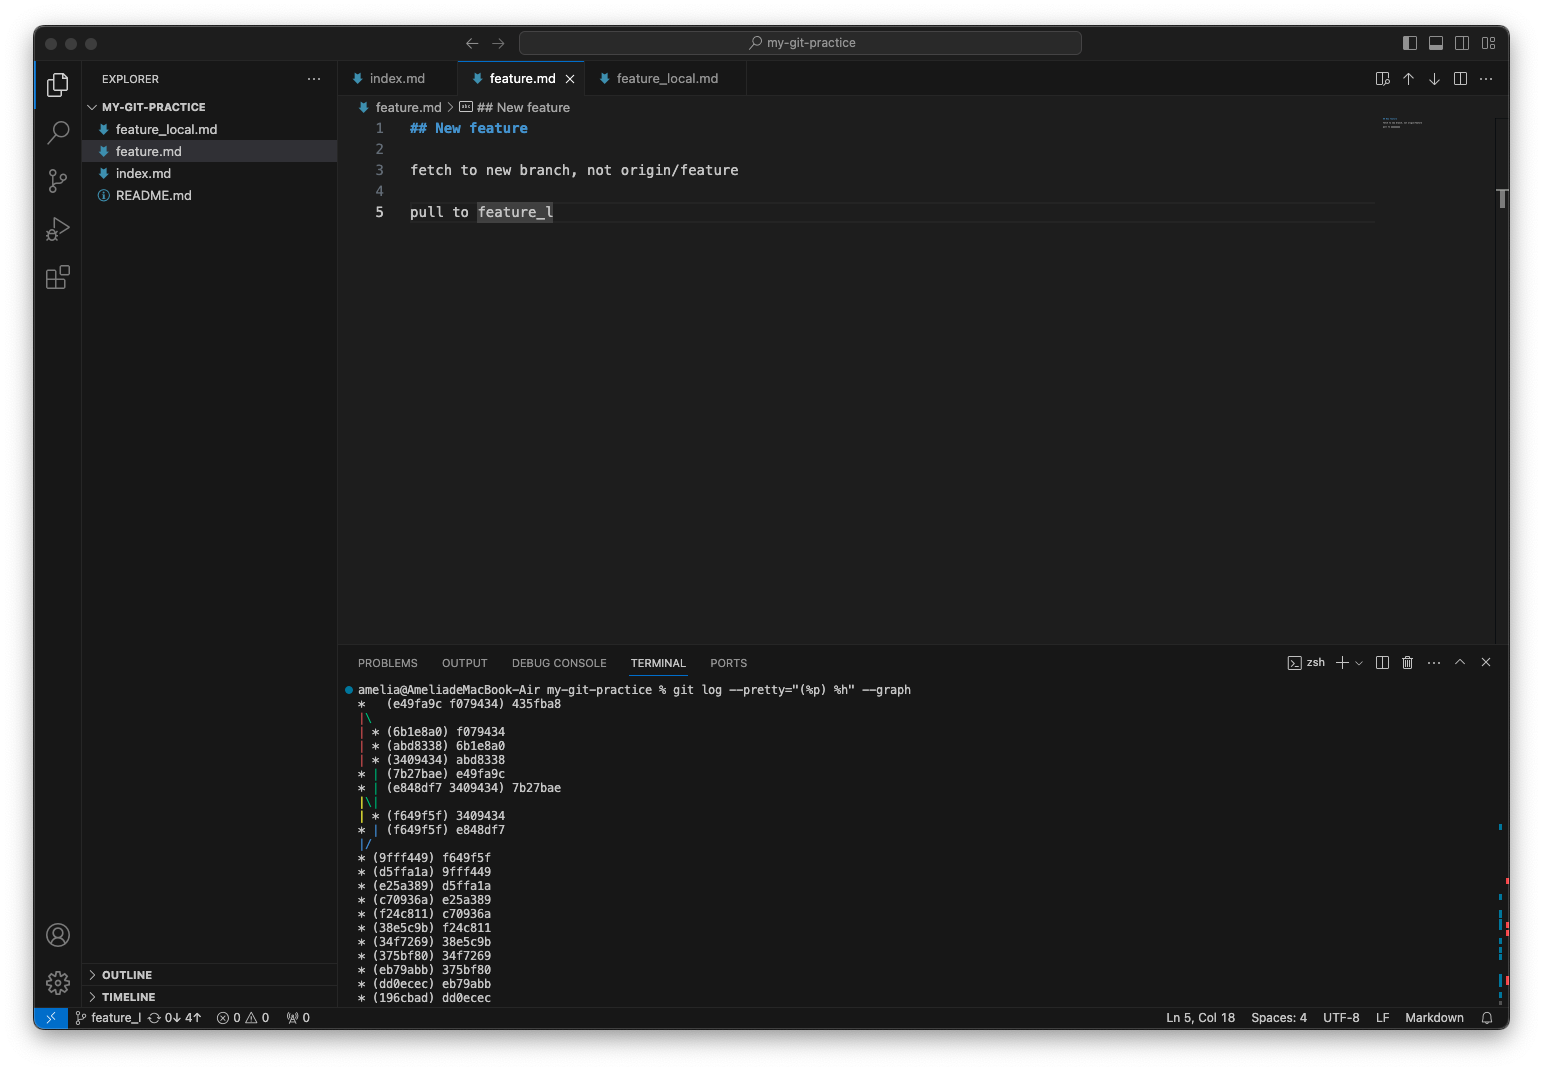
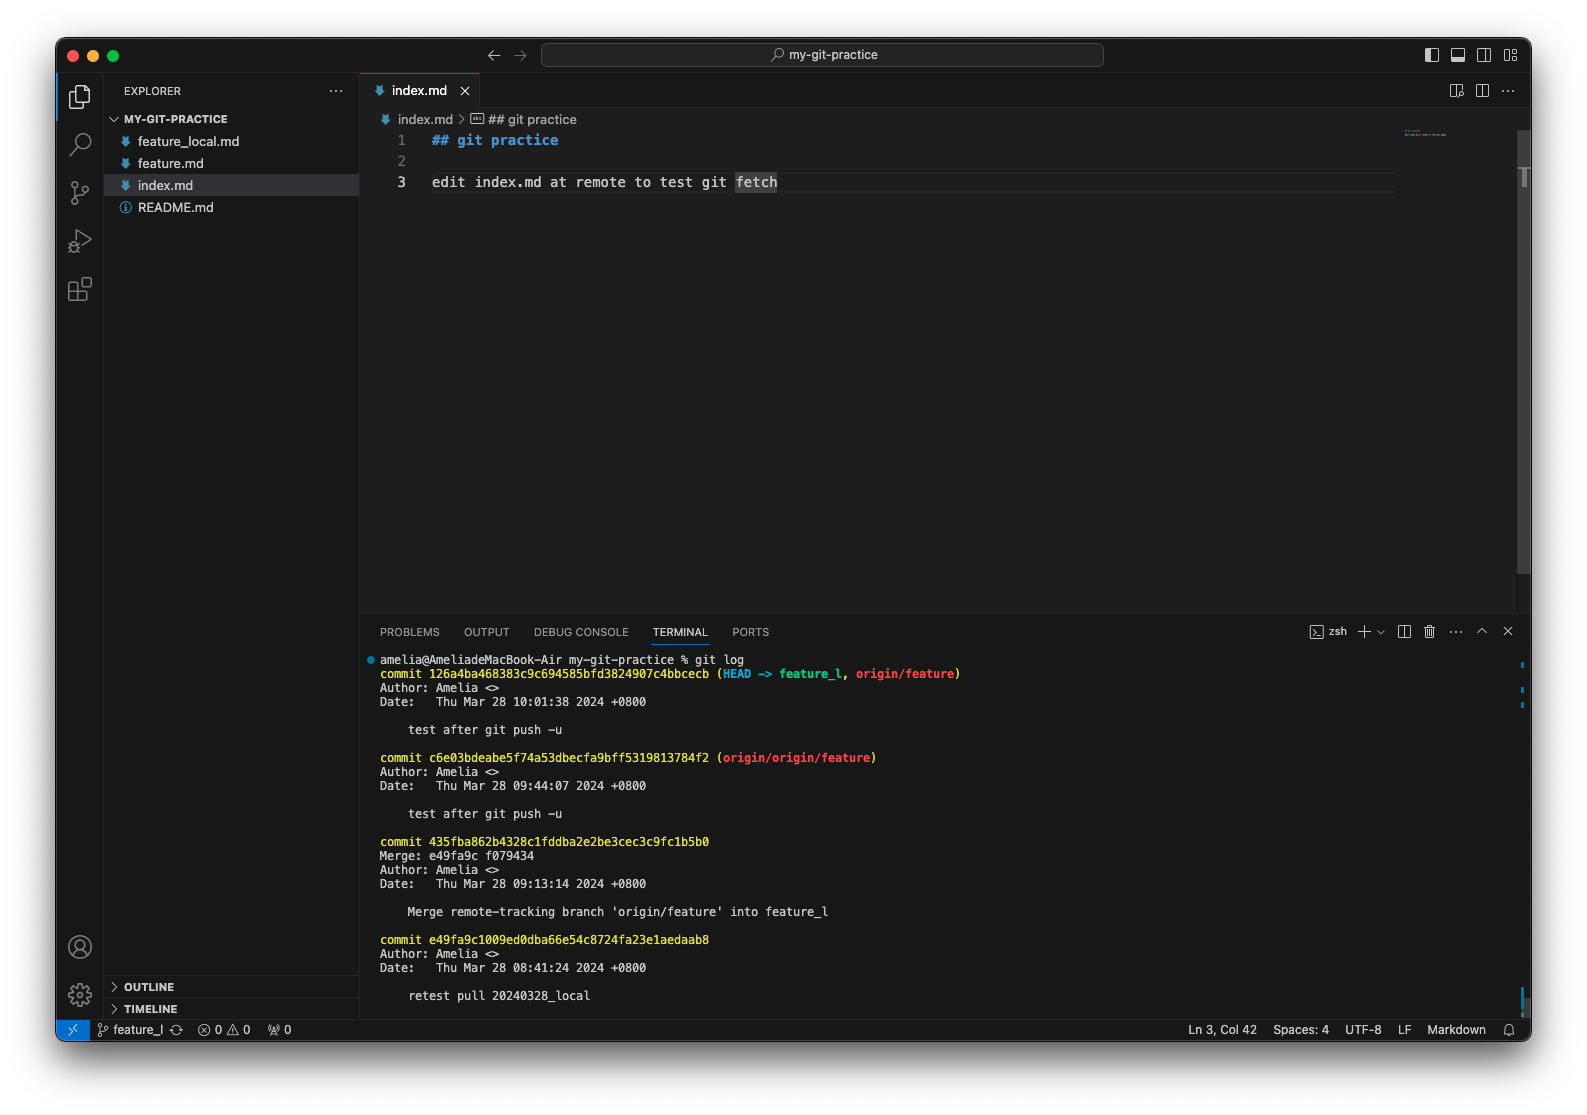
由 git log --graph 可以清楚看到 commit history 呈現線性,而不像 merge 會呈現出分支後合併。
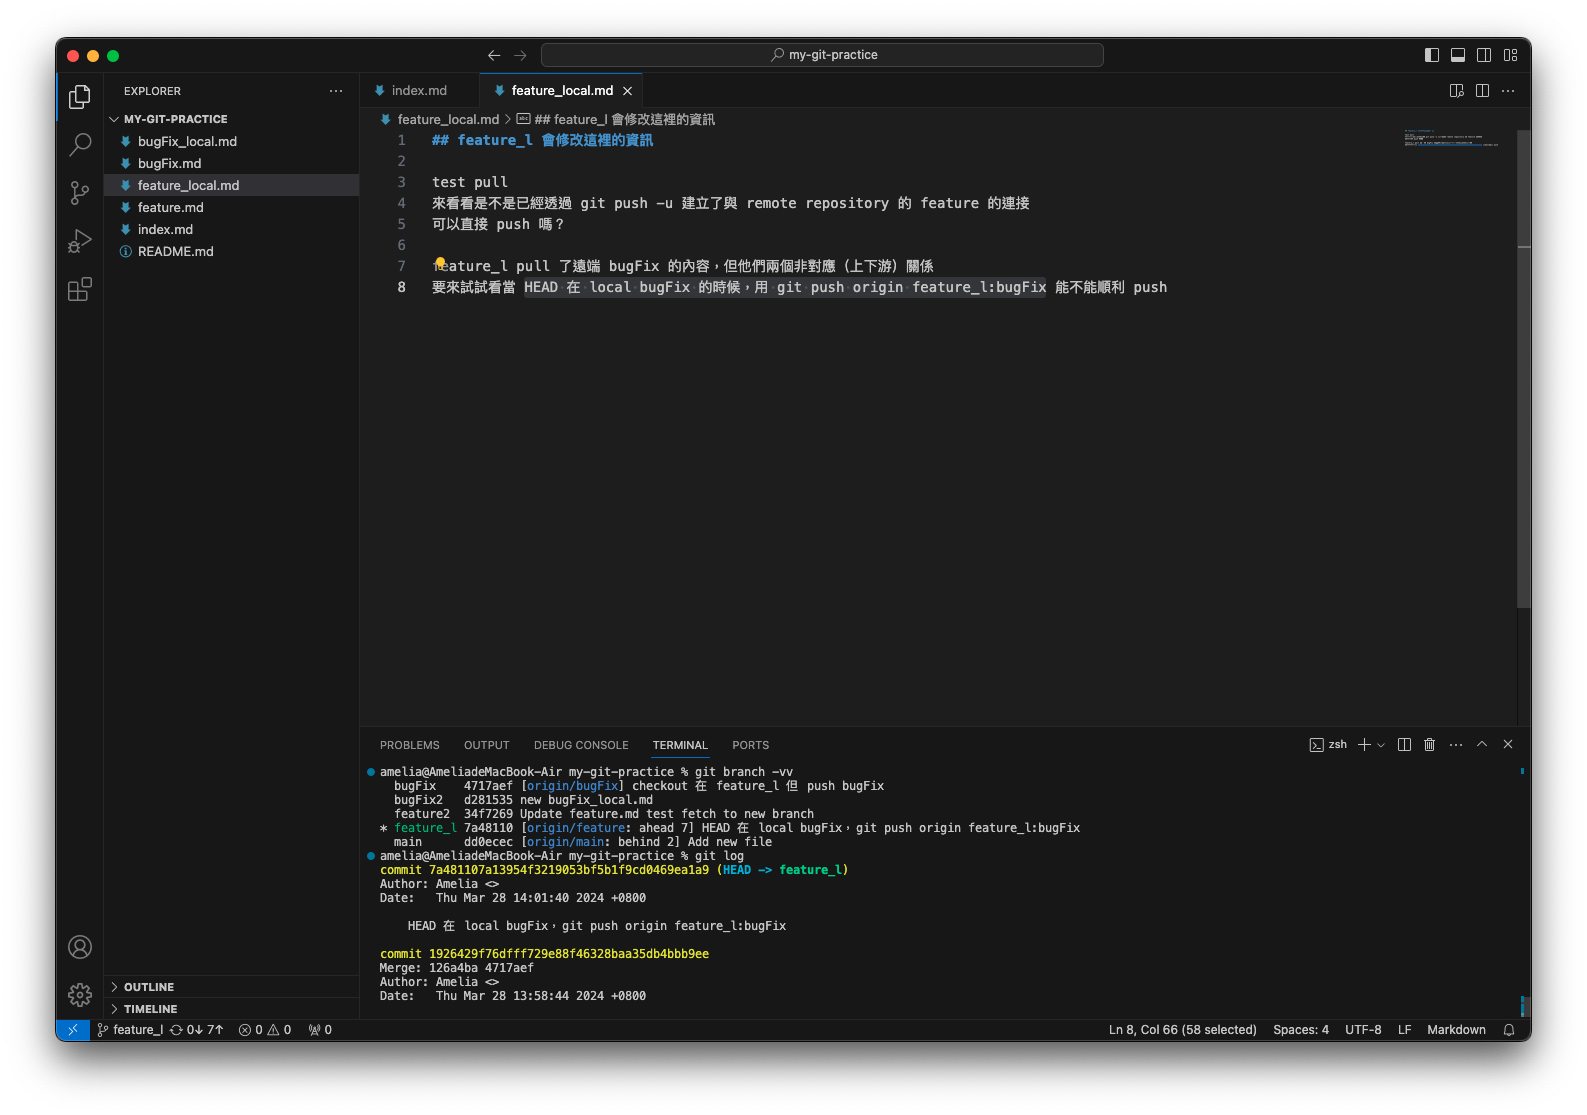
欲把 remote 端的 bugFix 內容 pull 到 local 端 feature_l
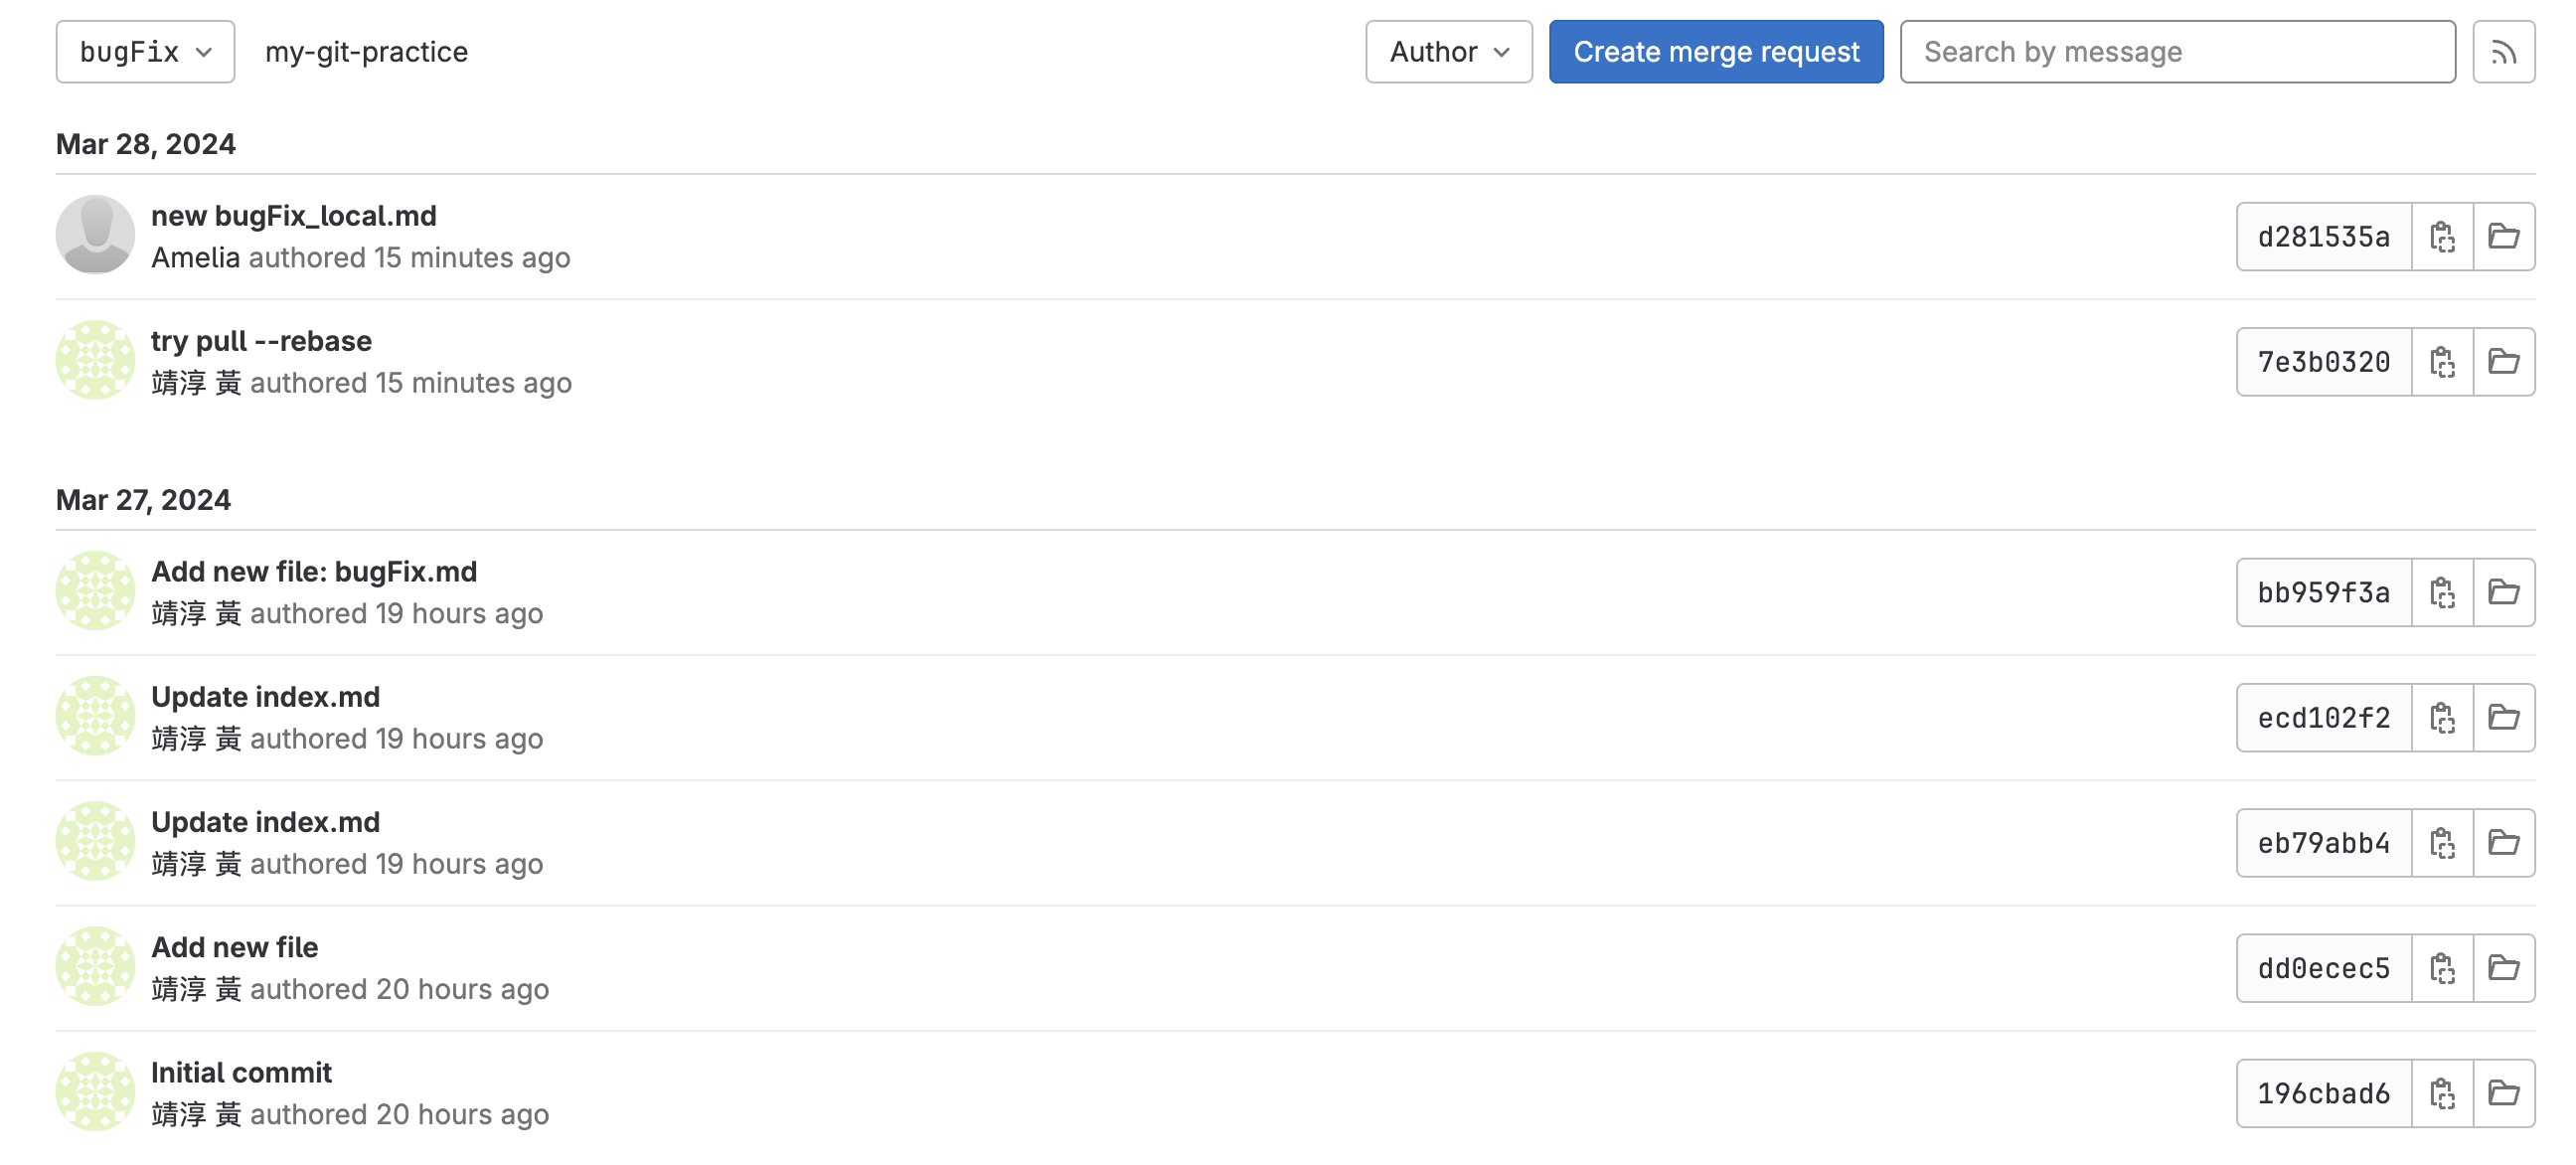
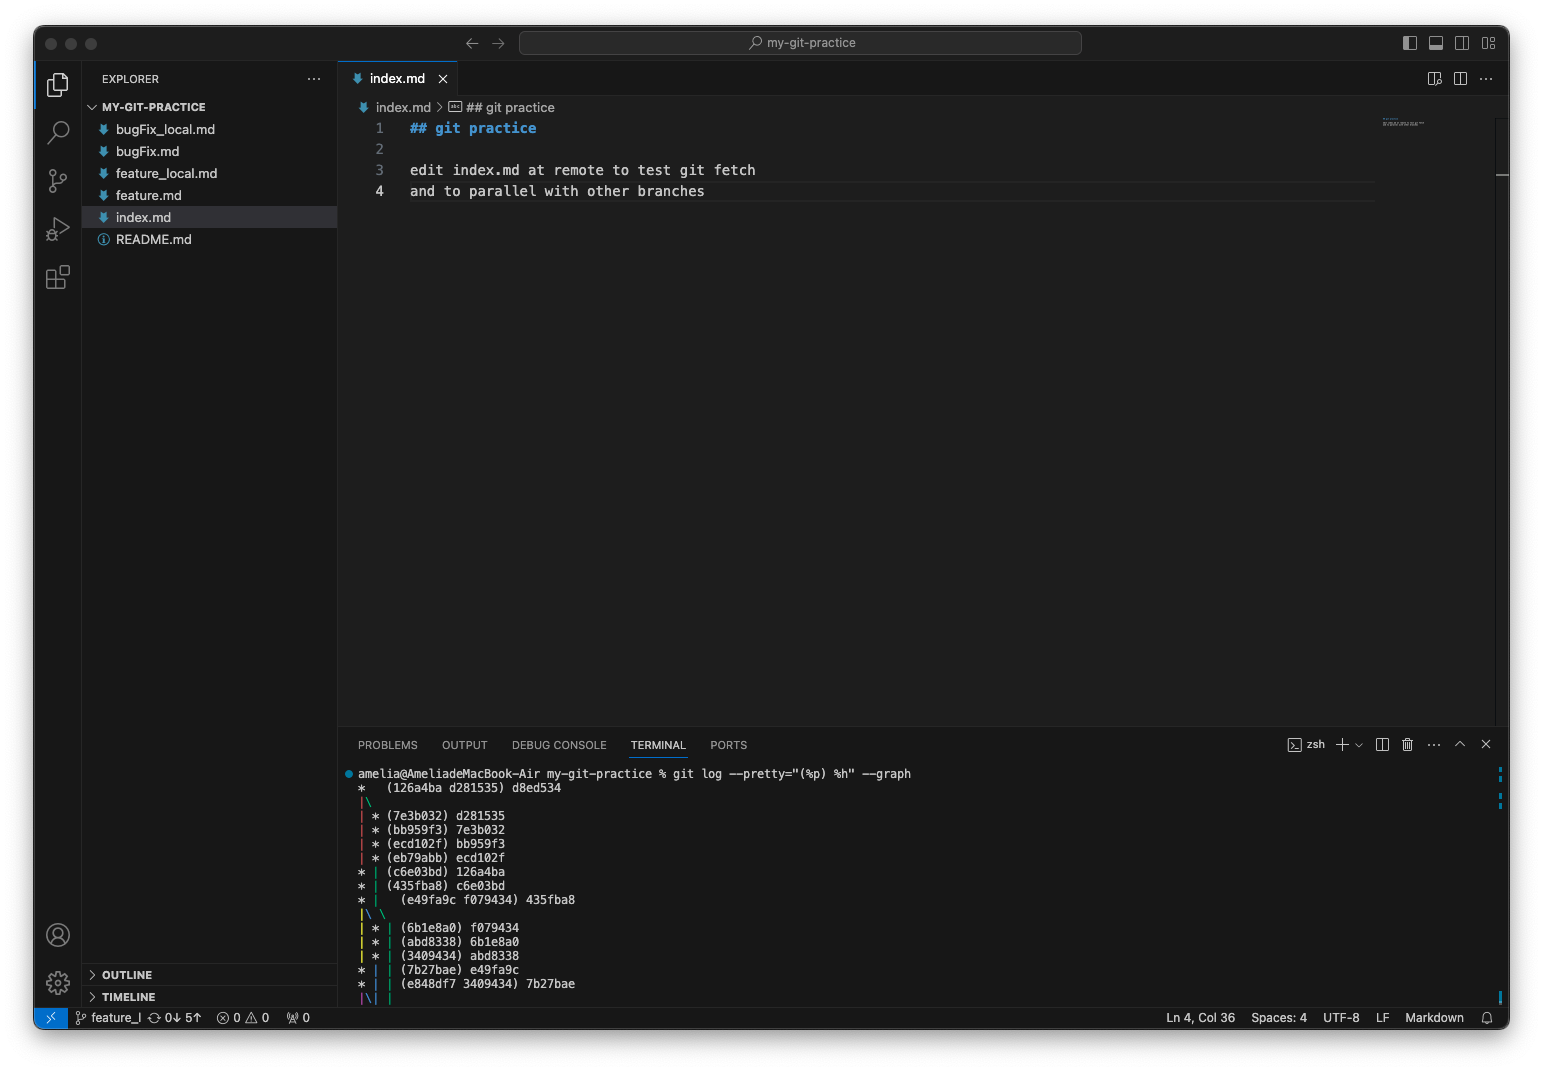
目前 remote repository 的 bugFix commit history 如下圖
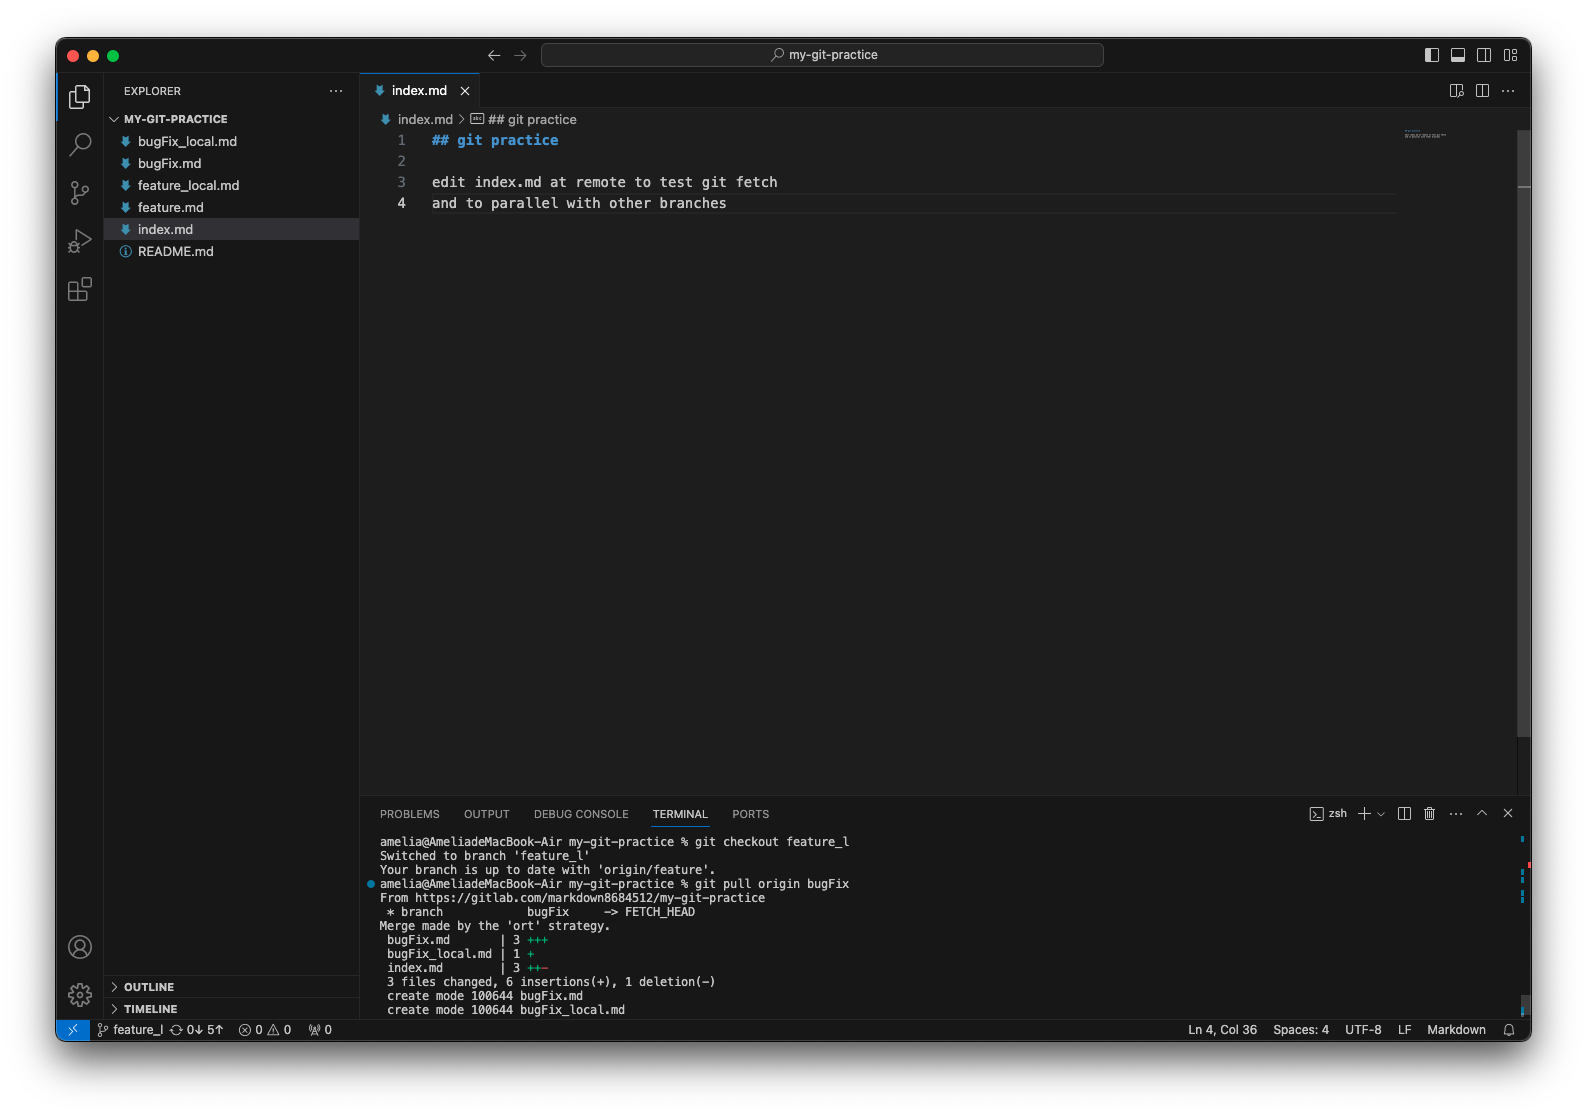 bugFix 的檔案被加進來了!
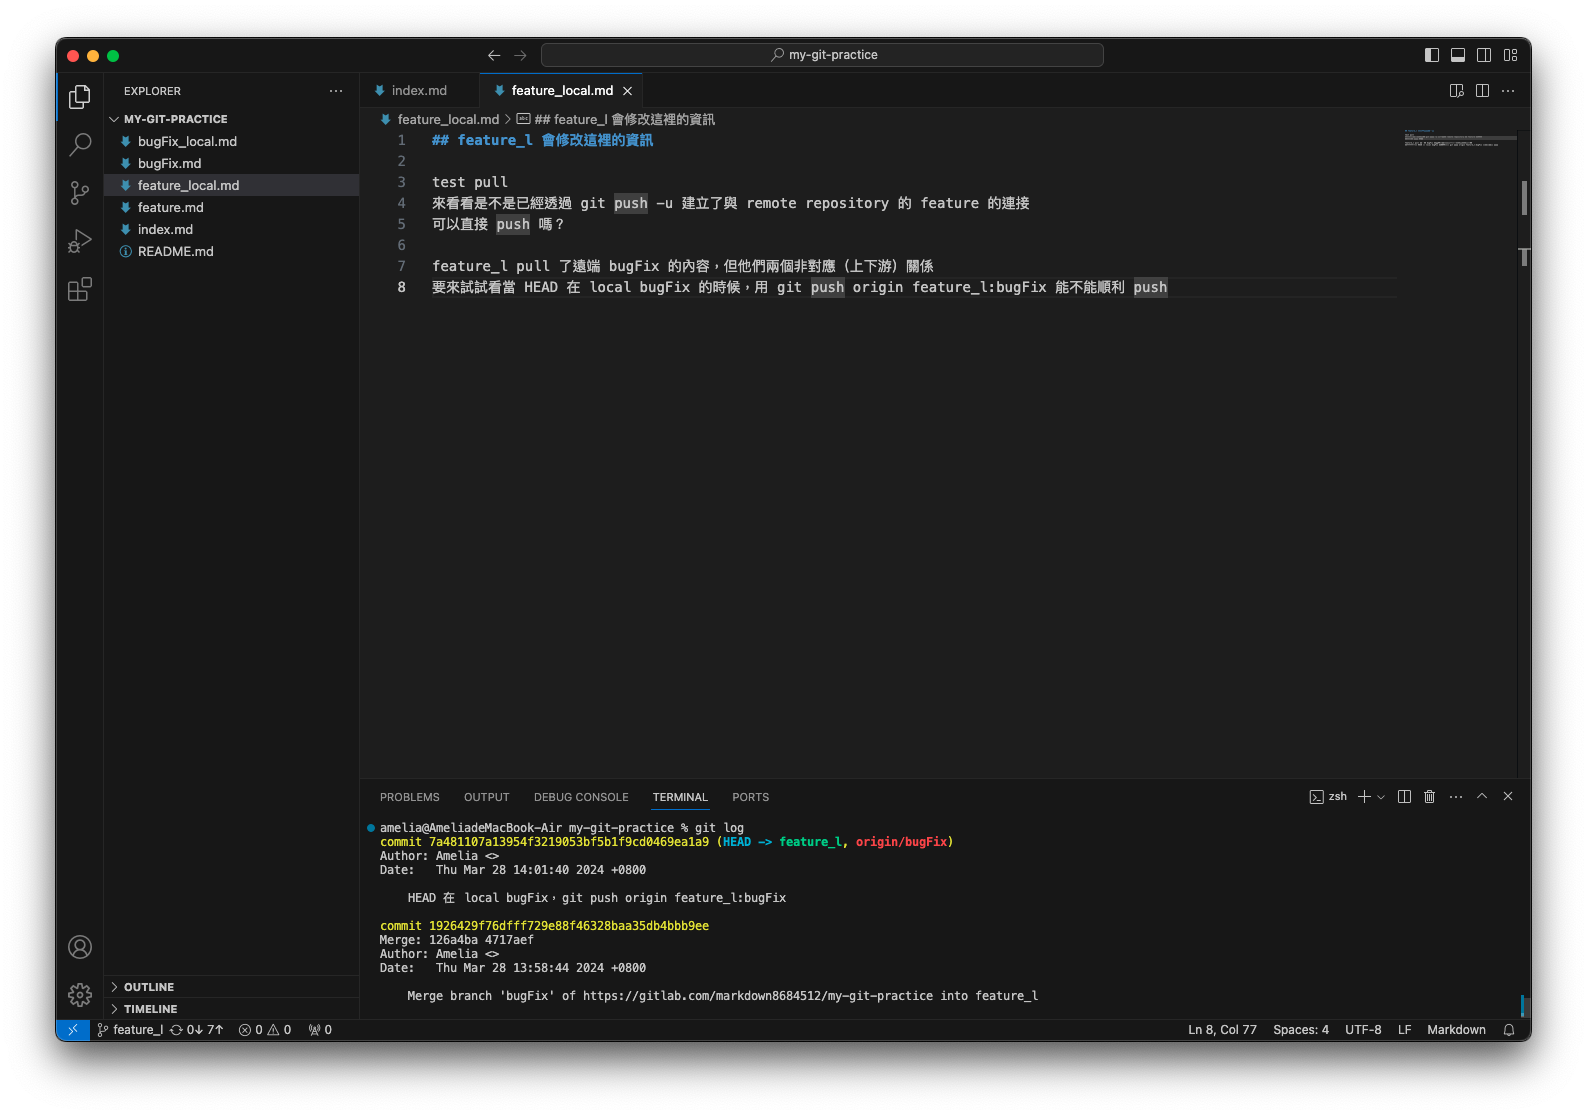
另使用 git log 查看目前 feature_l 的 commit history:
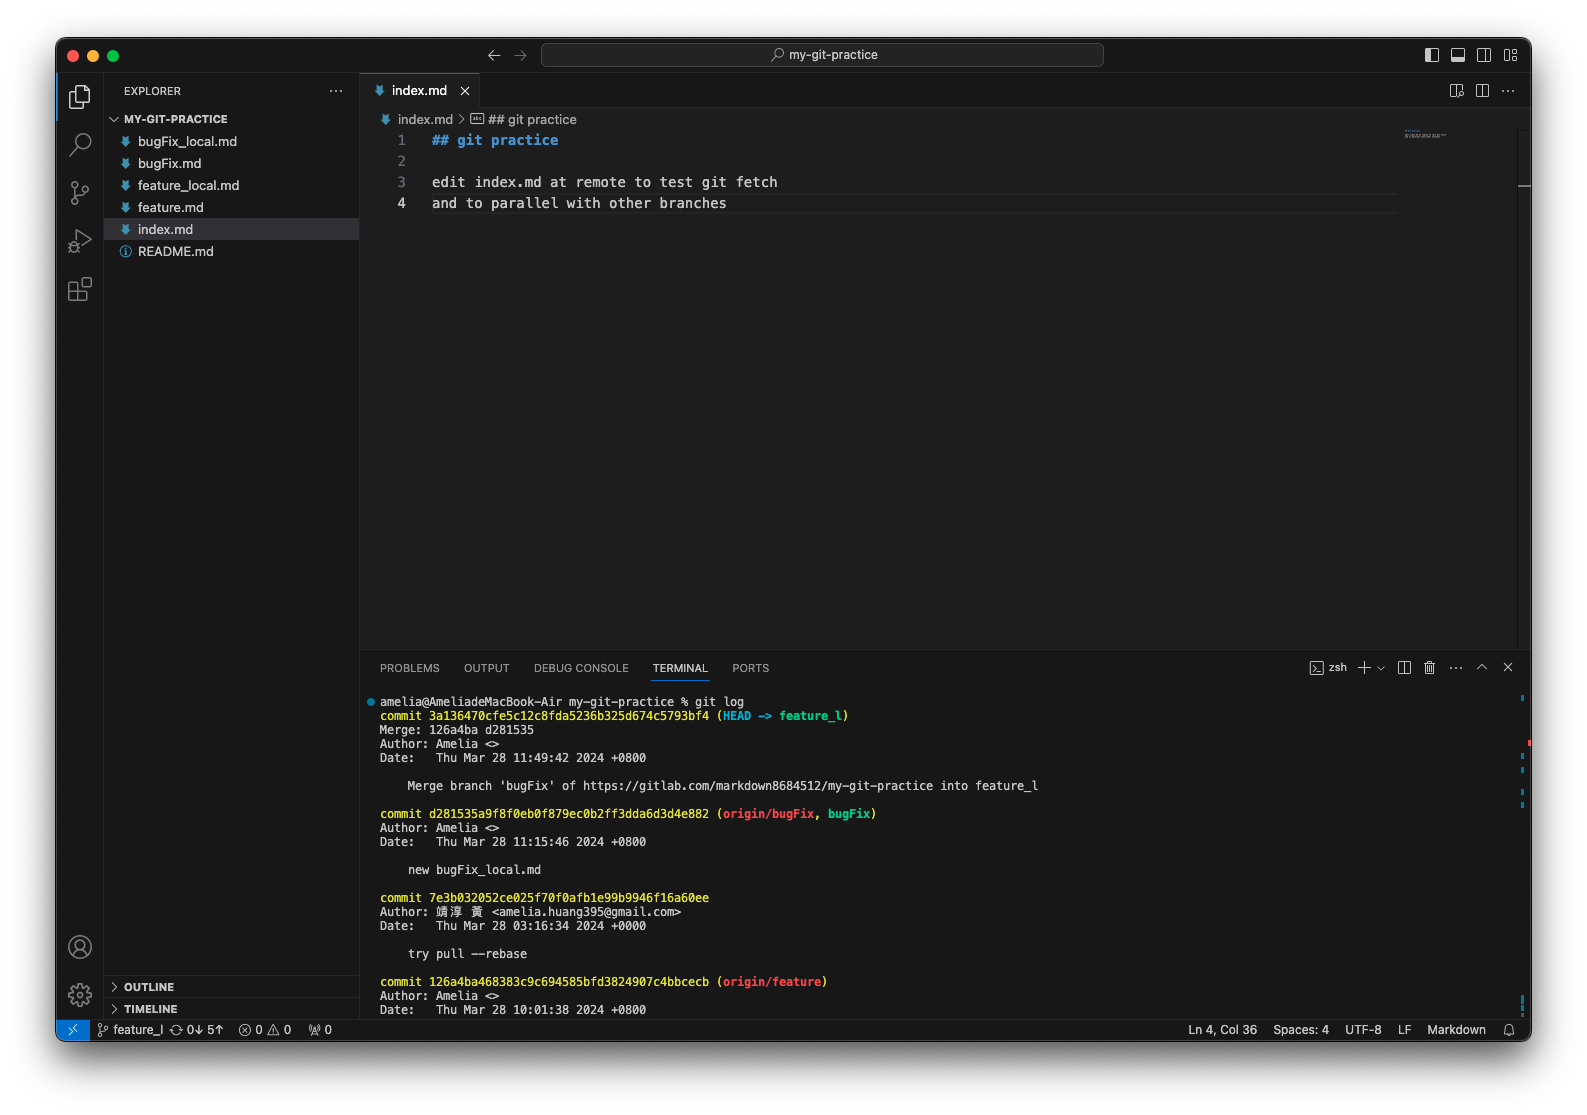 可以看到 origin/bugFix 的確是 feature_l 的 parent commit
 再進一步用 git log --graph 查看
 橘框處為 remote 端 bugFix 的 commit,與 feature_l 的 commit merge 成一新的 commit (3a13647)。
為什麼 local destination 只能是 remote source 對應的 local branch 或是新的 branch 呢?
前面有提到 pull 是執行 fetch + merge,若執行 git pull origin bugFix:feature_l,就等同於執行了 git fetch origin bugFix:feature_l,意即將遠端 bugFix 的修改內容下載到 feature_l,而此兩支 branch 本來就不為對應關係,因此會產生衝突,git 會回報以下錯誤:
欲把 remote 端的 bugFix 內容 pull 到 local 端,並以新的分支 bugFix2 指向其最新的 commit,但目前 HEAD 所在位置為 local 的 feature_l。
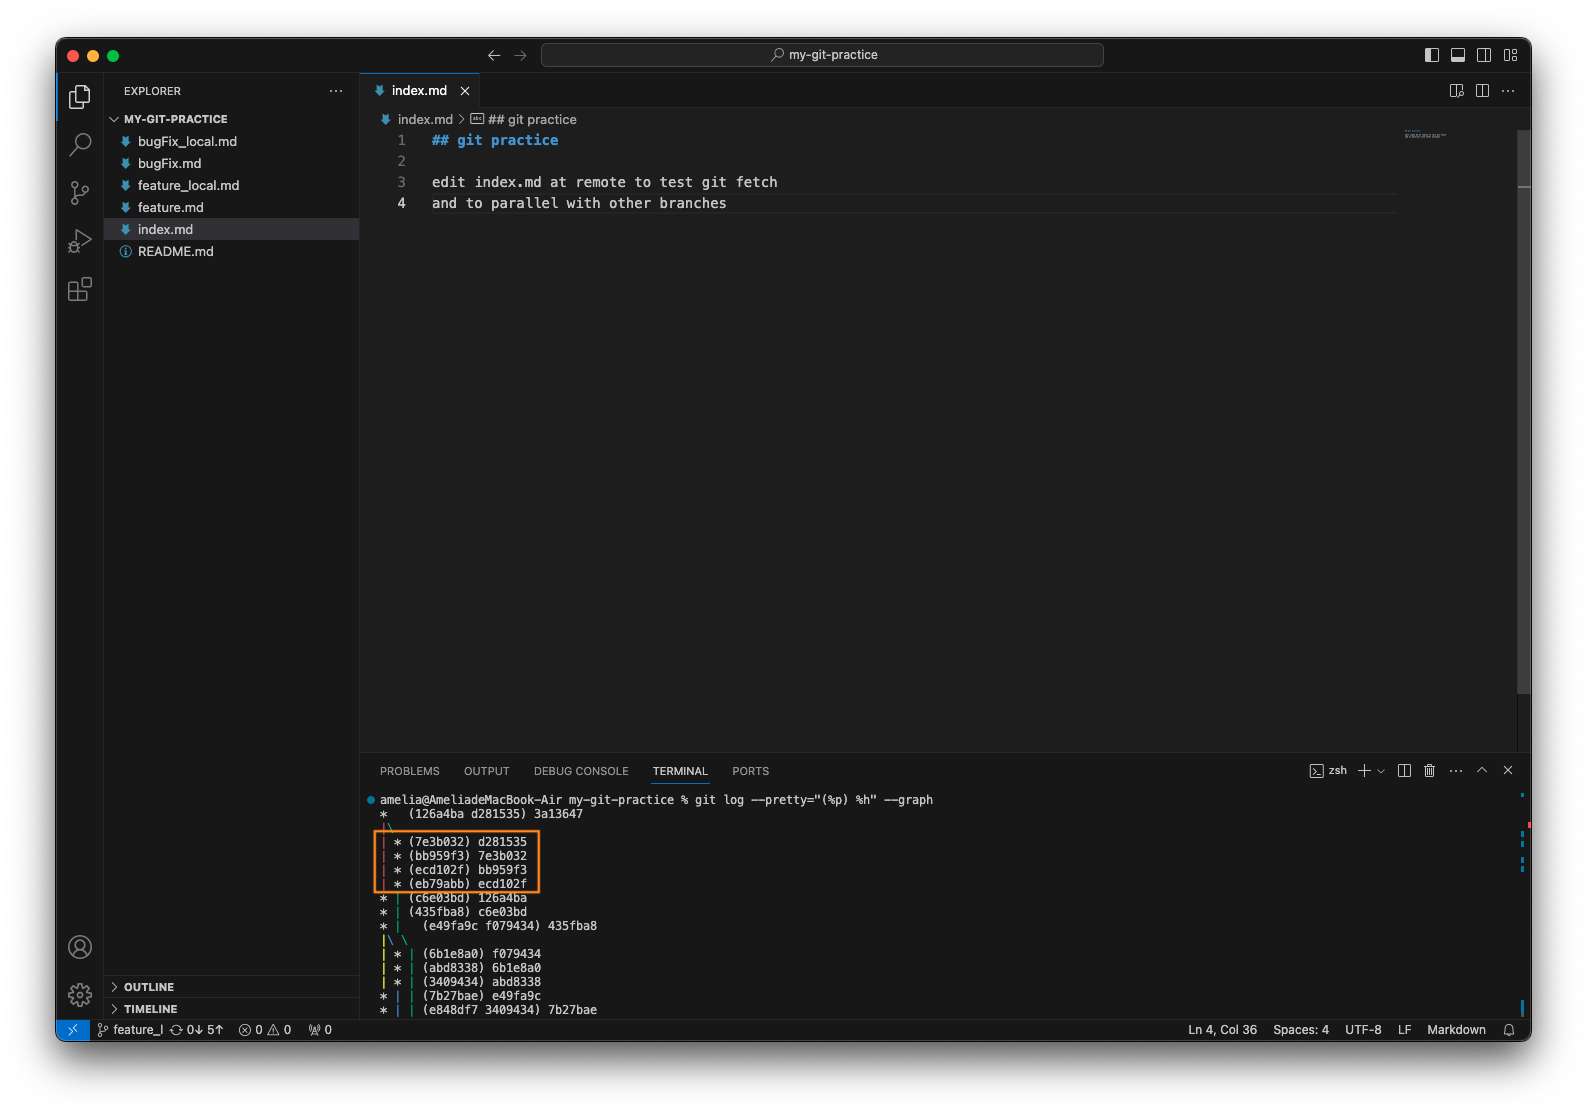
目前 remote repository 的 bugFix commit history 如下圖
 可以看到 origin/bugFix 的位置多了一個 bugFix2 的 branch,且該內容 merge 回 HEAD 所在的 feature_l,和前一個指令的結果一樣!
進一步用 git log --graph 查看,結果也和前一個指令一樣。
-
git push:
將目前所在 (HEAD) 的位置 (local repository) 的 commit 上傳至 remote repository。
於 Git 2.0 後,push.default 預設值為 simple,可透過指令 "git config push.default (模式參數)" 修改。以下範例為將 push.default 改為 upstream 後執行。
push.default 模式參數有以下:參數 說明 nothing 不 push 任何更新。 matching Git 2.0 前的預設值,會 push 所有對應的 branches。在 local 端與 remote 端有相同名字的,git 會認為他們是對應關係。 upstream push 現在所在的 local branch 到其上游的 branch。 current push 現在所在的 local branch 到和其同名的 branch。 simple 將目前所在的 local branch 的更新 push 到其上游 (upstream) branch,但當 local branch 與 upstream branch 名字不相同時會拒絕 push。 - -u "remote_name" "local_branch_name":"remote_branch_name":當 local branch 的名稱和 remote 端 branch 名稱不一致時,欲建立兩 branch 的連結關係時使用,以便後續 git push。
- git push "remote repository" "local branch":當要 push 的 local branch 和 接受 push 的 remote repository 的 branch 已有連接關係時使用。不用理會目前 HEAD 指向的位置,直接將指定的 local branch 上傳至指定的 remote repository。
- git push "remote repository" "local source(可以是 branch 也可以是 commit)":"remote destination(會是一個 branch,可以給新的 branch 名稱,git 會協助建立)":當要 push 的 local source 和 接受 push 的 remote destination 非連接關係時使用。不用理會目前 HEAD 指向的位置,直接將指定的 local source 上傳至指定的 remote destination。
- git push "remote repository" "(空白)":"remote destination":將 local source 留空,git 會刪除指定的 remote destination (branch)。
Example
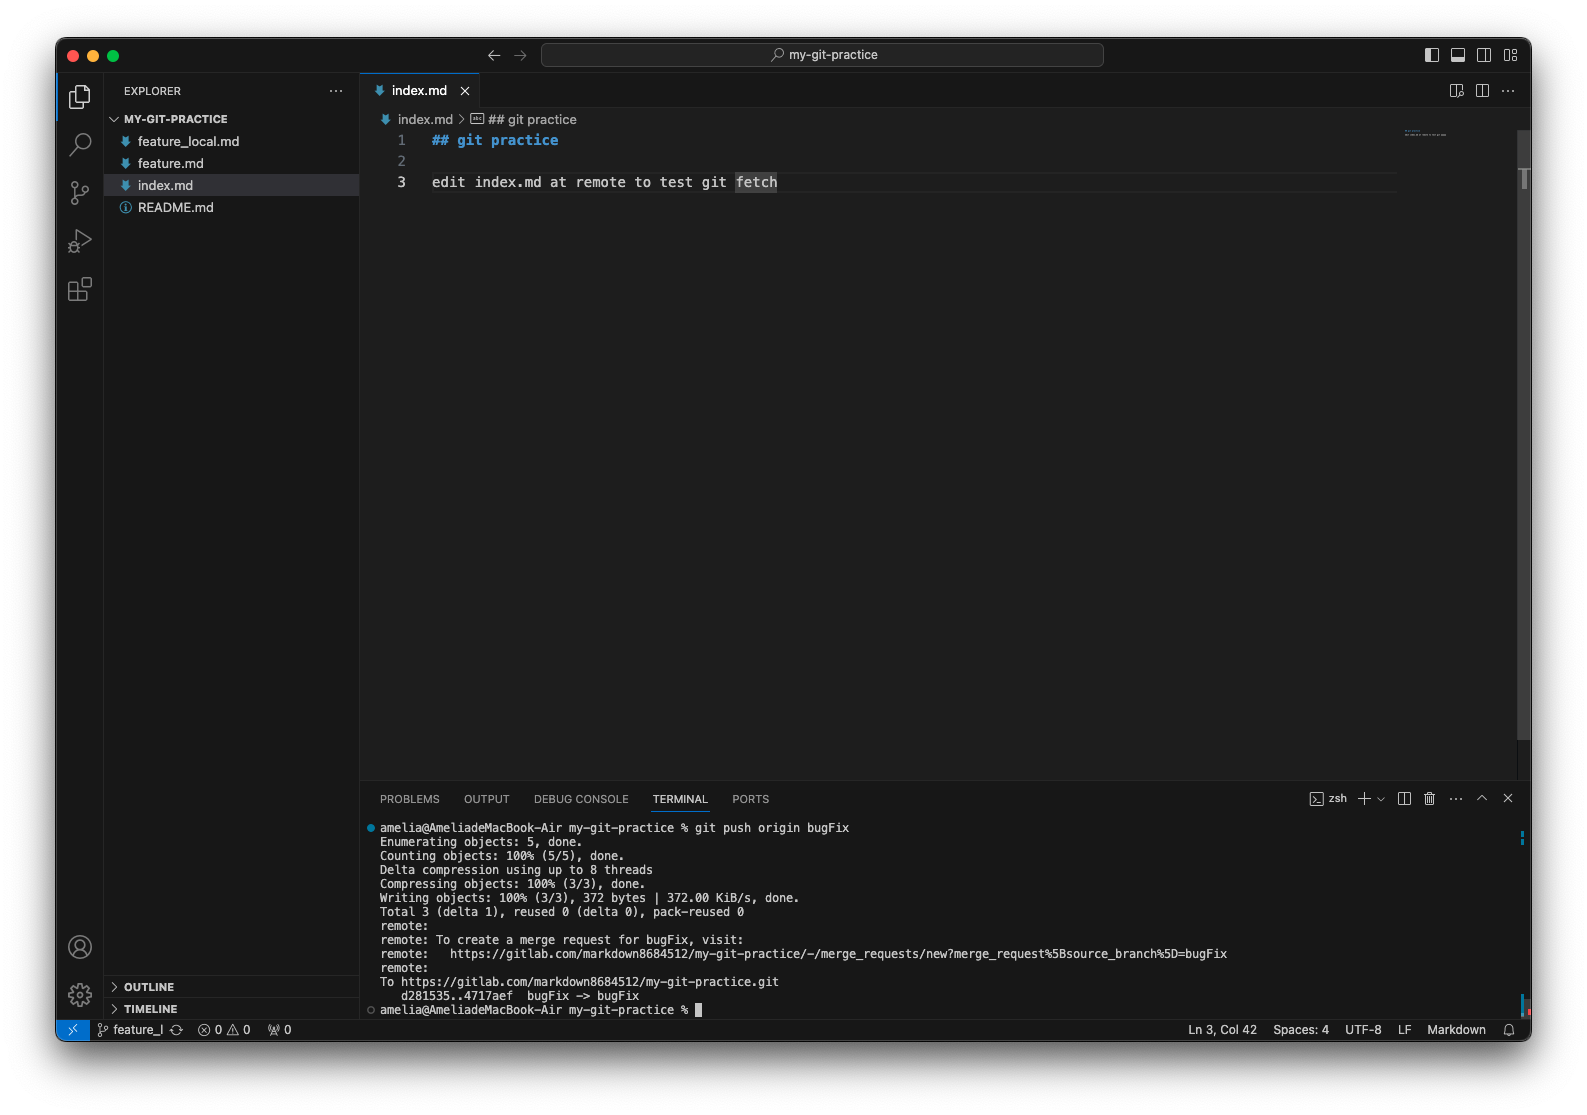
目前 checkout 在 local 端的 bugFix,其對應到 origin/bugFix。
在執行 git pull 將 remote repository 有的修改同步至 local bugFix branch 後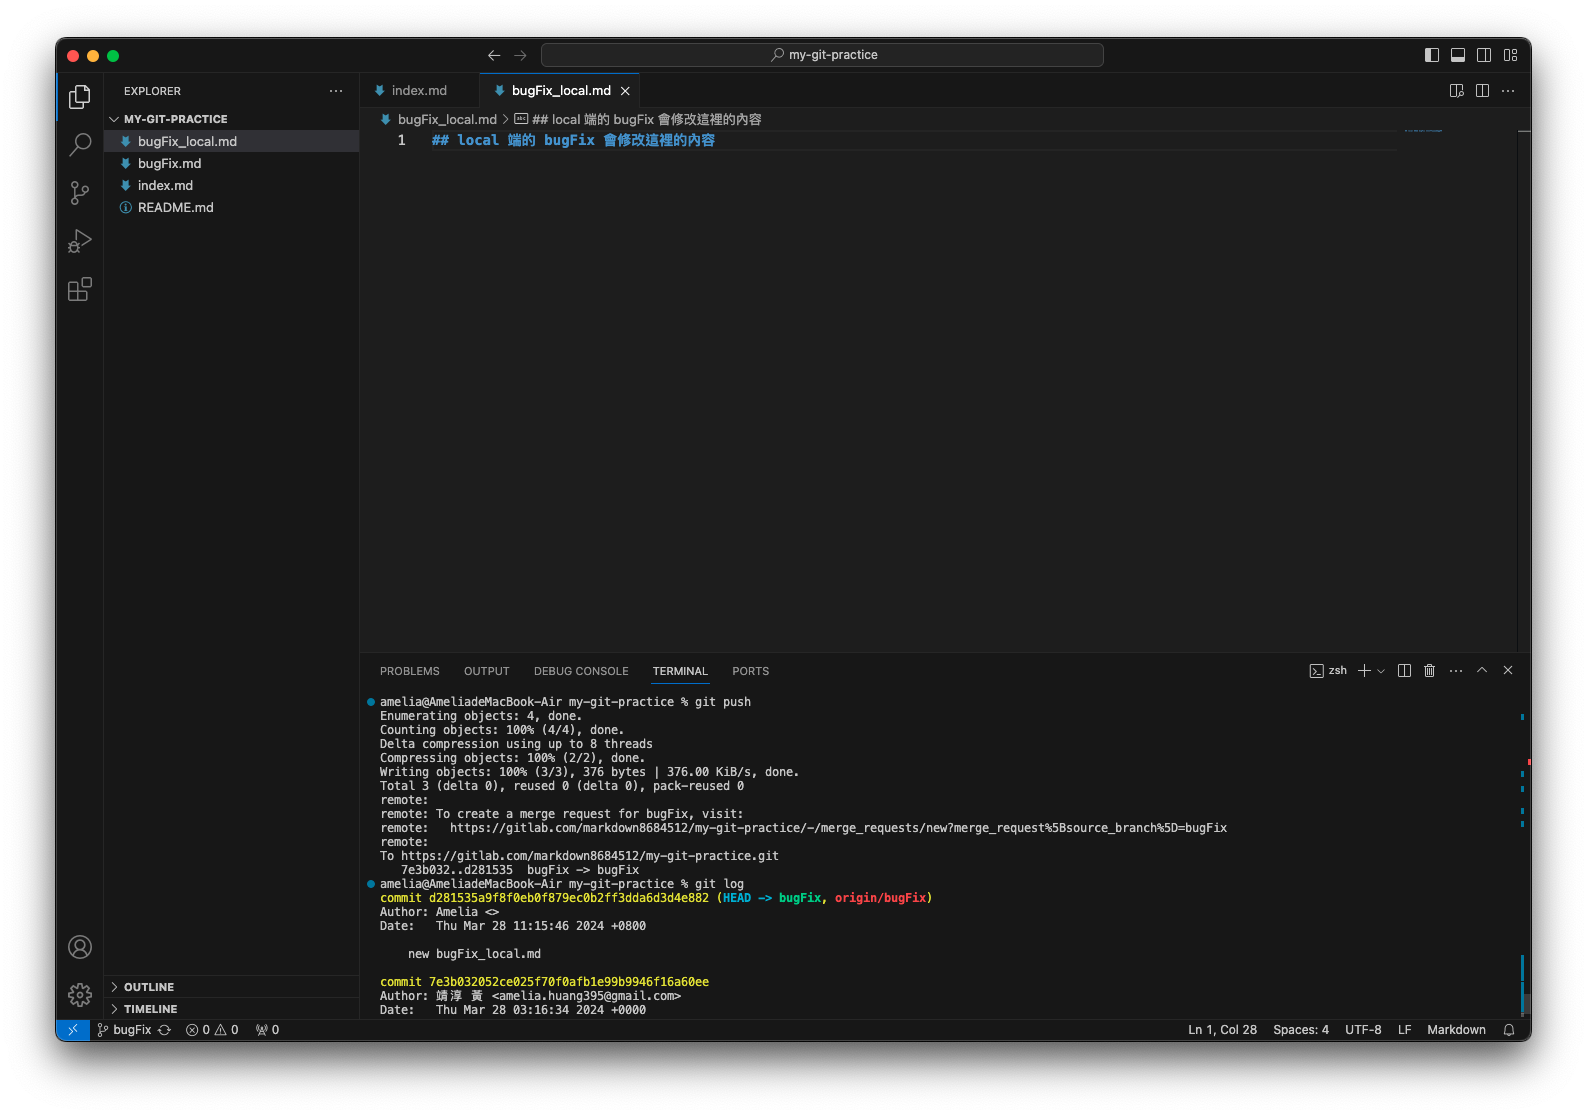

push 成功!
local branch 為 feature_l;remote 端 branch 為 feature
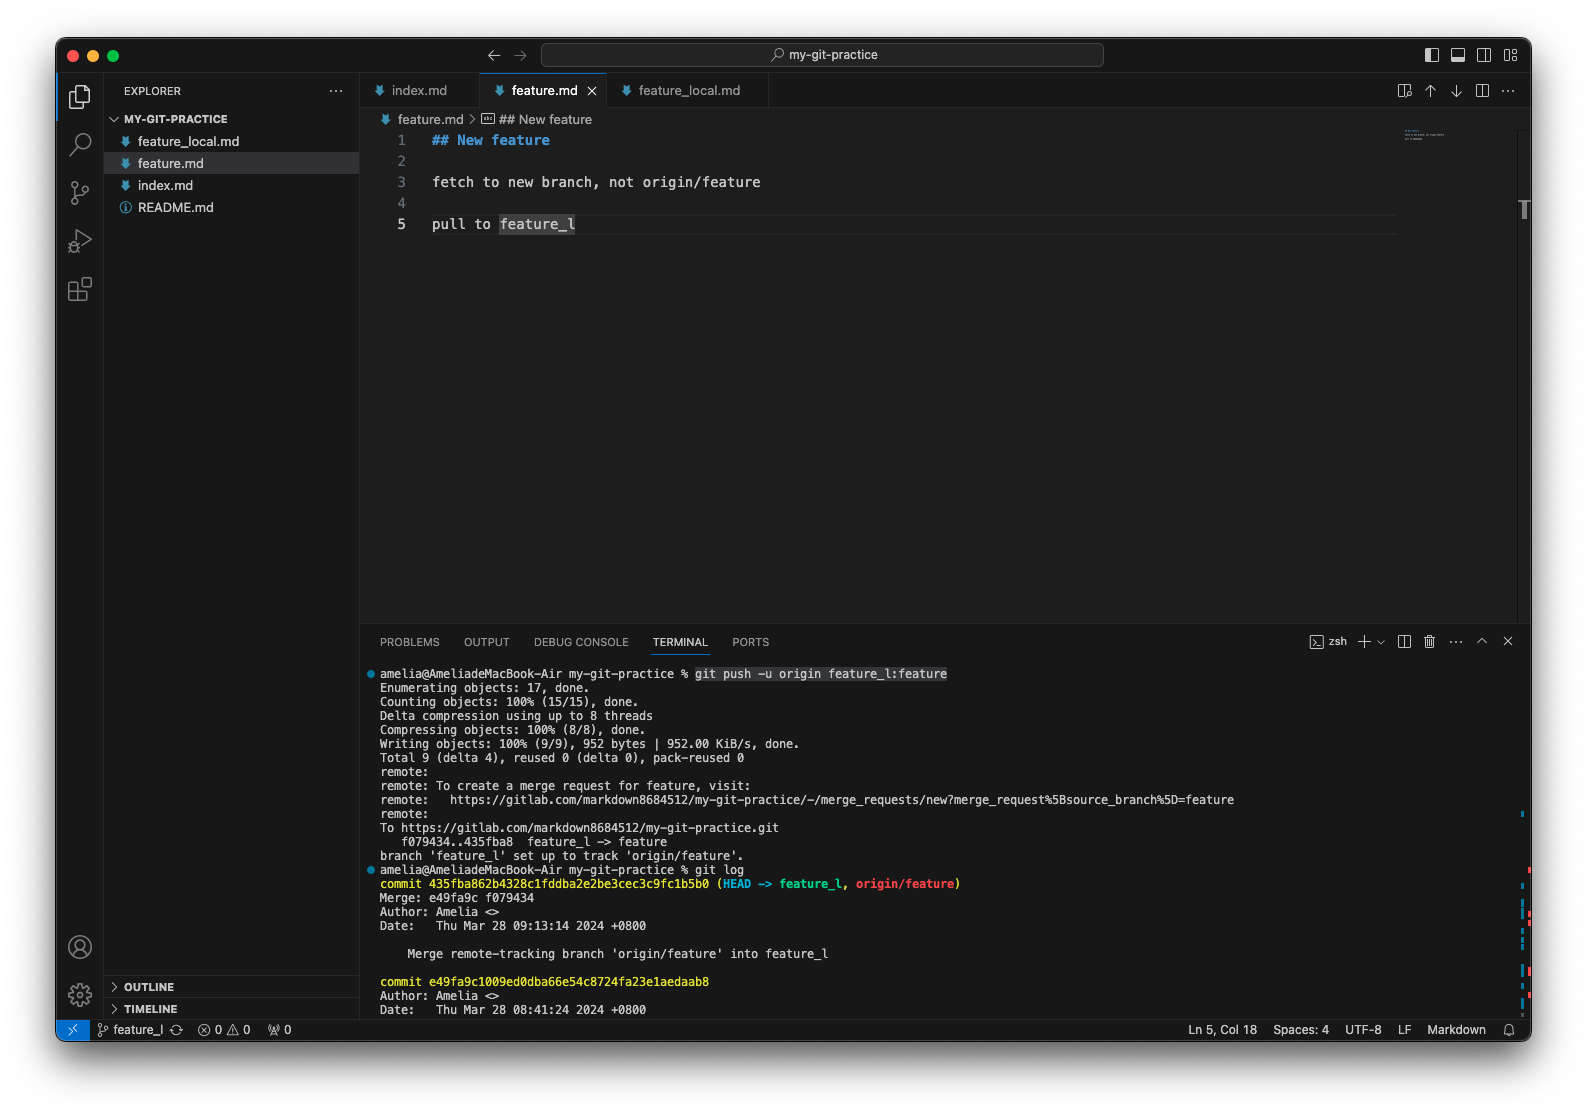

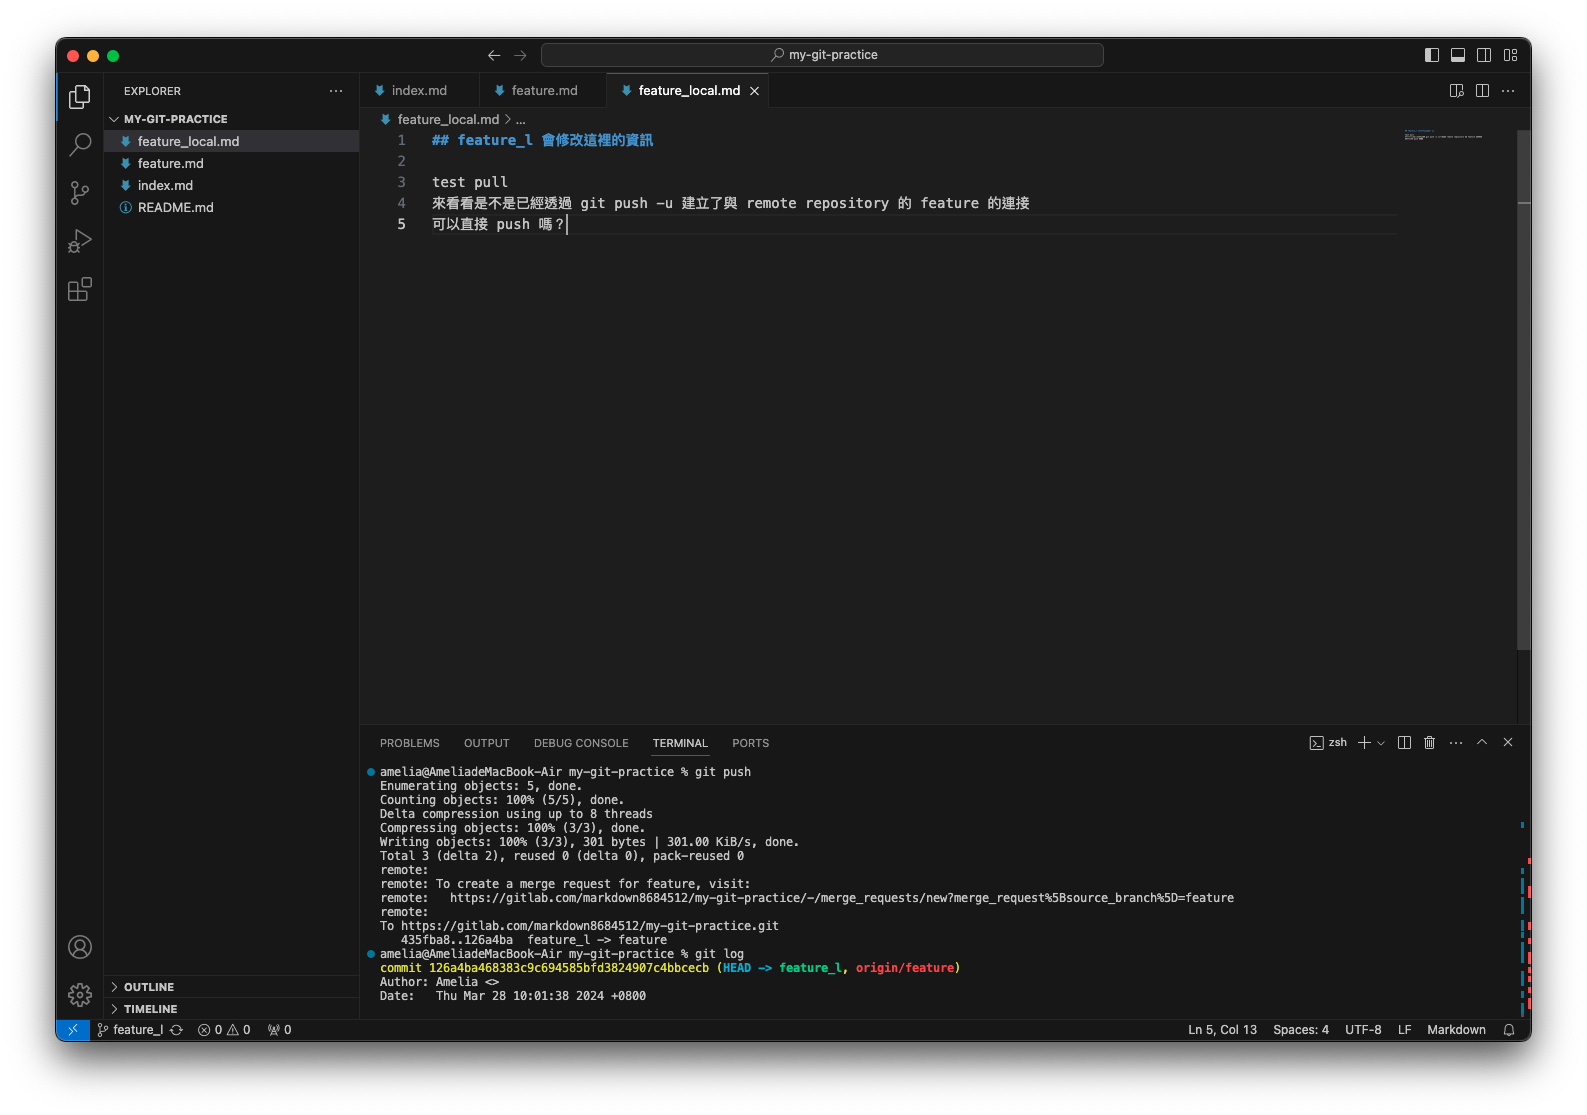
push 完成!可以看到 origin/feature 指向了 feature_l 所在的 commit,remote repository 的 feature 也更新了。 再更新 feature_1 並 commit 後直接執行 push

push 成功!
目前 HEAD 所在位置為 feature_l
切換到 bugFix 看一下 log
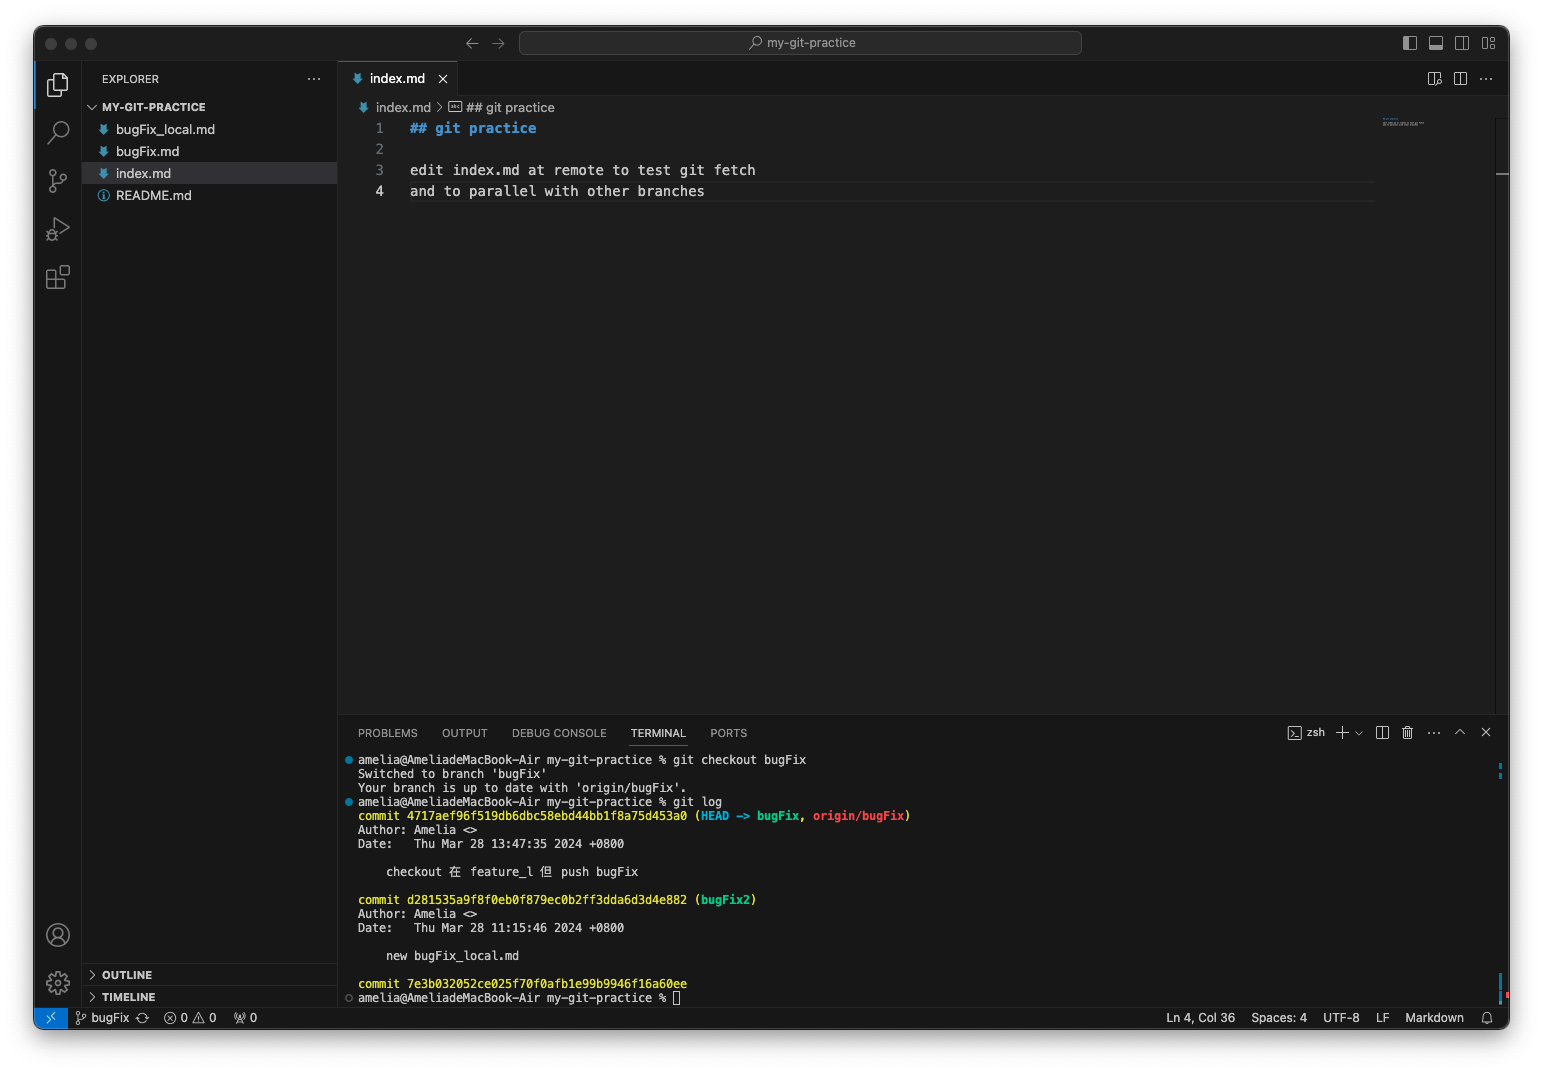

origin/bugFix 指向與 bugFix 同一個 commit,remote 端的 bugFix 也有更新到 commit (4717aef9) 了!


Git 例外清單
於專案資料夾內建立一 .gitignore 檔案,其內撰寫之檔名都不會被加入追蹤,撰寫方式:
-
American Standard Code for Information Interchange,美國資訊交換標準程式碼。最初為 7 位元,後擴充為 8 位元。如大寫英文 A 的 ASCII 碼為 "01000001"。 ↩